在Spring Boot项目中,可以通过 @EnableScheduling注解和 @Scheduled注解实现定时任务(在DD的Spring Boot教程中就有介绍: 使用@Scheduled实现定时任务
),也可以通过 SchedulingConfigurer接口来实现定时任务。但是这两种方式不能动态添加、删除、启动、停止任务。
下面是DD在简书上看到的一篇非常不错的文章,作者jessehua,通过扩展Spring自带的定时任务,实现了定时任务的动态增删启停。如果你也有这样的需求,那么可以看看下面的内容,学习一下作者的思路。
要实现动态增删启停定时任务功能,比较广泛的做法是集成Quartz框架。但是本人的开发原则是:在满足项目需求的情况下,尽量少的依赖其它框架,避免项目过于臃肿和复杂。
查看spring-context这个jar包中 org.springframework.scheduling.ScheduledTaskRegistrar这个类的源代码,发现可以通过改造这个类就能实现动态增删启停定时任务功能。

添加执行定时任务的线程池配置类:
@Configuration
public class SchedulingConfig {
    @Bean
    public TaskScheduler taskScheduler() {
        ThreadPoolTaskScheduler taskScheduler = new ThreadPoolTaskScheduler();
        // 定时任务执行线程池核心线程数
        taskScheduler.setPoolSize(4);
        taskScheduler.setRemoveOnCancelPolicy(true);
        taskScheduler.setThreadNamePrefix("TaskSchedulerThreadPool-");
        return taskScheduler;
    }
}
|
添加ScheduledFuture的包装类。ScheduledFuture是ScheduledExecutorService定时任务线程池的执行结果。
public final class ScheduledTask {

    volatile ScheduledFuture<?> future;

    /**
     * 取消定时任务
     */
    public void cancel() {
        ScheduledFuture<?> future = this.future;
        if (future != null) {
            future.cancel(true);
        }
    }
}
|
添加Runnable接口实现类,被定时任务线程池调用,用来执行指定bean里面的方法。
public class SchedulingRunnable implements Runnable {
private static final Logger logger = LoggerFactory.getLogger(SchedulingRunnable.class);
private String beanName;
private String methodName;
private String params;
public SchedulingRunnable(String beanName, String methodName) {
this(beanName, methodName, null);
}
public SchedulingRunnable(String beanName, String methodName, String params) {
this.beanName = beanName;
this.methodName = methodName;
this.params = params;
}
@Override
public void run() {
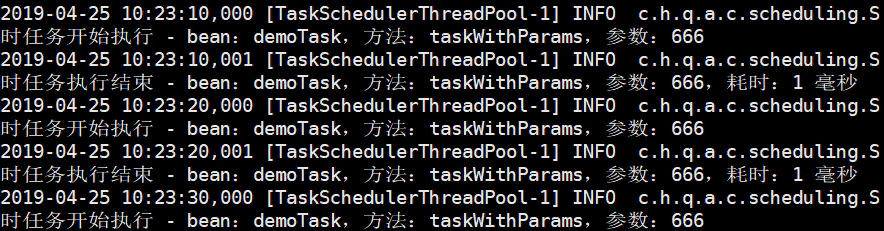
logger.info("定时任务开始执行 - bean:{},方法:{},参数:{}", beanName, methodName, params);
long startTime = System.currentTimeMillis();
try {
Object target = SpringContextUtils.getBean(beanName);
Method method = null;
if (StringUtils.isNotEmpty(params)) {
method = target.getClass().getDeclaredMethod(methodName, String.class);
} else {
method = target.getClass().getDeclaredMethod(methodName);
}
ReflectionUtils.makeAccessible(method);
if (StringUtils.isNotEmpty(params)) {
method.invoke(target, params);
} else {
method.invoke(target);
}
} catch (Exception ex) {
logger.error(String.format("定时任务执行异常 - bean:%s,方法:%s,参数:%s ", beanName, methodName, params), ex);
}
long times = System.currentTimeMillis() - startTime;
logger.info("定时任务执行结束 - bean:{},方法:{},参数:{},耗时:{} 毫秒", beanName, methodName, params, times);
}
@Override
public boolean equals(Object o) {
if (this == o) return true;
if (o == null || getClass() != o.getClass()) return false;
SchedulingRunnable that = (SchedulingRunnable) o;
if (params == null) {
return beanName.equals(that.beanName) &&
methodName.equals(that.methodName) &&
that.params == null;
}
return beanName.equals(that.beanName) &&
methodName.equals(that.methodName) &&
params.equals(that.params);
}
@Override
public int hashCode() {
if (params == null) {
return Objects.hash(beanName, methodName);
}
return Objects.hash(beanName, methodName, params);
}
}
|
添加定时任务注册类,用来增加、删除定时任务:
@Component
public class CronTaskRegistrar implements DisposableBean {

    private final Map<Runnable, ScheduledTask> scheduledTasks = new ConcurrentHashMap<>(16);

    @Autowired
    private TaskScheduler taskScheduler;

    public TaskScheduler getScheduler() {
        return this.taskScheduler;
    }

    public void addCronTask(Runnable task, String cronExpression) {
        addCronTask(new CronTask(task, cronExpression));
    }

    public void addCronTask(CronTask cronTask) {
        if (cronTask != null) {
            Runnable task = cronTask.getRunnable();
            if (this.scheduledTasks.containsKey(task)) {
                removeCronTask(task);
            }

            this.scheduledTasks.put(task, scheduleCronTask(cronTask));
        }
    }

    public void removeCronTask(Runnable task) {
        ScheduledTask scheduledTask = this.scheduledTasks.remove(task);
        if (scheduledTask != null)
            scheduledTask.cancel();
    }

    public ScheduledTask scheduleCronTask(CronTask cronTask) {
        ScheduledTask scheduledTask = new ScheduledTask();
        scheduledTask.future = this.taskScheduler.schedule(cronTask.getRunnable(), cronTask.getTrigger());

        return scheduledTask;
    }


    @Override
    public void destroy() {
        for (ScheduledTask task : this.scheduledTasks.values()) {
            task.cancel();
        }

        this.scheduledTasks.clear();
    }
}
|
添加定时任务示例类:
@Component("demoTask")
public class DemoTask {
    public void taskWithParams(String params) {
        System.out.println("执行有参示例任务:" + params);
    }

    public void taskNoParams() {
        System.out.println("执行无参示例任务");
    }
}
|
定时任务数据库表设计:
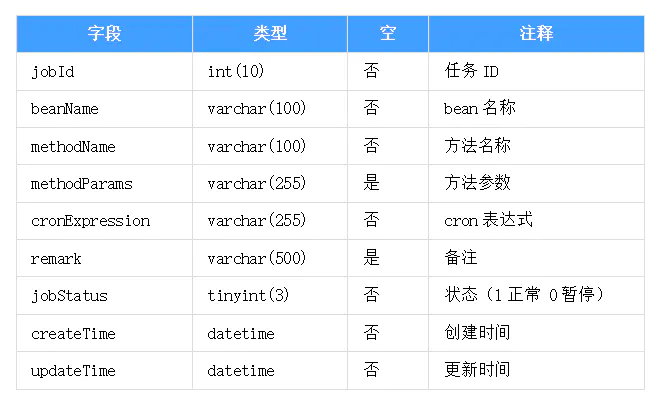
添加定时任务实体类:
public class SysJobPO {
    /**
     * 任务ID
     */
    private Integer jobId;
    /**
     * bean名称
     */
    private String beanName;
    /**
     * 方法名称
     */
    private String methodName;
    /**
     * 方法参数
     */
    private String methodParams;
    /**
     * cron表达式
     */
    private String cronExpression;
    /**
     * 状态(1正常 0暂停)
     */
    private Integer jobStatus;
    /**
     * 备注
     */
    private String remark;
    /**
     * 创建时间
     */
    private Date createTime;
    /**
     * 更新时间
     */
    private Date updateTime;

    public Integer getJobId() {
        return jobId;
    }

    public void setJobId(Integer jobId) {
        this.jobId = jobId;
    }

    public String getBeanName() {
        return beanName;
    }

    public void setBeanName(String beanName) {
        this.beanName = beanName;
    }

    public String getMethodName() {
        return methodName;
    }

    public void setMethodName(String methodName) {
        this.methodName = methodName;
    }

    public String getMethodParams() {
        return methodParams;
    }

    public void setMethodParams(String methodParams) {
        this.methodParams = methodParams;
    }

    public String getCronExpression() {
        return cronExpression;
    }

    public void setCronExpression(String cronExpression) {
        this.cronExpression = cronExpression;
    }

    public Integer getJobStatus() {
        return jobStatus;
    }

    public void setJobStatus(Integer jobStatus) {
        this.jobStatus = jobStatus;
    }

    public String getRemark() {
        return remark;
    }

    public void setRemark(String remark) {
        this.remark = remark;
    }

    public Date getCreateTime() {
        return createTime;
    }

    public void setCreateTime(Date createTime) {
        this.createTime = createTime;
    }

    public Date getUpdateTime() {
        return updateTime;
    }

    public void setUpdateTime(Date updateTime) {
        this.updateTime = updateTime;
    }

}
|
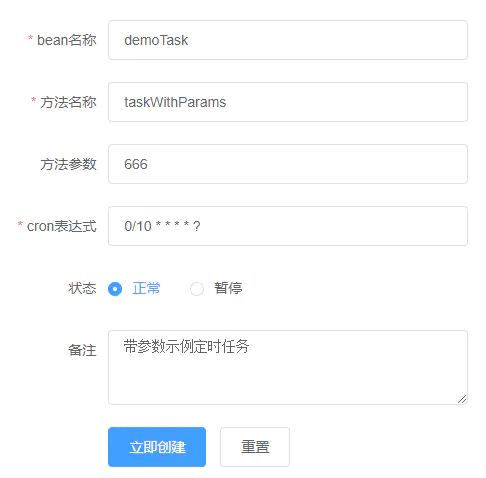
新增定时任务:
boolean success = sysJobRepository.addSysJob(sysJob);
if (!success)
    return OperationResUtils.fail("新增失败");
else {
    if (sysJob.getJobStatus().equals(SysJobStatus.NORMAL.ordinal())) {
        SchedulingRunnable task = new SchedulingRunnable(sysJob.getBeanName(), sysJob.getMethodName(), sysJob.getMethodParams());
        cronTaskRegistrar.addCronTask(task, sysJob.getCronExpression());
    }
}

return OperationResUtils.success();
|
修改定时任务,先移除原来的任务,再启动新任务
boolean success = sysJobRepository.editSysJob(sysJob);
if (!success)
    return OperationResUtils.fail("编辑失败");
else {
    //先移除再添加
    if (existedSysJob.getJobStatus().equals(SysJobStatus.NORMAL.ordinal())) {
        SchedulingRunnable task = new SchedulingRunnable(existedSysJob.getBeanName(), existedSysJob.getMethodName(), existedSysJob.getMethodParams());
        cronTaskRegistrar.removeCronTask(task);
    }

    if (sysJob.getJobStatus().equals(SysJobStatus.NORMAL.ordinal())) {
        SchedulingRunnable task = new SchedulingRunnable(sysJob.getBeanName(), sysJob.getMethodName(), sysJob.getMethodParams());
        cronTaskRegistrar.addCronTask(task, sysJob.getCronExpression());
    }
}

return OperationResUtils.success();
|
删除定时任务
boolean success = sysJobRepository.deleteSysJobById(req.getJobId());
if (!success)
    return OperationResUtils.fail("删除失败");
else{
    if (existedSysJob.getJobStatus().equals(SysJobStatus.NORMAL.ordinal())) {
        SchedulingRunnable task = new SchedulingRunnable(existedSysJob.getBeanName(), existedSysJob.getMethodName(), existedSysJob.getMethodParams());
        cronTaskRegistrar.removeCronTask(task);
    }
}

return OperationResUtils.success();
|
添加实现了CommandLineRunner接口的SysJobRunner类,当spring boot项目启动完成后,加载数据库里状态为正常的定时任务。
@Service
public class SysJobRunner implements CommandLineRunner {

    private static final Logger logger = LoggerFactory.getLogger(SysJobRunner.class);

    @Autowired
    private ISysJobRepository sysJobRepository;

    @Autowired
    private CronTaskRegistrar cronTaskRegistrar;

    @Override
    public void run(String... args) {
        // 初始加载数据库里状态为正常的定时任务
        List<SysJobPO> jobList = sysJobRepository.getSysJobListByStatus(SysJobStatus.NORMAL.ordinal());
        if (CollectionUtils.isNotEmpty(jobList)) {
            for (SysJobPO job : jobList) {
                SchedulingRunnable task = new SchedulingRunnable(job.getBeanName(), job.getMethodName(), job.getMethodParams());
                cronTaskRegistrar.addCronTask(task, job.getCronExpression());
            }

            logger.info("定时任务已加载完毕...");
        }
    }
}
|
工具类SpringContextUtils,用来从spring容器里获取bean
@Component
public class SpringContextUtils implements ApplicationContextAware {

    private static ApplicationContext applicationContext;

    @Override
    public void setApplicationContext(ApplicationContext applicationContext)
            throws BeansException {
        SpringContextUtils.applicationContext = applicationContext;
    }

    public static Object getBean(String name) {
        return applicationContext.getBean(name);
    }

    public static <T> T getBean(Class<T> requiredType) {
        return applicationContext.getBean(requiredType);
    }

    public static <T> T getBean(String name, Class<T> requiredType) {
        return applicationContext.getBean(name, requiredType);
    }

    public static boolean containsBean(String name) {
        return applicationContext.containsBean(name);
    }

    public static boolean isSingleton(String name) {
        return applicationContext.isSingleton(name);
    }

    public static Class<? extends Object> getType(String name) {
        return applicationContext.getType(name);
    }
}
|
好了,今天的学习就到这里!如果您学习过程中如遇困难?可以加入我们超高质量的 Spring技术交流群,参与交流与讨论,更好的学习与进步!更多 Spring Boot教程可以点击直达!,欢迎收藏与转发支持!