同时入选IMDB和豆瓣电影100强的经典电影
 |
2009-05-19 添加1. 肖申克的救赎 The Shawshank Redemption
导演 : 弗兰克·德拉邦特 Frank Darabont
|
 |
2009-05-19 添加2. 教父 The Godfather
导演 : 弗朗西斯·福特·科波拉 Francis Ford Coppola
|
 |
2009-05-19 添加3. 教父2 The Godfather: Part Ⅱ
导演 : Francis Ford Coppola
|
 |
2009-05-19 添加4. 低俗小说 Pulp Fiction
导演 : 昆汀·塔伦蒂诺 Quentin Tarantino
|
 |
2009-05-19 添加5. 辛德勒的名单 Schindler's List
导演 : Steven Spielberg
|
 |
2009-05-19 添加6. 飞越疯人院 One Flew Over the Cuckoo's Nest
导演 : 米洛斯·福尔曼 Miloš Forman
|
 |
2009-05-19 添加7. 七武士 七人の侍
导演 : 黑泽明
|
 |
2009-05-19 添加8. 指环王3:王者无敌 The Lord of the Rings: The Return of the King
导演 : 彼得·杰克逊 Peter Jackson
|
 |
2009-05-19 添加9. 上帝之城 Cidade de Deus
导演 : Fernando Meirelles/Kátia Lund
|
 |
2009-05-19 添加10. 指环王1:魔戒再现 The Lord of the Rings: The Fellowship of the Ring
导演 : 彼得·杰克逊 Peter Jackson
|
 |
2009-05-19 添加11. 搏击俱乐部 Fight Club
导演 : 大卫·芬奇 David Fincher
|
 |
2009-05-19 添加12. 这个杀手不太冷 Léon
导演 : 吕克·贝松 Luc Besson
|
 |
2009-05-19 添加13. 美丽人生 La vita è bella
导演 : 罗伯托·贝尼尼 Roberto Benigni
|
 |
2009-05-19 添加14. 天堂电影院 Nuovo Cinema Paradiso
导演 : 朱塞佩·托纳多雷 Giuseppe Tornatore
|
 |
2009-06-07 添加15. 千与千寻 千と千尋の神隠し
导演 : 宫崎骏 Hayao Miyazaki
|
 |
2009-06-07 添加16. 钢琴家 The Pianist
导演 : Roman Polanski
|
 |
2009-06-07 添加17. 指环王2:双塔奇兵 The Lord of the Rings: The Two Towers
导演 : 彼得·杰克逊 Peter Jackson
|
 |
2009-06-07 添加18. 美国往事 Once Upon a Time in America
导演 : Sergio Leone
|
 |
2009-06-07 添加19. 阿甘正传 Forrest Gump
导演 : Robert Zemeckis
|
 |
2009-06-07 添加20. 天使爱美丽 Le fabuleux destin d'Amélie Poulain
导演 : Jean-Pierre Jeunet
|
 |
2009-06-07 添加21. 梦之安魂曲 Requiem for a Dream
导演 : 达伦·阿伦诺夫斯基 Darren Aronofsky
|
 |
2010-02-21 添加22. 机器人总动员 WALL·E
导演 : 安德鲁·斯坦顿 Andrew Stanton
|
 |
2010-02-21 添加23. 窃听风暴 Das Leben der Anderen
导演 : 弗洛里安·亨克尔·冯·多纳斯马 Florian Henckel von Donnersmarck
|
 |
2010-02-21 添加24. 飞屋环游记 Up
导演 : 彼特·道格特 Pete Docter
|
 |
2010-02-21 添加25. 雨中曲 Singin' in the Rain
导演 : Stanley Donen/Gene Kelly |
Dynamic DataSource Routing | SpringSource Team Blog
Anyways, here's the code for my Catalog:
As you can see, the Catalog simply returns a list of Item objects. The Item just contains name and price properties:
Now, in order to demonstrate multiple DataSources, I created an enum for different Customer types (representing "levels" of membership I guess), and I created three different databases – so that each type of customer would get a distinct item list (I did mention that this would be a contrived example didn't I?). The important thing is that each of the databases are equivalent in terms of the schema. That way the Catalog's query will work against any of them – just returning different results. In this case, it's just the "item" table with 2 columns: name and price. And… here is the enum:
It's time to create some bean definitions. Since I have 3 datasources where everything is the same except for the port number, I created a parent bean so that the shared properties can be inherited. Then, I added the 3 bean definitions to represent the per-CustomerType DataSources:
Notice that I added a PropertyPlaceholderConfigurer so that I could externalize the port numbers in a "db.properties" file, like so:
Now things start to get interesting. I need to supply the "routing" DataSource to my Catalogso that it can dynamically get connections from the 3 different databases at runtime based on the current customer's type. As I mentioned, the AbstractRoutingDataSource can be rather simple to implement. Here is my implementation:
…and the CustomerContextHolder simply provides access to a thread-bound CustomerType. In reality, the 'context' would likely hold more information about the customer. Also note that if you are using Acegi, then you could retrieve some information from the userDetails. For this example, it's just the customer "type":
Finally, I just need to configure the catalog and routing DataSource beans. As you can see, the "real" DataSource references are provided in a Map. If you provide Strings, they can be resolved as JNDI names (or any custom resolution strategy can be provided – see the JavaDoc). Also, I've simply set the 'bronzeDataSource' as the default:
Of course I'd like to see this working, so I've created a simple test (extending one of Spring's integration test support classes). I added 3 items to the "gold" database, 2 items to the "silver" database, and only 1 item to the "bronze" database. This is the test:
…and rather than simply taking a screenshot of the green bar, you'll notice I've provided some console output – the results!:
As you can see, the configuration is simple. Better still, the data-access code is not concerned with looking up different DataSources. For more information, consult the JavaDoc for AbstractRoutingDataSource.
动态切换数据源(spring+hibernate) - liheping - 博客园
package lhp.example.context;
public enum DBType {
      dataSource1, dataSource2;
}

package lhp.example.context;

public class ContextHolder {
    private static final ThreadLocal<Object> holder = new ThreadLocal<Object>();

    public static void setDbType(DBType dbType) {
        holder.set(dbType);
    }

    public static DBType getDbType() {
        return (DBType) holder.get();
    }

    public static void clearDbType() {
        holder.remove();
    }
}
package lhp.example.context;

import java.util.logging.Logger;

import org.springframework.jdbc.datasource.lookup.AbstractRoutingDataSource;

public class DynamicDataSource extends AbstractRoutingDataSource {
    public static final Logger logger = Logger.getLogger(DynamicDataSource.class.toString());

    @Override
    protected Object determineCurrentLookupKey() {
        DBType key = ContextHolder.getDbType();//获得当前数据源标识符
        //logger.info("当前数据源 :" + key);
        return key;
    }

}
<!-- 数据源1 : mysql -->
    <bean id="dataSource1" class="com.mchange.v2.c3p0.ComboPooledDataSource">
        <property name="driverClass" value="com.mysql.jdbc.Driver" />
        <property name="jdbcUrl" value="jdbc:mysql://127.0.0.1:3306/dec" />
        <property name="user" value="root" />
        <property name="password" value="" />
    </bean>
    <!-- 数据源2 : mysql  -->
    <bean id="dataSource2" class="com.mchange.v2.c3p0.ComboPooledDataSource">
        <property name="driverClass" value="com.mysql.jdbc.Driver" />
        <property name="jdbcUrl" value="jdbc:mysql://127.0.0.1:3306/lms" />
        <property name="user" value="root" />
        <property name="password" value="" />
    </bean>

    <!-- 数据源3 :  access -->
    <bean id="dataSource3" class="com.mchange.v2.c3p0.ComboPooledDataSource">
        <property name="driverClass" value="sun.jdbc.odbc.JdbcOdbcDriver" />
        <property name="jdbcUrl" value="jdbc:odbc:accessTest" />
        <property name="user" value="administrator" />
        <property name="password" value="XLZX0309" />
    </bean>

    <!-- mysql 动态数据源设置-->
    <bean id="mysqlDynamicDataSource" class="lhp.example.context.DynamicDataSource">
        <property name="targetDataSources">
            <!-- 标识符类型 -->
            <map key-type="lhp.example.context.DBType">
                <entry key="dataSource1" value-ref="dataSource1" />
                <entry key="dataSource2" value-ref="dataSource2" />
            </map>
        </property>
        <property name="defaultTargetDataSource" ref="dataSource1" />
    </bean>
<!-- mysql sessionFactory -->
    <bean id="mysqlSessionFactory" class="org.springframework.orm.hibernate3.LocalSessionFactoryBean">
        <property name="dataSource" ref="mysqlDynamicDataSource" />
        <property name="hibernateProperties">
            <props>
                <prop key="hibernate.dialect">org.hibernate.dialect.MySQLDialect</prop>
                <prop key="hibernate.show_sql">true</prop>
                <prop key="hibernate.hbm2ddl.auto">update</prop><!--create validate -->
                <prop key="hibernate.query.substitutions">true 1, false 0</prop>
            </props>
        </property>
    </bean>

    <!-- access sessionFactory -->
    <bean id="aceessSessionFactory" class="org.springframework.orm.hibernate3.LocalSessionFactoryBean">
        <property name="dataSource" ref="dataSource3" />
        <property name="hibernateProperties">
            <props>
                <!-- access 语法和MSSQL相似 所以用的MSSQL方言,或者可以使用第三方方言 -->
                <prop key="hibernate.dialect">org.hibernate.dialect.SQLServerDialect</prop>
                <prop key="hibernate.jdbc.batch_size">30</prop>
                <prop key="hibernate.jdbc.fetch_size">50</prop>
                <prop key="hibernate.show_sql">true</prop>
                <prop key="hibernate.format_sql">false</prop>
                <prop key="hibernate.hbm2ddl.auto">update</prop><!--create validate -->
                <prop key="hibernate.query.substitutions">true 1, false 0</prop>
                <prop key="hibernate.cglib.use_reflection_optimizer">true</prop>
                <!-- <prop key="hibernate.cache.use_second_level_cache">true</prop> -->
                <!-- <prop key="hibernate.cache.provider_class">org.hibernate.cache.EhCacheProvider</prop> -->
                <!-- <prop key="hibernate.cache.use_query_cache">true</prop> -->
                <!-- <prop key="hibernate.generate_statistics">true</prop> -->
                <!-- <prop key="hibernate.cache.provider_configuration_file_resource_path">classpath:ehcache.xml</prop> -->
            </props>
        </property>
    </bean>
package lhp.example.junit;

import static org.junit.Assert.*;
import java.sql.DatabaseMetaData;
import lhp.example.context.ContextHolder;
import lhp.example.context.DBType;
import org.hibernate.Session;
import org.hibernate.SessionFactory;
import org.junit.Before;
import org.junit.Test;
import org.springframework.context.ApplicationContext;
import org.springframework.context.support.ClassPathXmlApplicationContext;

public class ServiceTest {
    private ApplicationContext context;
    //三个数据源的URL
    private String dataSource1_URL = "jdbc:mysql://127.0.0.1:3306/dec";
    private String dataSource2_URL = "jdbc:mysql://127.0.0.1:3306/lms";
    private String dataSource3_URL = "jdbc:odbc:accessTest";
    private SessionFactory mysqlSessionFactory;
    private SessionFactory aceessSessionFactory;

    @Before
    public void setUp() throws Exception {
        // 选择数据源初始化spring
        ContextHolder.setDbType(DBType.dataSource1);
        //
        String[] xmlFiles = new String[] {
                "applicationContext-dataSource.xml",
                "applicationContext-hibernate.xml",
                "applicationContext-spring.xml" };
        //
        context = new ClassPathXmlApplicationContext(xmlFiles);
        //
        mysqlSessionFactory = (SessionFactory) context.getBean("mysqlSessionFactory");
        aceessSessionFactory = (SessionFactory) context.getBean("aceessSessionFactory");
    }

    @SuppressWarnings("deprecation")
    @Test
    public void mysqlDataSourceTest() {
        try {

            Session mysqlSession = mysqlSessionFactory.openSession();
            // 获得数据库元数据
            DatabaseMetaData meatData = mysqlSession.connection().getMetaData();

            // 默认启动数据源 dataSource1
            //断言当前数据源URL是否是dataSource1的URL
            assertEquals(dataSource1_URL, meatData.getURL());

            // 切换到数据源 dataSource2
            ContextHolder.setDbType(DBType.dataSource2);
            mysqlSession = mysqlSessionFactory.openSession();
            meatData = mysqlSession.connection().getMetaData();
            //断言当前数据源URL是否是dataSource2的URL
            assertEquals(dataSource2_URL, meatData.getURL());

        } catch (Exception e) {
            e.printStackTrace();
        }
    }

    @SuppressWarnings("deprecation")
    @Test
    public void accessDataSourceTest() {
        try {
            Session accessSession = aceessSessionFactory.openSession();
            // 获得数据库元数据
            DatabaseMetaData meatData = accessSession.connection().getMetaData();
            //断言当前数据源URL是否是dataSource3的URL
            assertEquals(dataSource3_URL, meatData.getURL());


        } catch (Exception e) {
            e.printStackTrace();
        }
    }

}
Mahout学习笔记-分类算法之Decision Forest - 潘的博客 - 博客园
根据最近的Mahout Wiki,Mahout实现的分类算法有:随机梯度下降(SGD),贝叶斯分类,Online Passive Aggressive,HMM和决策森林(随机森林)。随机梯度下降当前不能并行处理,贝叶斯分类更适合处理文本数据,所以这两个算法都不太适合我的应用场景(并行处理,特征类型为数字),OPA和HMM不太熟悉,所以就选用了决策森林(随机森林)。
决策森林,顾名思义,就是由多个决策树组成森林,然后用这个森林进行分类,非常适合用MapReduce实现,进行并行处理。决策森林又称为随机森林,这是因为不同于常规的决策树(ID3,C4.5),决策森林中每个每棵树的每个节点在选择该点的分类特征时并不是从所有的输入特征里选择一个最好的,而是从所有的M个输入特征里随机的选择m个特征,然后从这m个特征里选择一个最好的(这样比较适合那种输入特征数量特别多的应用场景,在输入特征数量不多的情况下,我们可以取m=M)。然后针对目标特征类型的不同,取多个决策树的平均值(目标特征类型为数字类型(numeric))或大多数投票(目标特征类型为类别(category))。
在Mahout的example中有一个Decision Tree的例子,可以直接在命令行运行:
1. 准备数据:
数据为Breiman提供的glass:http://archive.ics.uci.edu/ml/datasets/Glass+Identification。
2. 生成数据的说明文件:
在Mahout目录下执行:bin/mahout org.apache.mahout.df.tools.Describe -p testdata/glass.data -f testdata/glass.info -d I 9 N L
数据格式为CSV,最后的I 9 N L说明各特征的属性:
I表示忽略第一个特征值(该特征值一般用来标示每一条训练样例,亦即可以作为ID)。
9 N表示接下来的9个特征是输入特征,类型为数字类型。
L 表示该特征是目标特征,亦即Label。
以glass文件的前几行为例为例:
1,1.52101,13.64,4.49,1.10,71.78,0.06,8.75,0.00,0.00,1
2,1.51761,13.89,3.60,1.36,72.73,0.48,7.83,0.00,0.00,1
3,1.51618,13.53,3.55,1.54,72.99,0.39,7.78,0.00,0.00,1
4,1.51766,13.21,3.69,1.29,72.61,0.57,8.22,0.00,0.00,1
5,1.51742,13.27,3.62,1.24,73.08,0.55,8.07,0.00,0.00,1
第一个特征被忽略,因为这个特征是作为ID用来表示每个样例的,2-10是9个输入特征,用来训练分类器,类型为数字(Numeric),最后一个特征是目标特征,代表每个样例所属的类别,这里所有样例都属于"1"类。
3. 进行分类和测试
在Mahout目录下执行:bin/mahout org.apache.mahout.df.BreimanExample -d testdata/glass.data -ds testdata/glass.info -i 10 -t 100
-i表示迭代的次数
-t表示每棵决策树的节点的个数
BreimanExample默认会构造两个森林,一个取m=1,一个取m=log(M+1)。之所以这么做是为了说明即使m值很小,整个森林的分类结果也会挺好。
推荐引擎:使用Mahout协同过滤
参考:基于 Apache Mahout 构建社会化推荐引擎:http://www.ibm.com/developerworks/cn/java/j-lo-mahout/
使用Mahout为布尔型数据生成推荐内容
Generating Recommendations with mahout for Boolean data sets (data sets with no preference value)
关于在Spark MLlib中基于布尔型数据集推荐可参考:Spark MLlib中的协同过滤
通过指定alpha:是一个针对于隐性反馈 ALS 版本的参数,这个参数决定了偏好行为强度的基准。
val alpha = 0.01
val model = ALS.trainImplicit(ratings, rank, numIterations, 0.01, alpha)
参考:http://spark.apache.org/docs/latest/mllib-collaborative-filtering.html
Craig Andrews » Best way to use HttpClient in Android
Google不鼓励使用HttpClient,更喜欢使用HttpURLConnection和HttpsURLConnection。
Many Android applications access the Internet resources over HTTP (and my projects are no exception). There are 2 common ways to do that: use Apache HttpClient 4.x (which is included in Android) or use HttpURLConnection (from Java). Google stated in a September 29, 2011 blog post that they prefer you use HttpURLConnection, but many apps and a large number of Java libraries already use HttpClient and won’t be changing soon (if ever). So HttpClient is here to stay.
With that in mind, the performance and footprint of HttpClient can vary widely based on how its set up. Here are my recommendations:
- Always use one HttpClient instance for your entire application. HttpClient is not free to instantiate – each additional instance takes time to create and uses more memory. However, more importantly, using one instance allows HttpClient to pool and reuse connections along with other optimizations that can make big differences in how your application performs.
- Use a thread safe connection manager. If you’re using one global HttpClient, it will be accessed by multiple threads concurrently – so if you don’t use a thread safe connection manager, Bad Things will happen.
- Use Android’s android.net.SSLCertificateSocketFactory and android.net.SSLSessionCacheif they’re available. Using these instead of the base HttpClient SSLSocketFactorywill reduce round trips when connecting to the same https site multiple times, making your application feel faster.
- Set the user agent to something useful. That way, the server’s logs will be far more useful, which may save you (or someone else) a lot of time later if (when) a problem occurs.
With all that said, here’s how I get my global HttpClient instance. This code should work on all Android versions (it should even work all the way back to 1.0 – if anyone cares). I use Google Guice‘s Provider interface and injection to get the application, but you can easily adopt this to a form that doesn’t use Guice.
[HttpClient]HTTPClient PostMethod 中文乱码问题解决方案(2种) - 追竹 - 博客频道 - CSDN.NET
一、在调用PostMethod方法时设置字符编码:
- PostMethod postMethod = new PostMethod(
- "http://127.0.0.1:8080/HttpClientServer/login.do");
- postMethod.getParams(). setParameter( HttpMethodParams.HTTP_CONTENT_CHARSET,"utf-8");
二、重载PostMethod的getRequestCharSet()方法, 返回我们需要的编码(字符集)名称, 就可以解决 UTF-8 或者其它非默认编码提交 POST 请求时的乱码问题了.
- //Inner class for UTF-8 support
- public static class UTF8PostMethod extends PostMethod{
- public UTF8PostMethod(String url){
- super(url);
- }
- @Override
- public String getRequestCharSet() {
- //return super.getRequestCharSet();
- return "utf-8";
- }
- }
- PostMethod postMethod = new UTF8PostMethod(
- "http://127.0.0.1:8080/HttpClientServer/login.do");
三、最后服务器端要配合客户端,设置下编码字符集:
- public void doPost(HttpServletRequest request, HttpServletResponse response)
- throws ServletException, IOException {
- //解决中文乱码问题,此步不可少
- request.setCharacterEncoding("UTF-8");
- response.setContentType("text/html");
- response.setCharacterEncoding("UTF-8");
- PrintWriter out = response.getWriter();
- String username = (String) request.getParameter("username");
- String password = (String) request.getParameter("password");
- System.out.println("******************** doPost被执行了 ********************");
- System.out.println("您的请求参数为:/tusername:" + username + "/tpassword:"
- + password);
- out.print("您的请求参数为:/tusername:" + username + "/tpassword:" + password);
- out.flush();
- out.close();
- }
也说TOMCAT中文乱码问题 request的setCharacterEncoding必须在getParameter之前执行_深圳漂者_百度空间
setCharacterEncoding
public void setCharacterEncoding(java.lang.String env) throws java.io.UnsupportedEncodingException
Overrides the name of the character encoding used in the body of this request. This method must be called prior to reading request parameters or reading input using getReader().
request的setCharacterEncoding必须在getParameter之前执行,也就是说传说中的GBK编码下Ajax乱码问题,可以使用Servlet Filter避免乱码,在Filter里通过判断是否是Ajax请求来通过request.setCharacterEncoding设置相应的编码。
应用程序在Servlet Filter 或Controller程序中通过setCharacterEncoding设置先后两次不同的字符集如setCharacterEncoding("UTF-8")和setCharacterEncoding("GBK"),在不同的应用服务器下会有不同的效果,在Tomcat是以第一次设置的字符集为准,该案例中是以"UTF-8"为准;而Weblogic则以最后一次为准,以"GBK"为准。
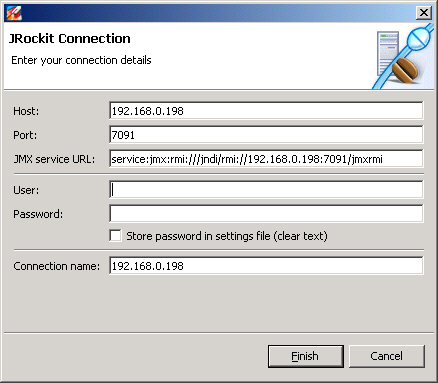
Java性能调优工具BEA JRockit Mission Control - kakatian1 - 51CTO技术博客
WebLogic使用
修改commEnv.cmd为-Xmanagement -Dcom.sun.management.jmxremote.port=7091 -Dcom.sun.management.jmxremote.authenticate=false -Dcom.sun.management.jmxremote.ssl=false
运行rmi的机器如果有多个IP就会有这个问题。也可以通过设置java.rmi.server.hostname=本机IP(非127.0.0.1)来解决。
我使用的方法是在启动参数上加入 -Djava.rmi.server.hostname=10.5.31.56
这样不用改hosts,也可以解决这个问题。
使用
启动代理开始连接
要使用JRockit Management Console来监控JRockit JVM,首先必须启动要监控的JVM中的管理代理。也就是说应用系统必须是用JRockit JDK进行启动的,并且启动了希望监控的JRockit的JMX管理代理服务。可以通过使用JRCMD或Ctrl-Break Handler来启动和关闭管理代理,最简单的方法是直接借助于-Xmanagement标志来启动它。如java -Xmanagement [your application]。但是通过JRCMD或Ctrl-Break Handler来进行管理更加方便与无侵入,连启动的命令都不用个性。有关JRCMD或Ctrl-Break Handler以及-Xmanagment选项的更多信息,请参见Management Console文档和Sun的JMX监控与管理的文档。
JRockit heap dump? | Oracle Forums
Problem: an application I look at experiences an OOM in production not yet reproduced anywhere else.
Is there any way to get a heap dump in JRockit when OOM occurs similar to -XX:+HeapDumpOnOutOfMemoryError option in Sun VM?
Is there a way to do it through command line?
Try -Djrockit.oomdiagnostics=true. It will print a lot of information about the current state of the heap to stderr when an OutOfMemoryError occurs.
-Djrockit.oomdiagnostics.filename=<path to file>
使用ffmpeg视频格式转换、视频截图、视频采集、屏幕录制
ffmpeg非常强大,轻松几条命令就可以完成你的工作。
把darkdoor.[001-100].jpg序列帧和001.mp3音频文件利用mpeg4编码方式合成视频文件darkdoor.avi:
$ ffmpeg -i 001.mp3 -i darkdoor.%3d.jpg -s 1024x768 -author skypp -vcodec mpeg4 darkdoor.avi
ffmpeg还支持mov格式:
$ ffmpeg -i darkdoor.%3d.jpg darkdoor.mov
要查看你的ffmpeg支持哪些格式,可以用如下命令:
$ ffmpeg -formats | less
还可以把视频文件导出成jpg序列帧:
$ ffmpeg -i bc-cinematic-en.avi example.%d.jpg
debian下安装ffmpeg很简单:
#apt-get install ffmpeg
视频文件截图
- 截取一张352x240尺寸大小的,格式为jpg的图片
ffmpeg -i test.asf -y -f image2 -t 0.001 -s 352x240 a.jpg
- 把视频的前30帧转换成一个Animated Gif
ffmpeg -i test.asf -vframes 30 -y -f gif a.gif
- 截取指定时间的缩微图
ffmpeg -i test.avi -y -f image2 -ss 8 -t 0.001 -s 350x240 test.jpg
- -ss后跟的时间单位为秒
- 转换文件为3GP格式
ffmpeg -y -i test.mpeg -bitexact -vcodec h263 -b 128 -r 15 -s 176x144
 -acodec aac -ac 2 -ar 22500 -ab 24 -f 3gp test.3gp
- 或
ffmpeg -y -i test.wmv -ac 1 -acodec libamr_nb -ar 8000 -ab 12200 -s 176x144 -b 128 -r 15 test.3gp
视频格式转换
- 如何使用 ffmpeg 编码得到高质量的视频
ffmpeg.exe -i "D:\Video\Fearless\Fearless.avi" -target film-dvd -s 720x352
 -padtop 64 -padbottom 64 -maxrate 7350000 -b 3700000 -sc_threshold 1000000000
 -trellis -cgop -g 12 -bf 2 -qblur 0.3 -qcomp 0.7 -me full -dc 10 -mbd 2
 -aspect 16:9 -pass 2 -passlogfile "D:\Video\ffmpegencode" -an -f mpeg2video "D:\Fearless.m2v"
ffmpeg.exe -i test.mp3 -ab 56 -ar 22050 -b 500 -r 15 -s 320x240 f:\test.flv
ffmpeg.exe -i test.wmv -ab 56 -ar 22050 -b 500 -r 15 -s 320x240 f:\test.flv
- 转码解密的VOB
ffmpeg -i snatch_1.vob -f avi -vcodec mpeg4 -b 800 -g 300 -bf 2 -acodec mp3 -ab 128 snatch.avi
- 上面的命令行将vob的文件转化成avi文件,mpeg4的视频和mp3的音频。注意命令中使用了B帧,所以mpeg4流是divx5兼容的。GOP大小是300意味着29.97帧频下每10秒就有INTRA帧。该映射在音频语言的DVD转码时候尤其有用。
- 同时编码到几种格式并且在输入流和输出流之间建立映射
ffmpeg -i /tmp/a.wav -ab 64 /tmp/a.mp2 -ab 128 /tmp/b.mp2 -map 0:0 -map 0:0
- 上面的命令行转换一个64Kbits 的a.wav到128kbits的a.mp2 ‘-map file:index’在输出流的顺序上定义了哪一路输入流是用于每一个输出流的。
- 转换文件为3GP格式
ffmpeg -i test.avi -y -b 20 -s sqcif -r 10 -acodec amr_wb -ab 23.85 -ac 1 -ar 16000 test.3gp
- 注:如果要转换为3GP格式,则ffmpeg在编译时必须加上–enable-amr_nb –enable-amr_wb,详细内容可参考:转换视频为3GPP格式
屏幕录制
- 使用ffmpeg录像屏幕
ffmpeg -vcodec mpeg4 -b 1000 -r 10 -g 300 -vd x11:0,0 -s 1024x768 ~/test.avi
:其中,-vd x11:0,0 指录制所使用的偏移为 x=0 和 y=0,-s 1024×768 指录制视频的大小为 1024×768。录制的视频文件为 test.avi,将保存到用户主目录中
- 如果你只想录制一个应用程序窗口或者桌面上的一个固定区域,那么可以指定偏移位置和区域大小。使用xwininfo -frame命令可以完成查找上述参数。
- 重新调整视频尺寸大小
ffmpeg -vcodec mpeg4 -b 1000 -r 10 -g 300 -i ~/test.avi -s 800×600 ~/test-800-600.avi
- 注:ffmpeg的屏幕录制功能只能在Linux环境下有效。
视频采集
- 把摄像头的实时视频录制下来,存储为文件
ffmpeg -f video4linux -s 320*240 -r 10 -i /dev/video0 test.asf
三、ffmepg使用
各种转换例子见:
FFmpeg Howto
程序下载:
Unofficial FFmpeg Win32 Builds(需要使用代理访问)
或:
FFMPEG FULL SDK V3.0
The generic syntax is:
ffmpeg [[infile options][`-i' infile]]… {[outfile options] outfile}…
As a general rule, options are applied to the next specified file. Therefore, order is important, and you can have the same option on the command line multiple times. Each occurrence is then applied to the next input or output file.
* To set the video bitrate of the output file to 64kbit/s:
ffmpeg -i input.avi -b 64k output.avi
* To force the frame rate of the input and output file to 24 fps:
ffmpeg -r 24 -i input.avi output.avi
* To force the frame rate of the output file to 24 fps:
ffmpeg -i input.avi -r 24 output.avi
* To force the frame rate of input file to 1 fps and the output file to 24 fps:
ffmpeg -r 1 -i input.avi -r 24 output.avi
The format option may be needed for raw input files.
By default, FFmpeg tries to convert as losslessly as possible: It uses the same audio and video parameters for the outputs as the one specified for the inputs.
转换文件为3GP格式
ffmpeg -y -i test.mpeg -bitexact -vcodec h263 -b 128 -r 15 -s 176x144 -acodec aac -ac 2 -ar 22500 -ab 24 -f 3gp test.3gp
或
ffmpeg -y -i test.mpeg -ac 1 -acodec amr_nb -ar 8000 -s 176x144 -b 128 -r 15 test.3gp
转换指定格式文件到FLV格式
ffmpeg.exe -i test.mp3 -ab 56 -ar 22050 -b 500 -r 15 -s 320x240 f:\test.flv
ffmpeg.exe -i test.wmv -ab 56 -ar 22050 -b 500 -r 15 -s 320x240 f:\test.flv

***************************************************************************

ffmpeg -i F:\tools\ffmpeg.rev10464\test.avi -ab 56 -ar 22050 -b 500 -r 15 -s 320x240 F:\tools\ffmpeg.rev10464\test.flv

ffmpeg -i "F:\tools\ffmpeg.rev10464\test.flv" -y -f image2 -ss 8 -t 0.001 -s 350x240 "test.jpg"


ffmpeg -i F:\01.wmv -ab 56 -ar 22050 -b 500 -r 15 -s 320x240 f:\test.flv
使用-ss参数 作用(time_off set the start time offset),可以从指定时间点开始转换任务。如:
转换文件格式的同时抓缩微图:
ffmpeg -i "test.avi" -y -f image2 -ss 8 -t 0.001 -s 350x240 'test.jpg'
对已有flv抓图:
ffmpeg -i "test.flv" -y -f image2 -ss 8 -t 0.001 -s 350x240 'test.jpg'
-ss后跟的时间单位为秒
Ffmpeg转换命令
ffmpeg -y -i test.mpeg -bitexact -vcodec h263 -b 128 -r 15 -s 176x144 -acodec aac -ac 2 -ar 22500
-ab 24 -f 3gp test.3gp
或者
ffmpeg -y -i test.mpeg -ac 1 -acodec amr_nb -ar 8000 -s 176x144 -b 128 -r 15 test.3gp
ffmpeg参数设定解说
-bitexact 使用标准比特率
-vcodec xvid 使用xvid压缩
-s 320x240 指定分辨率
-r 29.97 桢速率(可以改,确认非标准桢率会导致音画不同步,所以只能设定为15或者29.97)
画面部分,选其一
-b <比特率> 指定压缩比特率,似乎ffmpeg是自动VBR的,指定了就大概是平均比特率,比如768,1500这样的
就是原来默认项目中有的
-qscale <数值> 以<数值>质量为基础的VBR,取值0.01-255,约小质量越好
-qmin <数值> 设定最小质量,与-qmax(设定最大质量)共用,比如-qmin 10 -qmax 31
-sameq 使用和源同样的质量
声音部分
-acodec aac 设定声音编码
-ac <数值> 设定声道数,1就是单声道,2就是立体声,转换单声道的TVrip可以用1(节省一半容量),高品质
的DVDrip就可以用2
-ar <采样率> 设定声音采样率,PSP只认24000
-ab <比特率> 设定声音比特率,前面-ac设为立体声时要以一半比特率来设置,比如192kbps的就设成96,转换
君默认比特率都较小,要听到较高品质声音的话建议设到160kbps(80)以上
-vol <百分比> 设定音量,某些DVDrip的AC3轨音量极小,转换时可以用这个提高音量,比如200就是原来的2倍
这样,要得到一个高画质音质低容量的MP4的话,首先画面最好不要用固定比特率,而用VBR参数让程序自己去
判断,而音质参数可以在原来的基础上提升一点,听起来要舒服很多,也不会太大(看情况调整
例子:ffmpeg -y -i "1.avi" -title "Test" -vcodec xvid -s 368x208 -r 29.97 -b 1500 -acodec aac -ac 2 -ar 24000 -ab 128 -vol 200 -f psp -muxvb 768 "1.***"
解释:以上命令可以在Dos命令行中输入,也可以创建到批处理文件中运行。不过,前提是:要在ffmpeg所在的目录中执行(转换君所在目录下面的cores子目录)。
参数:
-y(覆盖输出文件,即如果1.***文件已经存在的话,不经提示就覆盖掉了)
-i "1.avi"(输入文件是和ffmpeg在同一目录下的1.avi文件,可以自己加路径,改名字)
-title "Test"(在PSP中显示的影片的标题)
-vcodec xvid(使用XVID编码压缩视频,不能改的)
-s 368x208(输出的分辨率为368x208,注意片源一定要是16:9的不然会变形)
-r 29.97(帧数,一般就用这个吧)
-b 1500(视频数据流量,用-b xxxx的指令则使用固定码率,数字随便改,1500以上没效果;还可以用动态码率如:-qscale 4和-qscale 6,4的质量比6高)
-acodec aac(音频编码用AAC)
-ac 2(声道数1或2)
-ar 24000(声音的采样频率,好像PSP只能支持24000Hz)
-ab 128(音频数据流量,一般选择32、64、96、128)
-vol 200(200%的音量,自己改)
-f psp(输出psp专用格式)
-muxvb 768(好像是给PSP机器识别的码率,一般选择384、512和768,我改成1500,PSP就说文件损坏了)
"1.***"(输出文件名,也可以加路径改文件名)
机器强劲的话,可以多开几个批处理文件,让它们并行处理。
E:\ffmpeg.exe -i I:\1.wmv -b 360 -r 25 -s 320x240 -hq -deinterlace -ab 56 -ar 22050 -ac 1 D:\2.flv
===========================================
ffmpeg.exe -i F:\闪客之家\闪客之歌.mp3 -ab 56 -ar 22050 -b 500 -r 15 -s 320x240 f:\11.flv ffmpeg -i F:\01.wmv -ab 56 -ar 22050 -b 500 -r 15 -s 320x240 f:\test.flv 使用-ss参数 作用(time_off set the start time offset),可以从指定时间点开始转换任务。如:
转换文件格式的同时抓缩微图:
ffmpeg -i "test.avi" -y -f image2 -ss 8 -t 0.001 -s 350x240 'test.jpg'
对已有flv抓图:
ffmpeg -i "test.flv" -y -f image2 -ss 8 -t 0.001 -s 350x240 'test.jpg'
-ss后跟的时间单位为秒 Ffmpeg转换命令
ffmpeg -y -i test.mpeg -bitexact -vcodec h263 -b 128 -r 15 -s 176x144 -acodec aac -ac 2 -ar 22500 -ab 24 -f 3gp test.3gp
或者
ffmpeg -y -i test.mpeg -ac 1 -acodec amr_nb -ar 8000 -s 176x144 -b 128 -r 15 test.3gp ffmpeg参数设定解说
-bitexact 使用标准比特率
-vcodec xvid 使用xvid压缩
-s 320x240 指定分辨率
-r 29.97 桢速率(可以改,确认非标准桢率会导致音画不同步,所以只能设定为15或者29.97)
画面部分,选其一
-b <比特率> 指定压缩比特率,似乎ffmpeg是自动VBR的,指定了就大概是平均比特率,比如768,1500这样的就是原来默认项目中有的
-qscale <数值> 以<数值>质量为基础的VBR,取值0.01-255,约小质量越好
-qmin <数值> 设定最小质量,与-qmax(设定最大质量)共用,比如-qmin 10 -qmax 31
-sameq 使用和源同样的质量 声音部分
-acodec aac 设定声音编码
-ac <数值> 设定声道数,1就是单声道,2就是立体声,转换单声道的TVrip可以用1(节省一半容量),高品质的DVDrip就可以用2
-ar <采样率> 设定声音采样率,PSP只认24000
-ab <比特率> 设定声音比特率,前面-ac设为立体声时要以一半比特率来设置,比如192kbps的就设成96,转换君默认比特率都较小,要听到较高品质声音的话建议设到160kbps(80)以上
-vol <百分比> 设定音量,某些DVDrip的AC3轨音量极小,转换时可以用这个提高音量,比如200就是原来的2倍 这样,要得到一个高画质音质低容量的MP4的话,首先画面最好不要用固定比特率,而用VBR参数让程序自己去判断,而音质参数可以在原来的基础上提升一点,听起来要舒服很多,也不会太大(看情况调整 例子:ffmpeg -y -i "1.avi" -title "Test" -vcodec xvid -s 368x208 -r 29.97 -b 1500 -acodec aac -ac 2 -ar 24000 -ab 128 -vol 200 -f psp -muxvb 768 "1.***"
解释:以上命令可以在Dos命令行中输入,也可以创建到批处理文件中运行。不过,前提是:要在ffmpeg所在的目录中执行(转换君所在目录下面的cores子目录)。
参数:
-y(覆盖输出文件,即如果1.***文件已经存在的话,不经提示就覆盖掉了)
-i "1.avi"(输入文件是和ffmpeg在同一目录下的1.avi文件,可以自己加路径,改名字)
-title "Test"(在PSP中显示的影片的标题)
-vcodec xvid(使用XVID编码压缩视频,不能改的)
-s 368x208(输出的分辨率为368x208,注意片源一定要是16:9的不然会变形)
-r 29.97(帧数,一般就用这个吧)
-b 1500(视频数据流量,用-b xxxx的指令则使用固定码率,数字随便改,1500以上没效果;还可以用动态码率如:-qscale 4和-qscale 6,4的质量比6高)
-acodec aac(音频编码用AAC)
-ac 2(声道数1或2)
-ar 24000(声音的采样频率,好像PSP只能支持24000Hz)
-ab 128(音频数据流量,一般选择32、64、96、128)
-vol 200(200%的音量,自己改)
-f psp(输出psp专用格式)
-muxvb 768(好像是给PSP机器识别的码率,一般选择384、512和768,我改成1500,PSP就说文件损坏了)
"1.***"(输出文件名,也可以加路径改文件名)
P.S. 版主机器强劲的话,可以多开几个批处理文件,让它们并行处理。 E:\ffmpeg.exe -i I:\1.wmv -b 360 -r 25 -s 320x240 -hq -deinterlace -ab 56 -ar 22050 -ac
gcc 4.6.0 源码安装
安装环境
[root@vm11 ~]# lsb_release -a
LSB Version: :core-4.0-amd64:core-4.0-ia32:core-4.0-noarch:graphics-4.0-amd64 :graphics-4.0-ia32:graphics-4.0-noarch:printing-4.0-amd64:printing-4.0-ia32:prin ting-4.0-noarch
Distributor ID: CentOS
Description: CentOS release 5.6 (Final)
Release: 5.6
Codename: Final
[root@vm11 ~]#
切换到浏览器.
在官方网站上选择gcc 4.6.0下载的ftp站点http://gcc.gnu.org/mirrors.html
我选择的是 http://mirrors-us.seosue.com/gcc/
![]() NameLast modifiedSizeDescription
NameLast modifiedSizeDescription
| Parent Directory | - | |||
| README | 25-Apr-2003 01:09 | 765 | ||
| infrastructure/ | 01-Apr-2011 04:43 | - | ||
| libstdc++/ | 17-Dec-2007 16:00 | - | ||
| md5.sum | 09-Mar-2010 16:00 | 41 | ||
| old-releases/ | 16-Jun-2001 17:00 | - | ||
| releases/ | 29-Jun-2011 04:34 | - | ||
| snapshots/ | 29-Jun-2011 04:34 | - | ||
| summit/ | 29-Jun-2011 04:34 | - |
进入ftp的目录,选择releases->gcc-4.6.0
| gcc-4.6.0.tar.bz2 | 25-Mar-2011 11:03 | 68M | ||
| gcc-4.6.0.tar.gz | 25-Mar-2011 11:04 | 89M |
|
选择其中一个复制下载链接
wget http://mirrors-us.seosue.com/gcc/releases/gcc-4.6.0/gcc-4.6.0.tar.bz2
bunzip2 gcc-4.6.0.tar.bz2
tar xf gcc-4.6.0.tar
编译源码安装gcc 4.6.0还需要一些依赖库
进入上面的ftp目录infrastructure/
分别 gmp mpc mpfr ppl cloog 安装包
wget http://mirrors-us.seosue.com/gcc/infrastructure/gmp-4.3.2.tar.bz2
wget http://mirrors-us.seosue.com/gcc/infrastructure/mpc-0.8.1.tar.gz
wget http://mirrors-us.seosue.com/gcc/infrastructure/mpfr-2.4.2.tar.bz2
wget http://mirrors-us.seosue.com/gcc/infrastructure/ppl-0.11.tar.gz
wget http://mirrors-us.seosue.com/gcc/infrastructure/cloog-0.16.2.tar.gz
如果cloog编译有问题可以在这里下载最新的http://gcc.gnu.org/wiki/Graphite_Build
bunzip2 gmp-4.3.2.tar.bz2
tar xf gmp-4.3.2.tar
gunzip mpc-0.8.1.tar.gz
tar xf mpc-0.8.1.tar
bunzip2 mpfr-2.4.2.tar.bz2
tar xf mpfr-2.4.2.tar
gunzip ppl-0.11.tar.gz
tar xf ppl-0.11.tar
gunzip cloog-0.16.2.tar.gz
tar xf cloog-0.16.2.tar
cd gmp-4.3.2
./configure --prefix=/usr
make && make install
最好指定安装目录,如果是默认是/usr/local/,有时候安装在local 时候,有可能出现在编译时候没有找到对应库
还有可以编辑/etc/ld.so.conf 文件添加/usr/local/目录,再次ldconfig
cd mpfr-2.4.2
./configure --prefix=/usr --with-gmp=/usr/
make && make install
cd mpc-0.8.1
./configure --prefix=/usr/ --with-gmp=/usr/ --with-mpfr=/usr/
make && make install
cd ppl-0.11
./configure --prefix=/usr/ --with-gmp=/usr/
make && make install
cd cloog-0.16.2
./configure --prefix=/usr/ --with-gmp=/usr/ --with-ppl=/usr/
make && make install
cd gcc.4.6.0
./configure --with-gmp=/usr/ --with-mpfr=/usr/ --with-mpc=/usr/ --with-cloog=/usr/ --enable-languages=c,c++ --enable-threads=posix --enable-__cxa_atexit --with-cpu=generic --disable-multilib --with-ppl=/usr/
make && make install