OpenLayers系列(2)——多个图层 - bob007abc的专栏 - 博客频道 - CSDN.NET
下面例子包含了多个图层构成,可设置最小显示比例,只有在当地图在缩放的这个最小比例时才显示该图层信息。
多图层的地图由两种图层构成:base layer 和overlay layer 。
Base layer: 任何一个地图中都存在至少一个图层,否则你的应用将呈现空白,我们把最基本的一个图层称为base layer。Base layer不止一种或一个,你可以选择任意一个图层作为应用的base layer,但是任何时候base layer都只能有一个是turn on的,如果程序在打开一个base layer时发现已经存在另一个打开着的base layer,则应用会关掉之前的base layer而使用最近打开的一个。所以base layer在地图中的概念就像是(radio button)一个单选按钮。
Overlay layer: 非base layer的图层统称为overlay layer。应用中可使用并同时打开任何多的overlay layer,你可以使用参数设置该层是否显示。Overlay layer在地图中的概念就像是(checkbox)多选框。
- <!DOCTYPE html>
- <html lang='en'>
- <head>
- <meta charset='utf-8' />
- <title>My OpenLayers Map</title>
- <script type='text/javascript' src='OpenLayers.js'></script>
- <script type='text/javascript'>
- var map;
- function init() {
- map = new OpenLayers.Map('map_element', {});
- var wms_layer_map = new OpenLayers.Layer.WMS(//base layer
- 'Base layer',
- 'http://vmap0.tiles.osgeo.org/wms/vmap0',
- {layers: 'basic'},
- {isBaseLayer: true}
- );
- var wms_layer_labels = new OpenLayers.Layer.WMS(//国家,洲,城市名层
- 'Location Labels',
- 'http://vmap0.tiles.osgeo.org/wms/vmap0',
- {layers: 'clabel,ctylabel,statelabel',
- transparent: true},
- {visibility: false, opacity:0.5}//默认不显示该层(但可以图层切换器中打开)
- );
- var wms_state_lines = new OpenLayers.Layer.WMS(//洲界层
- 'State Line Layer',
- 'http://labs.metacarta.com/wms/vmap0',
- {layers: 'stateboundary',
- transparent: true},
- {displayInLayerSwitcher: false, //设置该层不显示在图层切换器中
- minScale: 13841995.078125}//设置一个最小尺度,只有当地图在缩放时达到这个最小尺度时才显示该图层信息
- );
- var wms_water_depth = new OpenLayers.Layer.WMS(
- 'Water Depth',
- 'http://labs.metacarta.com/wms/vmap0',
- {layers: 'depthcontour',
- transparent: true},
- {opacity:0.8}
- );
- var wms_roads = new OpenLayers.Layer.WMS(
- 'Roads',
- 'http://labs.metacarta.com/wms/vmap0',
- {layers: 'priroad,secroad,rail',
- transparent: true},
- {transistionEffect:'resize'}//让该图层在缩放时呈现重新计算的效果
- );
- map.addLayers([
- wms_layer_map,
- wms_layer_labels,
- wms_state_lines,
- wms_water_depth,
- wms_roads]);
- map.addControl(new OpenLayers.Control.LayerSwitcher({}));
- if(!map.getCenter()){
- map.zoomToMaxExtent();
- }
- }
- </script>
- </head>
- <body onload='init();'>
- <div id='map_element' style='width: 500px; height: 500px;'>
- </div>
- </body>
- </html>
Openlayers 鼠标点击事件不响应注意:(
marker.events.register('mousedown', marker, function(evt) { alert(evt); OpenLayers.Event.stop(evt); });
)
把 map.addLayers([ol_wms, markers, drawlayer]); 改为
map.addLayers([ol_wms, drawlayer, markers]);
即Vector 放在 markers 之前,可能是图层覆盖的原因,要响应的图层,应放在最后;
否则像之前那样,点击的是 drawlayer 图层;
使用 ant 简洁构建前端 - { focus : web } - ITeye技术网站
注意两个可修改编码或字符集的地方:
压缩
对应于编译型语言构建的编译阶段,压缩优化 源码 ,推荐 css采用 yuicompressor ,JavaScript采用 google closure-compiler 。ant 可以通过 java 任务来方便地调用外部 java 程序,并且在同一 jvm 内运行也避免了通过 exec 执行外部程序的效率问题。不过由于压缩器每次只能针对单个源文件进行操作,这时就需要使用 ant 的 批处理任务(bulk task):apply
- <apply executable="java"
- dest="目的地"
- failonerror="true"
- parallel="并行执行"
- >
- <fileset dir="css源地址"
- includes="**/*.css"/>
- <arg line="-jar"/>
- <arg path="yuicompressor.jar"/>
- <arg line="--charset ${charset}"/>
- <srcfile/>
- <arg line="-o"/>
- <targetfile/>
- <mapper type="regexp" from="^(.*)\.(css|js)$" to="\1-min.\2"/>
- </apply>
打包
对于前端代码,打包的意义在于减少http链接数 ,主要用到的 ant 任务:concat ,将多个文件合并为一个文件
- <concat destfile="目的文件"
- encoding="读取编码"
- outputencoding="写入编码">
- <filelist .../>
- </concat>
同 copy 类似,若要求合并后的文件内容顺序,则使用filelist,否则使用fileset即可。
制作Web地图的几种方法
JavaScript-based:jVectorMap
jVectorMap uses only native browser technologies like JavaScript, CSS, HTML, SVG or VML. No Flash or any other proprietary browser plug-in is required. This allows jVectorMap to work in all modern mobile browsers.
参考:http://dove19900520.iteye.com/blog/1880668
D3.js is a JavaScript library for manipulating documents based on data. D3 helps you bring data to life using HTML, SVG and CSS. D3’s emphasis on web standards gives you the full capabilities of modern browsers without tying yourself to a proprietary framework, combining powerful visualization components and a data-driven approach to DOM manipulation.
纯SVG
Raphaël is a small JavaScript library that should simplify your work with vector graphics on the web. If you want to create your own specific chart or image crop and rotate widget, for example, you can achieve it simply and easily with this library.
Raphaël ['ræfeɪəl] uses the SVG W3C Recommendation and VML as a base for creating graphics. This means every graphical object you create is also a DOM object, so you can attach JavaScript event handlers or modify them later. Raphaël’s goal is to provide an adapter that will make drawing vector art compatible cross-browser and easy.
Raphaël currently supports Firefox 3.0+, Safari 3.0+, Chrome 5.0+, Opera 9.5+ and Internet Explorer 6.0+.
GeoMap:https://github.com/x6doooo/GeoMap
http://www.helloweba.com/view-blog-242.html
http://www.cnblogs.com/linfei721/archive/2013/06/02/3114174.html
http://rockydo.com/svgmap/svgmap.html
Fabric.js is a powerful and simple
Javascript HTML5 canvas library
Fabric provides interactive object model on top of canvas element
Fabric also has SVG-to-canvas (and canvas-to-SVG) parser
raphael.js矢量绘图(3)绘图方法 – Dx. Yang
在RaphaelJs里,用来绘制形状的方法不算多,比较容易掌握。
矩形
参数:x轴坐标,y轴坐标,宽度,高度
paper.rect(x, y, width, height);
圆形
参数:圆心的x轴坐标,y轴坐标,圆半径
paper.circle(x, y, r);
椭圆
参数:圆心的x轴坐标,y轴坐标,x轴半径,y轴半径
paper.ellipse(x, y, xr, yr);
路径
paper.path('M10,10 L20,20');
路径是矢量绘图里最强大的工具,同时也比较复杂。
路径的参数是一组字符串,由“命令字母+坐标数字”的组合构成。
具体设置方法可以参看另外几篇介绍:
路径详解1(基本):http://xbingoz.com/171.html
路径详解2(曲线):http://xbingoz.com/194.html
MDN路径教程:http://xbingoz.com/320.html
图片
image方法可以引入图片文件,和HTML里的img标签作用相似。
paper.image(src, x, y, width, height);
文字
RaphaelJs有两个方法用来绘制文字
1、paper.text(50, 50, "Raphaël\nkicks\nbutt!");
text方法用来绘制一般文字,和HTML里的文字一样,它只能使用浏览器支持的字体。
在字符串参数中加入\n可以输入多行文字
2、paper.print(10, 50, "print", paper.getFont("Museo"), 30);
print方法可以渲染任意字体的文字,它的第四个参数是字体,这里需要使用paper.getFont()方法,该方法接受一个字符串参数,表示需要获取的字体名称。只要该字体已在系统中注册,就可以获取,并使用它渲染文字。
图形对象
绘制形状的方法会返回形状对象,该对象可以使用show()、hide()等方法。
attr()是形状对象的一个常用方法,它可以改变形状对象的属性,例如:
|
1
2
3
4
5
6
7
8
9
10
|
//绘制一个矩形,左上角位于(10,10),宽800,高600,黑色填充//这里可以使用链式操作paper.rect(10, 10, 800, 600).attr('fill', '#000');//或者用一个变量缓存形状对象,便于后续操作var rect1 = paper.rect(10, 10, 800, 600);rect1.attr('fill', '#000');setTimeout(function(){ rect1.attr('fill', 'red');},1000); |
RGraph - HTML5 and JavaScript charts
RGraph is a HTML5 canvas and JavaScript based library built for web charts and supports over twenty different types of visualisation. Using the new <canvas> tag, RGraph creates these "HTML charts" inside the web browser using JavaScript, meaning quicker pages and less web server load. This leads to smaller page sizes, lower costs and faster websites.
Gallery · mbostock/d3 Wiki · GitHub
Welcome to the D3 gallery! Feel free to add links to your work! More examples are available on bl.ocks.org/mbostock. If you want to share an example and don't have your own hosting, consider using Gist and bl.ocks.org.
50 JavaScript Libraries for Charts and Graphs | TechSlides
How are you visualizing data in JavaScript? What is your favorite library for creating charts and graphs with JavaScript?
I have been a long time fan of jqPlot for its open source approach, simplicity,examples, and great features. It performs well, it is used by many corporations, and it is built on top of jQuery. Recently, however, D3 has really caught my eye. It uses JavaScript, HTML, SVG and CSS to really bring data to life. It is also open sourced, does not depend on jQuery, has a ton of examples, and there are even some good charting libraries based on D3. The other big player is HighCharts, also written in pure JavaScript with all demos that you can view and edit in JSFiddle and it also has some powerful features. Beyond these three, there are many more useful JavaScript charting libraries worth considering. Here is a list of the top 50 JS libraries for making charts and graphs:
FusionCharts – they call themselves an enterprise-grade JavaScript charting component and with good reason I suppose. They are probably the best-looking of the lot and have 90 chart types that work across devices and browsers (including IE 6, 7 and 8 for which they use VML). They have a ton of business dashboard examples,extensive documentation and some good articles on charting best practices. They also have a jQuery plugin. FusionCharts started a decade back (they even have a book on their startup journey) and claim to have 21,000 customers (LinkedIn, World Bank, White House, Oracle etc).
D3 – is really amazing and I love it’s simplicity. The documentation is really extensive, the source code is hosted on GitHub, and the examples are never-ending. There is aD3 prototyping tool called Tributary with many great examples. It’s so good that xcharts, nvd3, Rickshaw, Cubism.js, dc.js, and xkcd are all based on D3. If you are making some amazing custom data visualizations, D3 should probably be your choice, otherwise these d3-based libraries mentioned above are great for more simple straightforward graphs. Finally, I highly recommend looking at Scott Murray free book on D3 called Interactive Data Visualization for the Web and Dashing D3 tutorials.
HighCharts – very powerful, I love the JSFiddle examples and powerful features. I don’t like the license fee but they have great customers (IBM, NASA, MasterCard, etc). They also have backward compatibility with IE8.
jqPlot – if you are already using jQuery, you don’t want to pay for HighCharts, and D3 is too much for your simple use cases, then jqPlot is an excellent choice.
dygraphs – open source JavaScript library that produces interactive, zoomable charts of time series. It is really excellent for large data sets.
Protovis – free and open-source created by the same team that is now working on D3. If you are interested in comparing D3 to Protovis, check out this stackoveflow page.
Flot Charts – similar to jqPlot, Flot is a pure JavaScript plotting library for jQuery, with a focus on simple usage, attractive looks and interactive features. If you are interested in comparing Flot to jqPlot, this thread has some good information.
Google Chart Tools – powerful, free, simple to use, and it has everything from simple line charts to complex hierarchical tree maps, the chart galley provides a large number of well-designed chart types.
dc.js – a javascript charting library based on D3 with native crossfilter support and allowing highly efficient exploration on large multi-dimensional dataset.
xcharts – a D3-based library for building custom charts and graphs.
nvd3 – allows you to build re-usable charts and chart components without taking away the power that d3.js gives you.
rickshaw – JavaScript toolkit for creating interactive time series graphs.
Cubism.js – a D3 plugin for visualizing time series. Use Cubism to construct better realtime dashboards, pulling data from Graphite, Cube and other sources.
xkcd – allows you to make XKCD-style plots in Javascript using D3. Check outxkcdgraphs to make your own xkcd graphs.
jQuery Sparklines – a jQuery plugin that creates small inline charts directly in the browser.
peity – a simple jQuery plugin that converts an element’s content into a simple CANVAS mini pie, line or bar chart.
BonsaiJS – lightweight graphics library with an intuitive graphics API and an SVG renderer.
Flotr – a Javascript plotting library for Prototype.js. It comes with great features like legend support, negative value support, mouse tracking, selection support, zoom support, event hooks, css styling support, text included into the canvas, rotated labels, color gradients, graph title and subtitle, spreadsheet, CSV data download and much more.
ProtoChart – As the name suggests, ProtoChart allows you to create beautiful charts using Javascript and Prototype. It is open sourced, uses Canvas, and was highly motivated by Flot, Flotr and PlotKit libraries.
Flotr2 – a recent project by HumbleSoftware that lets you make graphs and charts with Canvas and JavaScript. HumbleSoftware also came out with envisionjs which uses flotr2 and allows you to make dynamic HTML5 visualizations.
jQuery-Visualize – HTML5 canvas charts driven by HTML table elements. Another charting plugin for jQuery.
JS Charts – a JavaScript based chart generator that requires little or no coding. The free version has a watermark which can be removed by paying for a license.
PlotKit – a chart and graph plotting Library for Javascript. It has support for HTML Canvas and also SVG via Adobe SVG Viewer and native browser support. PlotKit is a complete rewrite of CanvasGraph.
MilkChart – a compact JavaScript framework for creating graphs based on MooTools. It is simple and easy to understand.
moochart – is another plugin for MooTools and it focuses on drawing bubble diagrams on the canvas tag.
moowheel – a JavaScript connections visualization library based on MooTools.
table2chart – a MooTools plugin that generates charts from accessible data tables.
Canvas 3D Graph – a special type of bar graph that plot numbers in 3D.
TufteGraph – another JavaScript charting library based on jQuery. It has a really compact API and non-core layout is done via CSS.
ArborJS – a graph visualization library using web workers and jQuery.
TimePlot – focused entirely on graphing time-series data, with support for annotating the graph with temporal events.
gRaphael – create stunning charts on your website, based on Raphael graphics library.
ICO – another JavaScript graph library based on Raphael.
Elycharts – a pure javascript charting library, easy to use and completely customizable. It is based on jQuery and Raphaël libraries.
ZingChart – allows you to build advanced charts and visualizations in HTML5, SVG, VML and Flash.
RGraph – produces interactive charts using the HTML5 canvas tag.
Dojo Charting – if you are already using Dojo, then Dojo’s charting library is a great solution for making charts and graphs.
Bluff – Bluff is a JavaScript port of the Gruff graphing library for Ruby. It is designed to support all the features of Gruff with minimal dependencies.
canvasXpress – a javascript library based on the Canvas tag implemented in HTML5.
ccchart – a Simple JavaScript chart that does not depend on libraries such as jQuery.
JIT – JavaScript InfoVis Toolkit provides tools for creating Interactive Data Visualizations for the Web.
JSXGraph – a cross-browser library for interactive geometry, function plotting, charting, and data visualization in a web browser.
Smoothie Charts – a JavaScript Charting Library for Streaming Data.
YUI Charts – YUI module that provides a JavaScript API for visualizing data in a variety of formats leveraging SVG, HTML Canvas and VML to render its graphical elements.
amcharts – JavaScript/HTML5 charts including serial (column, bar, line, area, step line, smoothed line, candlestick and ohlc graphs), pie/donut, radar/polar and xy/scatter/bubble charts.
Emprise JavaScript Charts – pure JavaScript charts with great features and good cross browser support.
JavaScript Diagram Builder – a library of some objects and functions, which can help you to display a chart or graph in an easy way.
jGraph – HTML5 diagramming component with full IE 6-8 and touch device support.
Sencha Touch Charts – it uses HTML5 Canvas and CSS3 to deliver charts to the mobile web browsers.
Style Chart – a free Ajax Visualization Charting Service
If you are looking for more libraries and web services that deal with visualizing data, I recommend checking out Datavisualization.ch.
Have I missed any good JavaScript charting libraries?
Update:
AwesomeChartJS – great looking charts with JavaScript and the canvas element
Sigma.js – an open-source lightweight JavaScript library to make network visualizations using the HTML canvas element.
Graphene – a realtime dashboard & graphing toolkit based on D3 and Backbone.
jQuery ToastChart – a line-graph charting library that is designed to show all types of data using the HTML5 canvas element.
ChartsJS – Easy, object oriented client side graphs for designers and developers.
Cytoscape.js – open-source JavaScript graph library for analysis and visualization.
Ember Timetree – visualize hierarchical timeline data with Ember.js and D3.js.
Simplify.js – tiny high-performance JavaScript 2D/3D polyline simplification library (extracted from Leaflet)
DataMaps – Maps for interactive data visualizations in Javascript (with d3js)
Aristochart – simple and sophisticated static 2D line charts.
Morris.js – time-series line graphs with jQuery and Raphael.js
Grafico – a javascript charting library based on Raphaël and Prototype.js
jQuery orgChart – a small JQuery plugin that generates a hierarchical orginisational chart from a nested unordered list.
TimeChart – powerful and simple to use chart library for creating time based charts in pure HTML5-JavaScript.
JointJS – open source JavaScript library for creating diagrams.
sDashboard – simple & light weight dashboard framework in javascript
jQuery Spidergraph – an interactive HTML5 spider graph module for jQuery.
sheetsee.js – visualize data from a Google spreadsheet.
Chartbuilder – D3.js based front-end charting application that facilitates easy creation of simple beautiful charts
How To Display Hibernate Sql Parameter Values – Log4j
Change the Log level
Modify the Log4j properties file, and change the log level to “debug” or “trace” in “log4j.logger.org.hibernate.type” property.
File : log4j.properties
# Direct log messages to stdout
log4j.appender.stdout=org.apache.log4j.ConsoleAppender
log4j.appender.stdout.Target=System.out
log4j.appender.stdout.layout=org.apache.log4j.PatternLayout
log4j.appender.stdout.layout.ConversionPattern=%d{ABSOLUTE} %5p %c{1}:%L - %m%n

# Root logger option
log4j.rootLogger=INFO, stdout

# Hibernate logging options (INFO only shows startup messages)
log4j.logger.org.hibernate=INFO

# Log JDBC bind parameter runtime arguments
log4j.logger.org.hibernate.type=trace
在 xfire中使用 GZip来 压缩 传输量 - secyaher的日志 - 网易博客
在XFire1.2以后支持SOAP消息的GZip压缩传输,在合适的地方启动GZip压缩可以减少网络传输的数据量,加快速度。
在XFire中启动GZip压缩要用到一个开源的Filter:PJL Compressing Filter。这个Filter的最新版本是1.6.4,自1.5.0开始该工程开始构建于JDK5.0,因此在JDK1.4环境下只能使用1.4.6(这个版本会与高版本同步更新)。[http://sourceforge.net/projects/pjl-comp-filter/]
一、服务端启动GZip:在服务端启动GZip只需将PJL Compressing Filter下的jar包(用到的)导入到web的/WEB-INF/lib目录下。并在web.xml文件中增加如下配置:
|
<filter> <filter-name>CompressingFilter</filter-name> <filter-class> com.planetj.servlet.filter.compression.CompressingFilter </filter-class> <init-param> <param-name>debug</param-name> <param-value>false</param-value> </init-param> <init-param> <param-name>statsEnabled</param-name> <param-value>true</param-value> </init-param> </filter> <filter-mapping> <filter-name>CompressingFilter</filter-name> <url-pattern>/*</url-pattern> </filter-mapping> |
代码清单7-1:服务端加入GZip时web.xml中增加的配置
注:根据web.xml文法定义,这个定义必须位于servlet定义之前。
二、客户端启用GZip:客户端启动GZip只要将客户端的GZip的属性设为true却可。代码如下:
|
String serviceURL = "http://192.168.0.225/ldaxfire/services/LDAService";
// 创建service对象 Service serviceModel = new ObjectServiceFactory().create( ServiceInterface.class, null, "http://test.yicha.cn/adreport", null);
XFireProxyFactory serviceFactory = new XFireProxyFactory();
// 获取服务对象 ServiceInterface service = (ServiceInterface) serviceFactory.create( serviceModel, serviceURL);
// 获取客户端代理 Client client = ((XFireProxy) Proxy.getInvocationHandler(service)) .getClient();
// 启动response压缩 client.setProperty(CommonsHttpMessageSender. GZIP_RESPONSE_ENABLED, Boolean.TRUE);
// 启动request压缩 client.setProperty(CommonsHttpMessageSender. GZIP_RESPONSE_ENABLED,Boolean.TRUE);
// 同时启动response和request压缩 client.setProperty(CommonsHttpMessageSender.GZIP_ENABLED, Boolean.TRUE);
// 忽略超时 client.setProperty(CommonsHttpMessageSender.HTTP_TIMEOUT, "0");
// 调用服务 data = service.serviceMethod(); |
代码清单7-2:客户端调用的修改
注:在同时启用时,不必再分别启用response和request的GZip压缩。
注意,当服务端没有启用GZip,客户端启用请求GZip压缩时,会产生SOAP解析错误,如果服务端启动了GZip压缩功能,客户端是否启用GZip都没有影响。
How to Use SOAP Compression with Apache Axis 1.X
Configuring the Server
The configuration of the client and the server are independent. First, you can set up and test the server. After the server configuration is working you can move on to the client side.
We will use a Servlet filter to decompress the requests and compress the responses. Although a lot of other filters can only compress the response, our free filter can both compress the response and decompress the request. To use the filter for SOAP compression, it has to be added to the Axis Web application containing the Web Services. The filter is packaged into the library 2wayfilter-1.2.jar. Download the library and copy it into the Axis Web application's lib folder.
Now, you can configure the Web application to use the filter. Include the following filter and filter-mapping elements in the Web application's deployment descriptor. The deployment descriptor is in the file web.xml in the folder WEB-INF.
<web-app> ... <filter> <filter-name>2WayFilter</filter-name> <filter-class>com.osmoticweb.gzipfilter.GZIP2WayFilter</filter-class> </filter> <filter-mapping> <filter-name>2WayFilter</filter-name> <url-pattern>/*</url-pattern> </filter-mapping> ... </web-app>
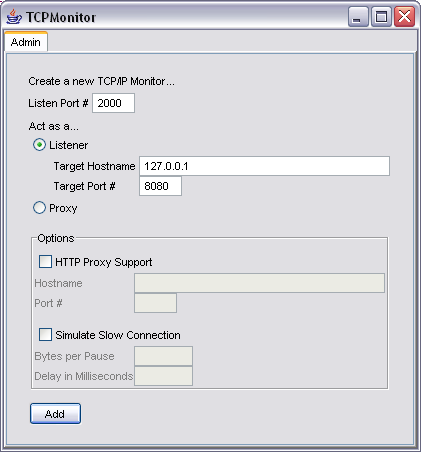
To use the compression feature of the server, the client must be able to compress requests and decompress responses. Apache Axis can be extended with the SOAP compression transport sender which supports compression and decompression of SOAP messages. The extension can be installed without recompiling or modifying Axis itself. Download the library soap-compression-1.2.jar containing the extension and place it into the classpath of the Axis client. The library contains the classcom.osmoticweb.soapcompression.CompressionHTTPSender which can be used instead of the built-in sender. To instruct the Axis client to use the new class a client side deployment descriptor is necessary. Create a file named client-config.wsdd, with the following content, and place it in the directory where the Axis client is started. See the Axis WSDD Reference for more details about the deployment descriptor. The compression sender is compatible with Axis 1.1 or newer. The configuration is different depending on which version of Axis is used. The difference lies in how parameters are declared in the file client-config.wsdd. Use the corresponding configuration for your Axis version. For details see the SOAP compression sender description. After starting tcpmon, a new session can be added to intercept our calls. For the test, we will use listen port 2000. The session will act as a listener for the target host 127.0.0.1 on target port8080. See the screenshot below. Now the test page can be requested from a Web browser that supports HTTP compression, for example, Mozilla, Firefox and Microsoft Internet Explorer.
Configuring the Client
Axis 1.2 Beta or Newer
<?xml version="1.0" encoding="UTF-8"?>
<deployment name="defaultClientConfig"
xmlns="http://xml.apache.org/axis/wsdd/"
xmlns:java="http://xml.apache.org/axis/wsdd/providers/java">
<transport name="http" pivot="java:com.osmoticweb.soapcompression.CompressionHTTPSender"> <parameter name="compressRequest" value="true"/> <parameter name="acceptEncodingHeader" value="true"/> </transport>
<transport name="local" pivot="java:org.apache.axis.transport.local.LocalSender"/>
<transport name="java" pivot="java:org.apache.axis.transport.java.JavaSender"/>
</deployment>
Axis 1.1
<?xml version="1.0" encoding="UTF-8"?>
<deployment name="defaultClientConfig"
xmlns="http://xml.apache.org/axis/wsdd/"
xmlns:java="http://xml.apache.org/axis/wsdd/providers/java">
<transport name="http" pivot="java:com.osmoticweb.soapcompression.CompressionHTTPSender"> <requestFlow> <handler type="java:com.osmoticweb.soapcompression.PutOptionsHandler"> <parameter name="compressRequest" value="true"/> <parameter name="acceptEncodingHeader" value="true"/> </handler> </requestFlow> </transport>
<transport name="local" pivot="java:org.apache.axis.transport.local.LocalSender"/>
<transport name="java" pivot="java:org.apache.axis.transport.java.JavaSender"/>
</deployment>
java org.apache.axis.utils.tcpmon
使用 Spring 2.5 基于注解驱动的 Spring MVC
使用过低版本 Spring MVC 的读者都知道:当创建一个 Controller 时,我们需要直接或间接地实现 org.springframework.web.servlet.mvc.Controller 接口。一般情况下,我们是通过继承 SimpleFormController 或 MultiActionController 来定义自己的 Controller 的。在定义 Controller 后,一个重要的事件是在 Spring MVC 的配置文件中通过 HandlerMapping 定义请求和控制器的映射关系,以便将两者关联起来。
来看一下基于注解的 Controller 是如何定义做到这一点的,下面是使用注解的 BbtForumController:
package com.baobaotao.web;

import com.baobaotao.service.BbtForumService;
import org.springframework.beans.factory.annotation.Autowired;
import org.springframework.stereotype.Controller;
import org.springframework.web.bind.annotation.ModelAttribute;
import org.springframework.web.bind.annotation.RequestMapping;
import org.springframework.web.bind.annotation.RequestMethod;

import java.util.Collection;

@Controller                   //<——①
@RequestMapping("/forum.do")
public class BbtForumController {

    @Autowired
    private BbtForumService bbtForumService;

    @RequestMapping //<——②
    public String listAllBoard() {
        bbtForumService.getAllBoard();
        System.out.println("call listAllBoard method.");
        return "listBoard";
    }
}
|
从上面代码中,我们可以看出 BbtForumController 和一般的类并没有区别,它没有实现任何特殊的接口,因而是一个地道的 POJO。让这个 POJO 与众不同的魔棒就是 Spring MVC 的注解!
在 ① 处使用了两个注解,分别是 @Controller 和 @RequestMapping。在“使用 Spring 2.5 基于注解驱动的 IoC”这篇文章里,笔者曾经指出过 @Controller、@Service 以及 @Repository 和 @Component 注解的作用是等价的:将一个类成为 Spring 容器的 Bean。由于 Spring MVC 的 Controller 必须事先是一个 Bean,所以 @Controller 注解是不可缺少的。
真正让 BbtForumController 具备 Spring MVC Controller 功能的是 @RequestMapping 这个注解。@RequestMapping 可以标注在类定义处,将 Controller 和特定请求关联起来;还可以标注在方法签名处,以便进一步对请求进行分流。在 ① 处,我们让 BbtForumController 关联“/forum.do”的请求,而 ② 处,我们具体地指定 listAllBoard() 方法来处理请求。所以在类声明处标注的 @RequestMapping 相当于让 POJO 实现了 Controller 接口,而在方法定义处的 @RequestMapping 相当于让 POJO 扩展 Spring 预定义的 Controller(如 SimpleFormController 等)。
为了让基于注解的 Spring MVC 真正工作起来,需要在 Spring MVC 对应的 xxx-servlet.xml 配置文件中做一些手脚。在此之前,还是先来看一下 web.xml 的配置吧:
清单 2. web.xml:启用 Spring 容器和 Spring MVC 框架
<?xml version="1.0" encoding="UTF-8"?>
<web-app xmlns="http://java.sun.com/xml/ns/javaee"
    xmlns:xsi="http://www.w3.org/2001/XMLSchema-instance"
    xsi:schemaLocation="http://java.sun.com/xml/ns/javaee
    http://java.sun.com/xml/ns/javaee/web-app_2_5.xsd" version="2.5">
    <display-name>Spring Annotation MVC Sample</display-name>
    <!--  Spring 服务层的配置文件 -->
    <context-param>
        <param-name>contextConfigLocation</param-name>
        <param-value>classpath:applicationContext.xml</param-value>
    </context-param>

    <!--  Spring 容器启动监听器 -->
    <listener>
        <listener-class>org.springframework.web.context.ContextLoaderListener
        </listener-class>
    </listener>

    <!--  Spring MVC 的Servlet,它将加载WEB-INF/annomvc-servlet.xml 的
    配置文件,以启动Spring MVC模块-->
    <servlet>
        <servlet-name>annomvc</servlet-name>
        <servlet-class>org.springframework.web.servlet.DispatcherServlet
        </servlet-class>
        <load-on-startup>2</load-on-startup>
    </servlet>

    <servlet-mapping>
        <servlet-name>annomvc</servlet-name>
        <url-pattern>*.do</url-pattern>
    </servlet-mapping>
</web-app>
|
web.xml 中定义了一个名为 annomvc 的 Spring MVC 模块,按照 Spring MVC 的契约,需要在 WEB-INF/annomvc-servlet.xml 配置文件中定义 Spring MVC 模块的具体配置。annomvc-servlet.xml 的配置内容如下所示:
<?xml version="1.0" encoding="UTF-8"?>
<beans
    xmlns="http://www.springframework.org/schema/beans"
    xmlns:xsi="http://www.w3.org/2001/XMLSchema-instance"
    xmlns:p="http://www.springframework.org/schema/p"
    xmlns:context="http://www.springframework.org/schema/context"
    xsi:schemaLocation="http://www.springframework.org/schema/beans
    http://www.springframework.org/schema/beans/spring-beans-2.5.xsd
    http://www.springframework.org/schema/context
    http://www.springframework.org/schema/context/spring-context-2.5.xsd">

    <!-- ①:对web包中的所有类进行扫描,以完成Bean创建和自动依赖注入的功能 -->
    <context:component-scan base-package="com.baobaotao.web"/>

    <!-- ②:启动Spring MVC的注解功能,完成请求和注解POJO的映射 -->
    <bean class="org.springframework.web.servlet.mvc.annotation.
        AnnotationMethodHandlerAdapter"/>

    <!--  ③:对模型视图名称的解析,即在模型视图名称添加前后缀 -->
    <bean class="org.springframework.web.servlet.view.InternalResourceViewResolver"
        p:prefix="/WEB-INF/jsp/" p:suffix=".jsp"/>
</beans>
|
因为 Spring 所有功能都在 Bean 的基础上演化而来,所以必须事先将 Controller 变成 Bean,这是通过在类中标注 @Controller 并在 annomvc-servlet.xml 中启用组件扫描机制来完成的,如 ① 所示。
在 ② 处,配置了一个 AnnotationMethodHandlerAdapter,它负责根据 Bean 中的 Spring MVC 注解对 Bean 进行加工处理,使这些 Bean 变成控制器并映射特定的 URL 请求。
而 ③ 处的工作是定义模型视图名称的解析规则,这里我们使用了 Spring 2.5 的特殊命名空间,即 p 命名空间,它将原先需要通过 <property> 元素配置的内容转化为 <bean> 属性配置,在一定程度上简化了 <bean> 的配置。
启动 Tomcat,发送 http://localhost/forum.do URL 请求,BbtForumController 的 listAllBoard() 方法将响应这个请求,并转向 WEB-INF/jsp/listBoard.jsp 的视图页面。
在低版本的 Spring MVC 中,我们可以通过继承 MultiActionController 让一个 Controller 处理多个 URL 请求。使用 @RequestMapping 注解后,这个功能更加容易实现了。请看下面的代码:
package com.baobaotao.web;

import com.baobaotao.service.BbtForumService;
import org.springframework.beans.factory.annotation.Autowired;
import org.springframework.stereotype.Controller;
import org.springframework.web.bind.annotation.RequestMapping;

@Controller
public class BbtForumController {
    @Autowired
    private BbtForumService bbtForumService;

    @RequestMapping("/listAllBoard.do") // <—— ①
    public String listAllBoard() {
        bbtForumService.getAllBoard();
        System.out.println("call listAllBoard method.");
        return "listBoard";
    }

    @RequestMapping("/listBoardTopic.do") // <—— ②
    public String listBoardTopic(int topicId) {
        bbtForumService.getBoardTopics(topicId);
        System.out.println("call listBoardTopic method.");
        return "listTopic";
    }
}
|
在这里,我们分别在 ① 和 ② 处为 listAllBoard() 和 listBoardTopic() 方法标注了 @RequestMapping 注解,分别指定这两个方法处理的 URL 请求,这相当于将 BbtForumController 改造为 MultiActionController。这样 /listAllBoard.do 的 URL 请求将由 listAllBoard() 负责处理,而 /listBoardTopic.do?topicId=1 的 URL 请求则由 listBoardTopic() 方法处理。
对于处理多个 URL 请求的 Controller 来说,我们倾向于通过一个 URL 参数指定 Controller 处理方法的名称(如 method=listAllBoard),而非直接通过不同的 URL 指定 Controller 的处理方法。使用 @RequestMapping 注解很容易实现这个常用的需求。来看下面的代码:
清单 4. 一个 Controller 对应一个 URL,由请求参数决定请求处理方法
package com.baobaotao.web;

import com.baobaotao.service.BbtForumService;
import org.springframework.beans.factory.annotation.Autowired;
import org.springframework.stereotype.Controller;
import org.springframework.web.bind.annotation.RequestMapping;

@Controller
@RequestMapping("/bbtForum.do")  // <—— ① 指定控制器对应URL请求
public class BbtForumController {

    @Autowired
    private BbtForumService bbtForumService;

    // <—— ② 如果URL请求中包括"method=listAllBoard"的参数,由本方法进行处理
    @RequestMapping(params = "method=listAllBoard")
    public String listAllBoard() {
        bbtForumService.getAllBoard();
        System.out.println("call listAllBoard method.");
        return "listBoard";
    }

    // <—— ③ 如果URL请求中包括"method=listBoardTopic"的参数,由本方法进行处理
    @RequestMapping(params = "method=listBoardTopic")
    public String listBoardTopic(int topicId) {
        bbtForumService.getBoardTopics(topicId);
        System.out.println("call listBoardTopic method.");
        return "listTopic";
    }
}
|
在类定义处标注的 @RequestMapping 让 BbtForumController 处理所有包含 /bbtForum.do 的 URL 请求,而 BbtForumController 中的请求处理方法对 URL 请求的分流规则在 ② 和 ③ 处定义分流规则按照 URL 的 method 请求参数确定。所以分别在类定义处和方法定义处使用 @RequestMapping 注解,就可以很容易通过 URL 参数指定 Controller 的处理方法了。
@RequestMapping 注解中除了 params 属性外,还有一个常用的属性是 method,它可以让 Controller 方法处理特定 HTTP 请求方式的请求,如让一个方法处理 HTTP GET 请求,而另一个方法处理 HTTP POST 请求,如下所示:
package com.baobaotao.web;

import com.baobaotao.service.BbtForumService;
import org.springframework.beans.factory.annotation.Autowired;
import org.springframework.stereotype.Controller;
import org.springframework.web.bind.annotation.RequestMapping;
import org.springframework.web.bind.annotation.RequestMethod;

@Controller
@RequestMapping("/bbtForum.do")
public class BbtForumController {

    @RequestMapping(params = "method=createTopic",method = RequestMethod.POST)
    public String createTopic(){
        System.out.println("call createTopic method.");
        return "createTopic";
    }
}
|
这样只有当 /bbtForum.do?method=createTopic 请求以 HTTP POST 方式提交时,createTopic() 方法才会进行处理。
Controller 的方法标注了 @RequestMapping 注解后,它就能处理特定的 URL 请求。我们不禁要问:请求处理方法入参是如何绑定 URL 参数的呢?在回答这个问题之前先来看下面的代码:
    @RequestMapping(params = "method=listBoardTopic")
    //<—— ① topicId入参是如何绑定URL请求参数的?
    public String listBoardTopic(int topicId) {
        bbtForumService.getBoardTopics(topicId);
        System.out.println("call listBoardTopic method.");
        return "listTopic";
    }
|
当我们发送 http://localhost//bbtForum.do?method=listBoardTopic&topicId=10 的 URL 请求时,Spring 不但让 listBoardTopic() 方法处理这个请求,而且还将 topicId 请求参数在类型转换后绑定到 listBoardTopic() 方法的 topicId 入参上。而 listBoardTopic() 方法的返回类型是 String,它将被解析为逻辑视图的名称。也就是说 Spring 在如何给处理方法入参自动赋值以及如何将处理方法返回值转化为 ModelAndView 中的过程中存在一套潜在的规则,不熟悉这个规则就不可能很好地开发基于注解的请求处理方法,因此了解这个潜在规则无疑成为理解 Spring MVC 框架基于注解功能的核心问题。
我们不妨从最常见的开始说起:请求处理方法入参的类型可以是 Java 基本数据类型或 String 类型,这时方法入参按参数名匹配的原则绑定到 URL 请求参数,同时还自动完成 String 类型的 URL 请求参数到请求处理方法参数类型的转换。下面给出几个例子:
- listBoardTopic(int topicId):和 topicId URL 请求参数绑定;
- listBoardTopic(int topicId,String boardName):分别和 topicId、boardName URL 请求参数绑定;
特别的,如果入参是基本数据类型(如 int、long、float 等),URL 请求参数中一定要有对应的参数,否则将抛出 TypeMismatchException 异常,提示无法将 null 转换为基本数据类型。
另外,请求处理方法的入参也可以一个 JavaBean,如下面的 User 对象就可以作为一个入参:
package com.baobaotao.web;

public class User {
    private int userId;
    private String userName;
    //省略get/setter方法
    public String toString(){
        return this.userName +","+this.userId;
    }
}
|
下面是将 User 作为 listBoardTopic() 请求处理方法的入参:
    @RequestMapping(params = "method=listBoardTopic")
    public String listBoardTopic(int topicId,User user) {
        bbtForumService.getBoardTopics(topicId);
        System.out.println("topicId:"+topicId);
        System.out.println("user:"+user);
        System.out.println("call listBoardTopic method.");
        return "listTopic";
    }
|
这时,如果我们使用以下的 URL 请求:http://localhost/bbtForum.do?method=listBoardTopic&topicId=1&userId=10&userName=tom
topicId URL 参数将绑定到 topicId 入参上,而 userId 和 userName URL 参数将绑定到 user 对象的 userId 和 userName 属性中。和 URL 请求中不允许没有 topicId 参数不同,虽然 User 的 userId 属性的类型是基本数据类型,但如果 URL 中不存在 userId 参数,Spring 也不会报错,此时 user.userId 值为 0。如果 User 对象拥有一个 dept.deptId 的级联属性,那么它将和 dept.deptId URL 参数绑定。
如果我们想改变这种默认的按名称匹配的策略,比如让 listBoardTopic(int topicId,User user) 中的 topicId 绑定到 id 这个 URL 参数,那么可以通过对入参使用 @RequestParam 注解来达到目的:
package com.baobaotao.web;

import org.springframework.web.bind.annotation.RequestMapping;
import org.springframework.web.bind.annotation.RequestParam;

…

@Controller
@RequestMapping("/bbtForum.do")
public class BbtForumController {

    @RequestMapping(params = "method=listBoardTopic")
    public String listBoardTopic(@RequestParam("id") int topicId,User user) {
        bbtForumService.getBoardTopics(topicId);
        System.out.println("topicId:"+topicId);
        System.out.println("user:"+user);
        System.out.println("call listBoardTopic method.");
        return "listTopic";
    }
…
}
|
这里,对 listBoardTopic() 请求处理方法的 topicId 入参标注了 @RequestParam("id") 注解,所以它将和 id 的 URL 参数绑定。
Spring 2.0 定义了一个 org.springframework.ui.ModelMap 类,它作为通用的模型数据承载对象,传递数据供视图所用。我们可以在请求处理方法中声明一个 ModelMap 类型的入参,Spring 会将本次请求模型对象引用通过该入参传递进来,这样就可以在请求处理方法内部访问模型对象了。来看下面的例子:
清单 9. 使用 ModelMap 访问请示对应的隐含模型对象
@RequestMapping(params = "method=listBoardTopic")
 public String listBoardTopic(@RequestParam("id")int topicId,
 User user,ModelMap model) {
     bbtForumService.getBoardTopics(topicId);
     System.out.println("topicId:" + topicId);
     System.out.println("user:" + user);
     //① 将user对象以currUser为键放入到model中
     model.addAttribute("currUser",user);
     return "listTopic";
 }
|
对于当次请求所对应的模型对象来说,其所有属性都将存放到 request 的属性列表中。象上面的例子,ModelMap 中的 currUser 属性将放到 request 的属性列表中,所以可以在 JSP 视图页面中通过 request.getAttribute(“currUser”) 或者通过 ${currUser} EL 表达式访问模型对象中的 user 对象。从这个角度上看, ModelMap 相当于是一个向 request 属性列表中添加对象的一条管道,借由 ModelMap 对象的支持,我们可以在一个不依赖 Servlet API 的 Controller 中向 request 中添加属性。
在默认情况下,ModelMap 中的属性作用域是 request 级别是,也就是说,当本次请求结束后,ModelMap 中的属性将销毁。如果希望在多个请求中共享 ModelMap 中的属性,必须将其属性转存到 session 中,这样 ModelMap 的属性才可以被跨请求访问。
Spring 允许我们有选择地指定 ModelMap 中的哪些属性需要转存到 session 中,以便下一个请求属对应的 ModelMap 的属性列表中还能访问到这些属性。这一功能是通过类定义处标注 @SessionAttributes 注解来实现的。请看下面的代码:
清单 10. 使模型对象的特定属性具有 Session 范围的作用域
package com.baobaotao.web;

…
import org.springframework.ui.ModelMap;
import org.springframework.web.bind.annotation.SessionAttributes;

@Controller
@RequestMapping("/bbtForum.do")
@SessionAttributes("currUser") //①将ModelMap中属性名为currUser的属性
//放到Session属性列表中,以便这个属性可以跨请求访问
public class BbtForumController {
…
    @RequestMapping(params = "method=listBoardTopic")
    public String listBoardTopic(@RequestParam("id")int topicId, User user,
ModelMap model) {
        bbtForumService.getBoardTopics(topicId);
        System.out.println("topicId:" + topicId);
        System.out.println("user:" + user);
        model.addAttribute("currUser",user); //②向ModelMap中添加一个属性
        return "listTopic";
    }

}
|
我们在 ② 处添加了一个 ModelMap 属性,其属性名为 currUser,而 ① 处通过 @SessionAttributes 注解将 ModelMap 中名为 currUser 的属性放置到 Session 中,所以我们不但可以在 listBoardTopic() 请求所对应的 JSP 视图页面中通过 request.getAttribute(“currUser”) 和 session.getAttribute(“currUser”) 获取 user 对象,还可以在下一个请求所对应的 JSP 视图页面中通过 session.getAttribute(“currUser”) 或 ModelMap#get(“currUser”) 访问到这个属性。
这里我们仅将一个 ModelMap 的属性放入 Session 中,其实 @SessionAttributes 允许指定多个属性。你可以通过字符串数组的方式指定多个属性,如 @SessionAttributes({“attr1”,”attr2”})。此外,@SessionAttributes 还可以通过属性类型指定要 session 化的 ModelMap 属性,如 @SessionAttributes(types = User.class),当然也可以指定多个类,如 @SessionAttributes(types = {User.class,Dept.class}),还可以联合使用属性名和属性类型指定:@SessionAttributes(types = {User.class,Dept.class},value={“attr1”,”attr2”})。
上面讲述了如何往ModelMap中放置属性以及如何使ModelMap中的属性拥有Session域的作用范围。除了在JSP视图页面中通过传统的方法访问ModelMap中的属性外,读者朋友可能会问:是否可以将ModelMap中的属性绑定到请求处理方法的入参中呢?答案是肯定的。Spring为此提供了一个@ModelAttribute的注解,下面是使用@ModelAttribute注解的例子:
清单 11. 使模型对象的特定属性具有 Session 范围的作用域
package com.baobaotao.web;

import com.baobaotao.service.BbtForumService;
import org.springframework.beans.factory.annotation.Autowired;
import org.springframework.stereotype.Controller;
import org.springframework.ui.ModelMap;
import org.springframework.web.bind.annotation.RequestMapping;
import org.springframework.web.bind.annotation.RequestParam;
import org.springframework.web.bind.annotation.SessionAttributes;
import org.springframework.web.bind.annotation.ModelAttribute;

import javax.servlet.http.HttpServletRequest;
import javax.servlet.http.HttpSession;

@Controller
@RequestMapping("/bbtForum.do")
@SessionAttributes("currUser") //①让ModelMap的currUser属性拥有session级作用域
public class BbtForumController {

    @Autowired
private BbtForumService bbtForumService;

    @RequestMapping(params = "method=listBoardTopic")
    public String listBoardTopic(@RequestParam("id")int topicId, User user,
ModelMap model) {
        bbtForumService.getBoardTopics(topicId);
        System.out.println("topicId:" + topicId);
        System.out.println("user:" + user);
        model.addAttribute("currUser",user); //②向ModelMap中添加一个属性
        return "listTopic";
    }


    @RequestMapping(params = "method=listAllBoard")
   //③将ModelMap中的
public String listAllBoard(@ModelAttribute("currUser") User user) {
//currUser属性绑定到user入参中。
        bbtForumService.getAllBoard();
        System.out.println("user:"+user);
        return "listBoard";
    }
}
|
在 ② 处,我们向 ModelMap 中添加一个名为 currUser 的属性,而 ① 外的注解使这个 currUser 属性拥有了 session 级的作用域。所以,我们可以在 ③ 处通过 @ModelAttribute 注解将 ModelMap 中的 currUser 属性绑定以请求处理方法的 user 入参中。
所以当我们先调用以下 URL 请求: http://localhost/bbtForum.do?method=listBoardTopic&id=1&userName=tom&dept.deptId=12
以执行listBoardTopic()请求处理方法,然后再访问以下URL: http://localhost/sample/bbtForum.do?method=listAllBoard
你将可以看到 listAllBoard() 的 user 入参已经成功绑定到 listBoardTopic() 中注册的 session 级的 currUser 属性上了。
我们知道标注了 @RequestMapping 注解的 Controller 方法就成为了请求处理方法,Spring MVC 允许极其灵活的请求处理方法签名方式。对于方法入参来说,它允许多种类型的入参,通过下表进行说明:
| 请求处理方法入参的可选类型 | 说明 |
|---|---|
| Java 基本数据类型和 String | 默认情况下将按名称匹配的方式绑定到 URL 参数上,可以通过 @RequestParam 注解改变默认的绑定规则 |
| request/response/session | 既可以是 Servlet API 的也可以是 Portlet API 对应的对象,Spring 会将它们绑定到 Servlet 和 Portlet 容器的相应对象上 |
| org.springframework.web.context.request.WebRequest | 内部包含了 request 对象 |
| java.util.Locale | 绑定到 request 对应的 Locale 对象上 |
| java.io.InputStream/java.io.Reader | 可以借此访问 request 的内容 |
| java.io.OutputStream / java.io.Writer | 可以借此操作 response 的内容 |
| 任何标注了 @RequestParam 注解的入参 | 被标注 @RequestParam 注解的入参将绑定到特定的 request 参数上。 |
| java.util.Map / org.springframework.ui.ModelMap | 它绑定 Spring MVC 框架中每个请求所创建的潜在的模型对象,它们可以被 Web 视图对象访问(如 JSP) |
| 命令/表单对象(注:一般称绑定使用 HTTP GET 发送的 URL 参数的对象为命令对象,而称绑定使用 HTTP POST 发送的 URL 参数的对象为表单对象) | 它们的属性将以名称匹配的规则绑定到 URL 参数上,同时完成类型的转换。而类型转换的规则可以通过 @InitBinder 注解或通过 HandlerAdapter 的配置进行调整 |
| org.springframework.validation.Errors / org.springframework.validation.BindingResult | 为属性列表中的命令/表单对象的校验结果,注意检验结果参数必须紧跟在命令/表单对象的后面 |
| rg.springframework.web.bind.support.SessionStatus | 可以通过该类型 status 对象显式结束表单的处理,这相当于触发 session 清除其中的通过 @SessionAttributes 定义的属性 |
Spring MVC 框架的易用之处在于,你可以按任意顺序定义请求处理方法的入参(除了 Errors 和 BindingResult 必须紧跟在命令对象/表单参数后面以外),Spring MVC 会根据反射机制自动将对应的对象通过入参传递给请求处理方法。这种机制让开发者完全可以不依赖 Servlet API 开发控制层的程序,当请求处理方法需要特定的对象时,仅仅需要在参数列表中声明入参即可,不需要考虑如何获取这些对象,Spring MVC 框架就象一个大管家一样“不辞辛苦”地为我们准备好了所需的一切。下面演示一下使用 SessionStatus 的例子:
清单 12. 使用 SessionStatus 控制 Session 级别的模型属性
@RequestMapping(method = RequestMethod.POST)
public String processSubmit(@ModelAttribute Owner owner,
BindingResult result, SessionStatus status) {//<——①
    new OwnerValidator().validate(owner, result);
    if (result.hasErrors()) {
        return "ownerForm";
    }
    else {
        this.clinic.storeOwner(owner);
        status.setComplete();//<——②
        return "redirect:owner.do?ownerId=" + owner.getId();
    }
}
|
processSubmit() 方法中的 owner 表单对象将绑定到 ModelMap 的“owner”属性中,result 参数用于存放检验 owner 结果的对象,而 status 用于控制表单处理的状态。在 ② 处,我们通过调用 status.setComplete() 方法,该 Controller 所有放在 session 级别的模型属性数据将从 session 中清空。
在低版本的 Spring MVC 中,请求处理方法的返回值类型都必须是 ModelAndView。而在 Spring 2.5 中,你拥有多种灵活的选择。通过下表进行说明:
| 请求处理方法入参的可选类型 | 说明 | |
|---|---|---|
| void |
此时逻辑视图名由请求处理方法对应的 URL 确定,如以下的方法:
对应的逻辑视图名为“welcome” |
|
| String |
此时逻辑视图名为返回的字符,如以下的方法:
对应的逻辑视图名为“ownerForm” |
|
| org.springframework.ui.ModelMap |
和返回类型为 void 一样,逻辑视图名取决于对应请求的 URL,如下面的例子:
对应的逻辑视图名为“vets”,返回的 ModelMap 将被作为请求对应的模型对象,可以在 JSP 视图页面中访问到。 |
|
| ModelAndView | 当然还可以是传统的 ModelAndView。 |
应该说使用 String 作为请求处理方法的返回值类型是比较通用的方法,这样返回的逻辑视图名不会和请求 URL 绑定,具有很大的灵活性,而模型数据又可以通过 ModelMap 控制。当然直接使用传统的 ModelAndView 也不失为一个好的选择。
Spring MVC 有一套常用的属性编辑器,这包括基本数据类型及其包裹类的属性编辑器、String 属性编辑器、JavaBean 的属性编辑器等。但有时我们还需要向 Spring MVC 框架注册一些自定义的属性编辑器,如特定时间格式的属性编辑器就是其中一例。
Spring MVC 允许向整个 Spring 框架注册属性编辑器,它们对所有 Controller 都有影响。当然 Spring MVC 也允许仅向某个 Controller 注册属性编辑器,对其它的 Controller 没有影响。前者可以通过 AnnotationMethodHandlerAdapter 的配置做到,而后者则可以通过 @InitBinder 注解实现。
下面先看向整个 Spring MVC 框架注册的自定义编辑器:
>bean class="org.springframework.web.servlet.mvc.annotation.
AnnotationMethodHandlerAdapter"<
    >property name="webBindingInitializer"<
        >bean class="com.baobaotao.web.MyBindingInitializer"/<
    >/property<
>/bean<
|
MyBindingInitializer 实现了 WebBindingInitializer 接口,在接口方法中通过 binder 注册多个自定义的属性编辑器,其代码如下所示:
package org.springframework.samples.petclinic.web;

import java.text.SimpleDateFormat;
import java.util.Date;

import org.springframework.beans.factory.annotation.Autowired;
import org.springframework.beans.propertyeditors.CustomDateEditor;
import org.springframework.beans.propertyeditors.StringTrimmerEditor;
import org.springframework.samples.petclinic.Clinic;
import org.springframework.samples.petclinic.PetType;
import org.springframework.web.bind.WebDataBinder;
import org.springframework.web.bind.support.WebBindingInitializer;
import org.springframework.web.context.request.WebRequest;

public class MyBindingInitializer implements WebBindingInitializer {

    public void initBinder(WebDataBinder binder, WebRequest request) {
        SimpleDateFormat dateFormat = new SimpleDateFormat("yyyy-MM-dd");
        dateFormat.setLenient(false);
        binder.registerCustomEditor(Date.class,
            new CustomDateEditor(dateFormat, false));
        binder.registerCustomEditor(String.class, new StringTrimmerEditor(false));
    }
}
|
如果希望某个属性编辑器仅作用于特定的 Controller,可以在 Controller 中定义一个标注 @InitBinder 注解的方法,可以在该方法中向 Controller 了注册若干个属性编辑器,来看下面的代码:
清单 15. 注册 Controller 级的自定义属性编辑器
@Controller
public class MyFormController {

    @InitBinder
    public void initBinder(WebDataBinder binder) {
        SimpleDateFormat dateFormat = new SimpleDateFormat("yyyy-MM-dd");
        dateFormat.setLenient(false);
        binder.registerCustomEditor(Date.class, new CustomDateEditor(dateFormat, false));
    }
    …
}
|
注意被标注 @InitBinder 注解的方法必须拥有一个 WebDataBinder 类型的入参,以便 Spring MVC 框架将注册属性编辑器的 WebDataBinder 对象传递进来。
在编写 Controller 时,常常需要在真正进入请求处理方法前准备一些数据,以便请求处理或视图渲染时使用。在传统的 SimpleFormController 里,是通过复写其 referenceData() 方法来准备引用数据的。在 Spring 2.5 时,可以将任何一个拥有返回值的方法标注上 @ModelAttribute,使其返回值将会进入到模型对象的属性列表中。来看下面的例子:
package com.baobaotao.web;

import com.baobaotao.service.BbtForumService;
import org.springframework.beans.factory.annotation.Autowired;
import org.springframework.stereotype.Controller;
import org.springframework.ui.ModelMap;
import org.springframework.web.bind.annotation.ModelAttribute;
import org.springframework.web.bind.annotation.RequestMapping;
import org.springframework.web.bind.annotation.RequestParam;
import org.springframework.web.bind.annotation.SessionAttributes;

import java.util.ArrayList;
import java.util.List;
import java.util.Set;

@Controller
@RequestMapping("/bbtForum.do")
public class BbtForumController {

    @Autowired
    private BbtForumService bbtForumService;

    @ModelAttribute("items")//<——①向模型对象中添加一个名为items的属性
    public List<String> populateItems() {
        List<String> lists = new ArrayList<String>();
        lists.add("item1");
        lists.add("item2");
        return lists;
    }

    @RequestMapping(params = "method=listAllBoard")
    public String listAllBoard(@ModelAttribute("currUser")User user, ModelMap model) {
        bbtForumService.getAllBoard();
        //<——②在此访问模型中的items属性
        System.out.println("model.items:" + ((List<String>)model.get("items")).size());
        return "listBoard";
    }
}
|
在 ① 处,通过使用 @ModelAttribute 注解,populateItem() 方法将在任何请求处理方法执行前调用,Spring MVC 会将该方法返回值以“items”为名放入到隐含的模型对象属性列表中。
所以在 ② 处,我们就可以通过 ModelMap 入参访问到 items 属性,当执行 listAllBoard() 请求处理方法时,② 处将在控制台打印出“model.items:2”的信息。当然我们也可以在请求的视图中访问到模型对象中的 items 属性。
Spring 2.5 对 Spring MVC 进行了很大增强,现在我们几乎完全可以使用基于注解的 Spring MVC 完全替换掉原来基于接口 Spring MVC 程序。基于注解的 Spring MVC 比之于基于接口的 Spring MVC 拥有以下几点好处:
- 方便请求和控制器的映射;
- 方便请求处理方法入参绑定URL参数;
- Controller 不必继承任何接口,它仅是一个简单的 POJO。
但是基于注解的 Spring MVC 并不完美,还存在优化的空间,因为在某些配置上它比基于 XML 的配置更繁琐。比如对于处理多个请求的 Controller 来说,假设我们使用一个 URL 参数指定调用的处理方法(如 xxx.do?method=listBoardTopic),当使用注解时,每个请求处理方法都必须使用 @RequestMapping() 注解指定对应的 URL 参数(如 @RequestMapping(params = "method=listBoardTopic")),而在 XML 配置中我们仅需要配置一个 ParameterMethodNameResolver 就可以了。
Handle UTF8 file with BOM - Real's Java How-to
From Wikipedia, the byte order mark (BOM) is a Unicode character used to signal the endianness (byte order) of a text file or stream. Its code point is U+FEFF. BOM use is optional, and, if used, should appear at the start of the text stream. Beyond its specific use as a byte-order indicator, the BOM character may also indicate which of the several Unicode representations the text is encoded in.
The common BOMs are :
| Encoding | Representation (hexadecimal) | Representation (decimal) |
| UTF-8 | EF BB BF | 239 187 191 |
| UTF-16 (BE) | FE FF | 254 255 |
| UTF-16 (LE) | FF FE | 255 254 |
| UTF-32 (BE) | 00 00 FE FF | 0 0 254 255 |
| UTF-32 (LE) | FF FE 00 00 | 255 254 0 0 |
UTF8 file are a special case because it is not recommended to add a BOM to them because it can break other tools like Java. In fact, Java assumes the UTF8 don't have a BOM so if the BOM is present it won't be discarded and it will be seen as data.
To create an UTF8 file with a BOM, open the Windows create a simple text file and save it as utf8.txt with the encoding UTF-8.
Now if you examine the file content as binary, you see the BOM at the beginning.

If we read it with Java.
import java.io.*;

public class x {

  public static void main(String args[]) {
    try {
        FileInputStream fis = new FileInputStream("c:/temp/utf8.txt");
        BufferedReader r = new BufferedReader(new InputStreamReader(fis,
                "UTF8"));
        for (String s = ""; (s = r.readLine()) != null;) {
            System.out.println(s);
        }
        r.close();
        System.exit(0);
    }

    catch (Exception e) {
        e.printStackTrace();
        System.exit(1);
    }
  }
}
The output contains a strange character at the beginning because the BOM is not discarded :
?helloworld
This behaviour is documented in the Java bug database, here and here. There will be no fix for now because it will break existing tools like javadoc ou xml parsers.
The Apache IO Commons provides some tools to handle this situation. The BOMInputStream class detects the BOM and, if required, can automatically skip it and return the subsequent byte as the first byte in the stream.
Or you can do it manually. The next example converts an UTF8 file to ANSI. We check the first line for the presence of the BOM and if present, we simply discard it.
import java.io.*;

public class UTF8ToAnsiUtils {

    // FEFF because this is the Unicode char represented by the UTF-8 byte order mark (EF BB BF).
    public static final String UTF8_BOM = "\uFEFF";

    public static void main(String args[]) {
        try {
            if (args.length != 2) {
                System.out
                        .println("Usage : java UTF8ToAnsiUtils utf8file ansifile");
                System.exit(1);
            }

            boolean firstLine = true;
            FileInputStream fis = new FileInputStream(args[0]);
            BufferedReader r = new BufferedReader(new InputStreamReader(fis,
                    "UTF8"));
            FileOutputStream fos = new FileOutputStream(args[1]);
            Writer w = new BufferedWriter(new OutputStreamWriter(fos, "Cp1252"));
            for (String s = ""; (s = r.readLine()) != null;) {
                if (firstLine) {
                    s = UTF8ToAnsiUtils.removeUTF8BOM(s);
                    firstLine = false;
                }
                w.write(s + System.getProperty("line.separator"));
                w.flush();
            }

            w.close();
            r.close();
            System.exit(0);
        }

        catch (Exception e) {
            e.printStackTrace();
            System.exit(1);
        }
    }

    private static String removeUTF8BOM(String s) {
        if (s.startsWith(UTF8_BOM)) {
            s = s.substring(1);
        }
        return s;
    }
}
解析获取Xml Encoding字符集Charset
| /* |
| * Given a URI string, open it, read its contents into a String |
| * and return the String |
| * |
| *@param uri the URI to open |
| *@return the content at the URI or null if any error occurs |
| */ |
| private String getRDFfromURI (String uri) throws getRDFException |
| { |
| /* add something like this code here, to allow reading from a file: |
| (if we really want to allow this!) |
| File ff = new File(uri); |
| in = new FileInputStream(ff); |
| */ |
| URL url = null; |
| try { |
| url = new URL(uri); |
| } catch (MalformedURLException e) { |
| throw new getRDFException("Malformed URI."); |
| } |
| URLConnection con = null; |
| try { |
| con = url.openConnection(); |
| con.setRequestProperty("Accept", "application/rdf+xml"); |
| con.connect(); |
| } catch (Exception e) { |
| throw new getRDFException("Unable to open connection."); |
| } |
| String contentT = con.getContentType(); |
| String HTTPcharset = null; |
| if (contentT != null) { |
| ContentType contentType = null; |
| try { |
| contentType = new ContentType(con.getContentType()); |
| } catch (javax.mail.internet.ParseException e) { |
| throw new getRDFException("Unparsable content type."); |
| } |
| HTTPcharset = contentType.getParameter("charset"); |
| } |
| // need buffer for lookahead for encoding detection |
| BufferedInputStream bis = null; |
| try { |
| bis = new BufferedInputStream(con.getInputStream()); |
| } catch (IOException e) { |
| throw new getRDFException("Cannot open stream."); |
| } |
| bis.mark(200); // mark start so that we can get back to it |
| String s = ""; |
| try { // read start of file as bytes |
| int c; |
| int numRead = 0; |
| while ((c = bis.read()) != -1) { |
| s += (char)c; |
| if (numRead++ >= 195) break; |
| } |
| } catch (IOException e) { |
| throw new getRDFException("IOException while starting reading."); |
| } |
| if (s.equals("")) |
| // Nothing was returned |
| throw new getRDFException("Empty document, ignored."); |
| // A server could return content but not the RDF/XML that |
| // we need. Check the beginning of s and if it looks like |
| // a generic HTML message, return an error. |
| if (s.startsWith("<!DOCTYPE")) |
| throw new getRDFException("Document looks like HTML, ignored."); |
| String APPFcharset = null; // 'charset' according to XML APP. F |
| int ignoreBytes = 0; |
| if (s.startsWith("\u00FE\u00FF")) { |
| APPFcharset = "UTF-16BE"; |
| ignoreBytes = 2; |
| } |
| else if (s.startsWith("\u00FF\u00FE")) { |
| APPFcharset = "UTF-16LE"; |
| ignoreBytes = 2; |
| } |
| else if (s.startsWith("\u00EF\u00BB\u00BF")) { |
| APPFcharset = "UTF-8"; |
| ignoreBytes = 3; |
| } |
| else if (s.startsWith("\u0000<\u0000?")) { |
| APPFcharset = "UTF-16BE"; |
| } |
| else if (s.startsWith("<\u0000?\u0000")) { |
| APPFcharset = "UTF-16LE"; |
| } |
| else if (s.startsWith("<?xml")) { |
| APPFcharset = "iso-8859-1"; //to not loose any bytes |
| } |
| else if (s.startsWith("\u004C\u006F\u00A7\u0094")) { |
| APPFcharset = "CP037"; // EBCDIC |
| } |
| else { |
| APPFcharset = "iso-8859-1"; //to not loose any bytes |
| } |
| // convert start of xml input according to APPFcharset |
| String xmlstart = null; |
| try { |
| // System.err.println("---------------------------"); |
| // System.err.println("ignoreBytes="+ignoreBytes); |
| // System.err.println("s="+s); |
| // System.err.println("APPFcharset="+APPFcharset); |
| // if (APPFcharset!=null){xmlstart = new String(s.substring(ignoreBytes).getBytes("iso-8859-1"), APPFcharset);} |
| // else {xmlstart=new String(s.substring(ignoreBytes).getBytes("iso-8859-1"));APPFcharset = "UTF-8";} |
| xmlstart = new String(s.substring(ignoreBytes).getBytes("iso-8859-1"), APPFcharset); |
| } catch (UnsupportedEncodingException e) { |
| throw new getRDFException("Unsupported encoding '"+APPFcharset+"'."); |
| } |
| RE r; |
| try { |
| r = new RE("<\\?xml[ \\t\\n\\r]+version[ \\t\\n\\r]?=[ \\t\\n\\r]?(['\"])([a-zA-Z0-9_:]|\\.|-)+\\1[ \\t\\n\\r]+encoding[ \\t\\n\\r]?=[ \\t\\n\\r]?(['\"])([A-Za-z]([A-Za-z0-9._]|-)*)\\3"); |
| } catch (RESyntaxException res) { |
| throw new getRDFException("Wrong regular expression syntax."); |
| } |
| // r.setMatchFlags(MATCH_NORMAL | MATCH_SINGLELINE); |
| String XMLcharset = null; |
| if (r.match(xmlstart) && r.getParenStart(0)==0) |
| XMLcharset = r.getParen(4); |
| if (HTTPcharset != null) |
| HTTPcharset = HTTPcharset.toUpperCase(); |
| if (XMLcharset != null) |
| XMLcharset = XMLcharset.toUpperCase(); |
| String finalCharset = null; |
| if (HTTPcharset != null) { |
| if (XMLcharset != null && !HTTPcharset.equals(XMLcharset)) |
| throw new getRDFException("Charset conflict: Content-Type: " |
| + contentT+ ". XML encoding: " + XMLcharset + "."); |
| finalCharset = HTTPcharset; |
| } |
| else if (XMLcharset != null) |
| finalCharset = XMLcharset; |
| if ((finalCharset != null && finalCharset.equals("UTF-16")) || |
| (finalCharset == null && APPFcharset.startsWith("UTF-16"))) |
| if (ignoreBytes == 2) |
| finalCharset = APPFcharset; // use correct endianness |
| else |
| throw new getRDFException("Illegal XML: UTF-16 without BOM."); |
| if (finalCharset == null) |
| finalCharset = "UTF-8"; |
| try { |
| bis.reset(); // move back to start of stream |
| bis.skip(ignoreBytes); // skip BOM |
| } catch (IOException e) { |
| throw new getRDFException("IOException while resetting stream."); |
| } |
| InputStreamReader isr = null; |
| try { |
| isr = new InputStreamReader(bis, finalCharset); |
| } catch (UnsupportedEncodingException e) { |
| throw new getRDFException("Unsupported encoding '"+finalCharset+"'."); |
| } |
| StringBuffer sb=new StringBuffer(""); |
| int bytenum=0; |
| try {// read whole file as characters |
| int c; |
| while ((c = isr.read()) != -1) { |
| sb.append((char)c); |
| bytenum++; |
| } |
| } |
| catch (IOException e){ |
| throw new getRDFException("Undecodable data when reading URI at byte "+bytenum+" using encoding '"+finalCharset+"'."+" Please check encoding and encoding declaration of your document."); |
| } |
| // todo: fix encoding parameter in xml pseudo-PI |
| return sb.toString(); |
| } |