Lucene 4.4 以后近实时NRT检索
Lucene4.4之后,NRTManager 及NRTManagerReopenThread 已经都没有了,如果做近实时搜索的话,就要这么做,
初始化:
Directory directory = new RAMDirectory();
IndexWriterConfig iwc = new IndexWriterConfig(Version.LUCENE_48, new StandardAnalyzer(ver));
IndexWriter indexWriter = new IndexWriter(directory, iwc);
TrackingIndexWriter trackWriter = new TrackingIndexWriter(indexWriter);
searcherManager = new SearcherManager(indexWriter, true, new SearcherFactory());
ControlledRealTimeReopenThread<IndexSearcher> CRTReopenThread =
new ControlledRealTimeReopenThread<IndexSearcher>(trackWriter, searcherManager, 5.0, 0.025) ;
CRTReopenThread.setDaemon(true);
CRTReopenThread.setName("后台刷新服务");
CRTReopenThread.start();
添加文档:
trackWriter.addDocument(doc);
进行搜索:
IndexSearcher searcher = searcherManager.acquire();
......
searcherManager.release(searcher);
分布式搜索ElasticSearch构建集群与简单搜索实例应用 - 苏若年 - 博客园
分布式ElasticSearch集群构建的方法.
Code Samples - Zoie - Confluence
Zoie is a real-time search and indexing system built on Apache Lucene.
Donated by LinkedIn.com on July 19, 2008, and has been deployed in a real-time large-scale consumer website: LinkedIn.com handling millions of searches as well as millions of updates daily.
Configuration
Zoie can be configured via Spring:
Basic Search
This example shows how to set up basic indexing and search
thread 1: (indexing thread)
thread 2: (search thread)
Apache Solr vs ElasticSearch - the Feature Smackdown!
API
| Feature | Solr 4.7.0 | ElasticSearch 1.0 |
|---|---|---|
| Format | XML,CSV,JSON | JSON |
| HTTP REST API |  |
|
Binary API  |
SolrJ |
TransportClient, Thrift (through a plugin) |
| JMX support | |
 ES specific stats are exposed through the REST API ES specific stats are exposed through the REST API |
| Client libraries |
PHP, Ruby, Perl, Scala, Python, .NET, Javascript | PHP, Ruby, Perl, Scala, Python, .NET, Javascript, Erlang, Clojure |
| 3rd-party product integration (open-source) |
Drupal, Magento, Django, ColdFusion, Wordpress, OpenCMS, Plone, Typo3, ez Publish, Symfony2, Riak (via Yokozuna) | Drupal, Django, Symfony2, Wordpress, CouchBase |
| 3rd-party product integration (commercial) |
DataStax Enterprise Search, Cloudera Search, Hortonworks Data Platform, MapR | SearchBlox, Hortonworks Data Platform, MapR |
| Output |
JSON, XML, PHP, Python, Ruby, CSV, Velocity, XSLT, native Java | JSON, XML/HTML (via plugin) |
Indexing
| Feature | Solr 4.7.0 | ElasticSearch 1.0 |
|---|---|---|
| Data Import | DataImportHandler - JDBC, CSV, XML, Tika, URL, Flat File | Rivers modules - ActiveMQ, Amazon SQS, CouchDB, Dropbox, DynamoDB, FileSystem, Git, GitHub, Hazelcast, JDBC, JMS, Kafka, LDAP, MongoDB, neo4j, OAI, RabbitMQ, Redis, RSS, Sofa, Solr, St9, Subversion, Twitter, Wikipedia |
| ID field for updates and deduplication | |
|
| DocValues |
|
|
| Partial Doc Updates |
with stored fields |
with _source field |
| Custom Analyzers and Tokenizers |
|
|
| Per-field analyzer chain |
|
|
| Per-doc/query analyzer chain |
|
|
| Synonyms |
|
Supports Solr and Wordnet synonym format |
| Multiple indexes |
|
|
| Near-Realtime Search/Indexing |
|
|
| Complex documents |
Flat document structure. No native support for nesting documents |
|
| Schemaless |
4.4+ |
|
| Multiple document types per schema |
One set of fields per schema, one schema per core |
|
| Online schema changes |
Schema change requires restart. Workaround possible using MultiCore. |
Only backward-compatible changes. |
| Apache Tika integration |
|
|
| Dynamic fields |
|
|
| Field copying |
|
via multi-fields |
| Hash-based deduplication |
|
|
Searching
| Feature | Solr 4.7.0 | ElasticSearch 1.0 |
|---|---|---|
| Lucene Query parsing |
|
|
| Structured Query DSL |
Need to programmatically create queries if going beyond Lucene query syntax. |
|
| Span queries |
via SOLR-2703 |
|
| Spatial search |
|
|
| Multi-point spatial search |
|
|
| Faceting |
|
The way top N facets work now is by getting the top N from each shard, and merging the results. This can giveincorrect counts when num shards > 1. |
| Advanced Faceting |
|
blog post |
| Pivot Facets |
|
|
| More Like This | |
|
| Boosting by functions |
|
|
| Boosting using scripting languages |
|
|
| Push Queries |
JIRA issue |
Percolation. Distributed percolation supported in 1.0 |
| Field collapsing/Results grouping |
|
possibly 1.0+ link |
| Spellcheck | |
Suggest API |
| Autocomplete | |
Added in 0.90.3 here |
| Query elevation |
|
workaround |
| Joins |
It's not supported in distributed search. See LUCENE-3759. |
via has_children and top_children queries |
| Resultset Scrolling |
New to 4.7.0 |
via scan search type |
| Filter queries |
|
also supports filtering by native scripts |
| Filter execution order |
local params and cache property |
_cache and _cache_key property |
| Alternative QueryParsers |
DisMax, eDisMax |
query_string, dis_max, match, multi_match etc |
| Negative boosting |
but awkward. Involves positively boosting the inverse set of negatively-boosted documents. |
|
| Search across multiple indexes | it can search across multiple compatible collections |
|
| Result highlighting | |
|
| Custom Similarity |
|
|
| Searcher warming on index reload |
|
Warmers API |
Customizability
| Feature | Solr 4.7.0 | ElasticSearch 1.0 |
|---|---|---|
| Pluggable API endpoints |
|
|
| Pluggable search workflow |
via SearchComponents |
|
| Pluggable update workflow |
|
|
| Pluggable Analyzers/Tokenizers | |
|
| Pluggable Field Types | |
|
| Pluggable Function queries | |
|
| Pluggable scoring scripts | |
|
| Pluggable hashing |
|
|
| Pluggable webapps |
|
site plugin |
| Automated plugin installation |
|
Installable from GitHub, maven, sonatype or elasticsearch.org |
Distributed
| Feature | Solr 4.7.0 | ElasticSearch 1.0 |
|---|---|---|
| Self-contained cluster |
Depends on separate ZooKeeper server |
Only ElasticSearch nodes |
| Automatic node discovery | ZooKeeper |
internal Zen Discovery or ZooKeeper |
| Partition tolerance | The partition without a ZooKeeper quorum will stop accepting indexing requests or cluster state changes, while the partition with a quorum continues to function. |
Partitioned clusters can diverge unless discovery.zen.minimum_master_nodes set to at least N/2+1, where N is the size of the cluster. If configured correctly, the partition without a quorum will stop operating, while the other continues to work. See this |
| Automatic failover | If all nodes storing a shard and its replicas fail, client requests will fail, unless requests are made with the shards.tolerant=true parameter, in which case partial results are retuned from the available shards. |
|
| Automatic leader election | |
|
| Shard replication | |
|
| Sharding |
|
|
| Automatic shard rebalancing |
|
it can be machine, rack, availability zone, and/or data center aware. Arbitrary tags can be assigned to nodes and it can be configured to not assign the same shard and its replicates on a node with the same tags. |
| Change # of shards | Shards can be added (when using implicit routing) or split (when using compositeId). Cannot be lowered. Replicas can be increased anytime. |
each index has 5 shards by default. Number of primary shards cannot be changed once the index is created. Replicas can be increased anytime. |
| Relocate shards and replicas |
can be done by creating a shard replicate on the desired node and then removing the shard from the source node |
can move shards and replicas to any node in the cluster on demand |
| Control shard routing |
shards or _route_ parameter |
routing parameter |
| Consistency | Indexing requests are synchronous with replication. A indexing request won't return until all replicas respond. No check for downed replicas. They will catch up when they recover. When new replicas are added, they won't start accepting and responding to requests until they are finished replicating the index. | Replication between nodes is synchronous by default, thus ES is consistent by default, but it can be set to asynchronous on a per document indexing basis. Index writes can be configured to fail is there are not sufficient active shard replicas. The default is quorum, but all or one are also available. |
Misc
| Feature | Solr 4.7.0 | ElasticSearch 1.0 |
|---|---|---|
| Web Admin interface | bundled with Solr |
via site plugins: elasticsearch-head, bigdesk, kopf,elasticsearch-HQ, Hammer |
| Hosting providers | WebSolr, Searchify, Hosted-Solr, IndexDepot, OpenSolr,gotosolr | bonsai.io, Indexisto, qbox.io, IndexDepot |
Thoughts...
As a number of folks point out in the discussion below, feature comparisons are inherently shallow and only go so far. I think they serve a purpose, but shouldn't be taken to be the last word on these 2 fantastic search products.
If you're running a smallish site and need search features without fancy bells-and-whistles, I think you'll be very happy with either Solr or ElasticSearch.
I've found ElasticSearch to be friendlier to teams which are used to REST APIs, JSON etc and don't have a Java background. If you're planning a large installation that requires running distributed search instances, I suspect you're also going to be happier with ElasticSearch.
As Matt Weber points out below, ElasticSearch was built to be distributed from the ground up, not tacked on as an 'afterthought' like it was with Solr. This is totally evident when examining the design and architecture of the 2 products, and also when browsing the source code.
Resources
- My other sites may be of interest if you're new to Lucene, Solr and ElasticSearch:
- The Solr wiki and the ElasticSearch Guide are your friends.
使用Lucene-Spatial实现集成地理位置的全文检索 - haiker - ITeye技术网站
Lucene通过Spatial包提供了对基于地理位置的全文检索的支持,最典型的应用场景就是:“搜索中关村附近1公里内的火锅店,并按远近排序”。使用Lucene-Spatial添加对地理位置的支持,和之前普通文本搜索主要有两点区别:
1. 将坐标信息转化为笛卡尔层,建立索引
- private void indexLocation(Document document, JSONObject jo)
- throws Exception {
- double longitude = jo.getDouble("longitude");
- double latitude = jo.getDouble("latitude");
- document.add(new Field("lat", NumericUtils
- .doubleToPrefixCoded(latitude), Field.Store.YES,
- Field.Index.NOT_ANALYZED));
- document.add(new Field("lng", NumericUtils
- .doubleToPrefixCoded(longitude), Field.Store.YES,
- Field.Index.NOT_ANALYZED));
- for (int tier = startTier; tier <= endTier; tier++) {
- ctp = new CartesianTierPlotter(tier, projector,
- CartesianTierPlotter.DEFALT_FIELD_PREFIX);
- final double boxId = ctp.getTierBoxId(latitude, longitude);
- document.add(new Field(ctp.getTierFieldName(), NumericUtils
- .doubleToPrefixCoded(boxId), Field.Store.YES,
- Field.Index.NOT_ANALYZED_NO_NORMS));
- }
- }
2. 搜索时,指定使用DistanceQueryFilter
- DistanceQueryBuilder dq = new DistanceQueryBuilder(latitude,
- longitude, miles, "lat", "lng",
- CartesianTierPlotter.DEFALT_FIELD_PREFIX, true, startTier,
- endTier);
- DistanceFieldComparatorSource dsort = new DistanceFieldComparatorSource(
- dq.getDistanceFilter());
- Sort sort = new Sort(new SortField("geo_distance", dsort));
下面是基于Lucene3.2.0和JUnit4.8.2的完整代码。
- <dependencies>
- <dependency>
- <groupId>junit</groupId>
- <artifactId>junit</artifactId>
- <version>4.8.2</version>
- <type>jar</type>
- <scope>test</scope>
- </dependency>
- <dependency>
- <groupId>org.apache.lucene</groupId>
- <artifactId>lucene-core</artifactId>
- <version>3.2.0</version>
- <type>jar</type>
- <scope>compile</scope>
- </dependency>
- <dependency>
- <groupId>org.apache.lucene</groupId>
- <artifactId>lucene-spatial</artifactId>
- <version>3.2.0</version>
- <type>jar</type>
- <scope>compile</scope>
- </dependency>
- <dependency>
- <groupId>org.json</groupId>
- <artifactId>json</artifactId>
- <version>20100903</version>
- <type>jar</type>
- <scope>compile</scope>
- </dependency>
- </dependencies>
首先准备测试用的数据:
- {"id":12,"title":"时尚码头美容美发热烫特价","longitude":116.3838183,"latitude":39.9629015}
- {"id":17,"title":"审美个人美容美发套餐","longitude":116.386564,"latitude":39.966102}
- {"id":23,"title":"海底捞吃300送300","longitude":116.38629,"latitude":39.9629573}
- {"id":26,"title":"仅98元!享原价335元李老爹","longitude":116.3846175,"latitude":39.9629125}
- {"id":29,"title":"都美造型烫染美发护理套餐","longitude":116.38629,"latitude":39.9629573}
- {"id":30,"title":"仅售55元!原价80元的老舍茶馆相声下午场","longitude":116.0799914,"latitude":39.9655391}
- {"id":33,"title":"仅售55元!原价80元的新笑声客栈早场","longitude":116.0799914,"latitude":39.9655391}
- {"id":34,"title":"仅售39元(红色礼盒)!原价80元的平谷桃","longitude":116.0799914,"latitude":39.9655391}
- {"id":46,"title":"仅售38元!原价180元地质礼堂白雪公主","longitude":116.0799914,"latitude":39.9655391}
- {"id":49,"title":"仅99元!享原价342.7元自助餐","longitude":116.0799914,"latitude":39.9655391}
- {"id":58,"title":"桑海教育暑期学生报名培训九折优惠券","longitude":116.0799914,"latitude":39.9655391}
- {"id":59,"title":"全国发货:仅29元!贝玲妃超模粉红高光光","longitude":116.0799914,"latitude":39.9655391}
- {"id":65,"title":"海之屿生态水族用品店抵用券","longitude":116.0799914,"latitude":39.9655391}
- {"id":67,"title":"小区东门时尚烫染个人护理美发套餐","longitude":116.3799914,"latitude":39.9655391}
- {"id":74,"title":"《郭德纲相声专辑》CD套装","longitude":116.0799914,"latitude":39.9655391}
根据上面的测试数据,编写测试用例,分别搜索坐标(116.3838183, 39.9629015)3千米以内的“美发”和全部内容,分别得到的结果应该是4条和6条。
- import static org.junit.Assert.assertEquals;
- import static org.junit.Assert.fail;
- import java.util.List;
- import org.junit.Test;
- public class LuceneSpatialTest {
- private static LuceneSpatial spatialSearcher = new LuceneSpatial();
- @Test
- public void testSearch() {
- try {
- long start = System.currentTimeMillis();
- List<String> results = spatialSearcher.search("美发", 116.3838183, 39.9629015, 3.0);
- System.out.println(results.size()
- + "个匹配结果,共耗时 "
- + (System.currentTimeMillis() - start) + "毫秒。\n");
- assertEquals(4, results.size());
- } catch (Exception e) {
- fail("Exception occurs...");
- e.printStackTrace();
- }
- }
- @Test
- public void testSearchWithoutKeyword() {
- try {
- long start = System.currentTimeMillis();
- List<String> results = spatialSearcher.search(null, 116.3838183, 39.9629015, 3.0);
- System.out.println( results.size()
- + "个匹配结果,共耗时 "
- + (System.currentTimeMillis() - start) + "毫秒.\n");
- assertEquals(6, results.size());
- } catch (Exception e) {
- fail("Exception occurs...");
- e.printStackTrace();
- }
- }
- }
下面是LuceneSpatial类,在构造函数中初始化变量和创建索引:
- public class LuceneSpatial {
- private Analyzer analyzer;
- private IndexWriter writer;
- private FSDirectory indexDirectory;
- private IndexSearcher indexSearcher;
- private IndexReader indexReader;
- private String indexPath = "c:/lucene-spatial";
- // Spatial
- private IProjector projector;
- private CartesianTierPlotter ctp;
- public static final double RATE_MILE_TO_KM = 1.609344; //英里和公里的比率
- public static final String LAT_FIELD = "lat";
- public static final String LON_FIELD = "lng";
- private static final double MAX_RANGE = 15.0; // 索引支持的最大范围,单位是千米
- private static final double MIN_RANGE = 3.0; // 索引支持的最小范围,单位是千米
- private int startTier;
- private int endTier;
- public LuceneSpatial() {
- try {
- init();
- } catch (Exception e) {
- e.printStackTrace();
- }
- }
- private void init() throws Exception {
- initializeSpatialOptions();
- analyzer = new StandardAnalyzer(Version.LUCENE_32);
- File path = new File(indexPath);
- boolean isNeedCreateIndex = false;
- if (path.exists() && !path.isDirectory())
- throw new Exception("Specified path is not a directory");
- if (!path.exists()) {
- path.mkdirs();
- isNeedCreateIndex = true;
- }
- indexDirectory = FSDirectory.open(new File(indexPath));
- //建立索引
- if (isNeedCreateIndex) {
- IndexWriterConfig indexWriterConfig = new IndexWriterConfig(
- Version.LUCENE_32, analyzer);
- indexWriterConfig.setOpenMode(OpenMode.CREATE_OR_APPEND);
- writer = new IndexWriter(indexDirectory, indexWriterConfig);
- buildIndex();
- }
- indexReader = IndexReader.open(indexDirectory, true);
- indexSearcher = new IndexSearcher(indexReader);
- }
- @SuppressWarnings("deprecation")
- private void initializeSpatialOptions() {
- projector = new SinusoidalProjector();
- ctp = new CartesianTierPlotter(0, projector,
- CartesianTierPlotter.DEFALT_FIELD_PREFIX);
- startTier = ctp.bestFit(MAX_RANGE / RATE_MILE_TO_KM);
- endTier = ctp.bestFit(MIN_RANGE / RATE_MILE_TO_KM);
- }
- private int mile2Meter(double miles) {
- double dMeter = miles * RATE_MILE_TO_KM * 1000;
- return (int) dMeter;
- }
- private double km2Mile(double km) {
- return km / RATE_MILE_TO_KM;
- }
创建索引的具体实现:
- private void buildIndex() {
- BufferedReader br = null;
- try {
- //逐行添加测试数据到索引中,测试数据文件和源文件在同一个目录下
- br = new BufferedReader(new InputStreamReader(
- LuceneSpatial.class.getResourceAsStream("data")));
- String line = null;
- while ((line = br.readLine()) != null) {
- index(new JSONObject(line));
- }
- writer.commit();
- } catch (Exception e) {
- e.printStackTrace();
- } finally {
- if (br != null) {
- try {
- br.close();
- } catch (IOException e) {
- e.printStackTrace();
- }
- }
- }
- }
- private void index(JSONObject jo) throws Exception {
- Document doc = new Document();
- doc.add(new Field("id", jo.getString("id"), Field.Store.YES,
- Field.Index.ANALYZED));
- doc.add(new Field("title", jo.getString("title"), Field.Store.YES,
- Field.Index.ANALYZED));
- //将位置信息添加到索引中
- indexLocation(doc, jo);
- writer.addDocument(doc);
- }
- private void indexLocation(Document document, JSONObject jo)
- throws Exception {
- double longitude = jo.getDouble("longitude");
- double latitude = jo.getDouble("latitude");
- document.add(new Field("lat", NumericUtils
- .doubleToPrefixCoded(latitude), Field.Store.YES,
- Field.Index.NOT_ANALYZED));
- document.add(new Field("lng", NumericUtils
- .doubleToPrefixCoded(longitude), Field.Store.YES,
- Field.Index.NOT_ANALYZED));
- for (int tier = startTier; tier <= endTier; tier++) {
- ctp = new CartesianTierPlotter(tier, projector,
- CartesianTierPlotter.DEFALT_FIELD_PREFIX);
- final double boxId = ctp.getTierBoxId(latitude, longitude);
- document.add(new Field(ctp.getTierFieldName(), NumericUtils
- .doubleToPrefixCoded(boxId), Field.Store.YES,
- Field.Index.NOT_ANALYZED_NO_NORMS));
- }
- }
搜索的具体实现:
- public List<String> search(String keyword, double longitude,
- double latitude, double range) throws Exception {
- List<String> result = new ArrayList<String>();
- double miles = km2Mile(range);
- DistanceQueryBuilder dq = new DistanceQueryBuilder(latitude,
- longitude, miles, "lat", "lng",
- CartesianTierPlotter.DEFALT_FIELD_PREFIX, true, startTier,
- endTier);
- //按照距离排序
- DistanceFieldComparatorSource dsort = new DistanceFieldComparatorSource(
- dq.getDistanceFilter());
- Sort sort = new Sort(new SortField("geo_distance", dsort));
- Query query = buildQuery(keyword);
- //搜索结果
- TopDocs hits = indexSearcher.search(query, dq.getFilter(),
- Integer.MAX_VALUE, sort);
- //获得各条结果相对应的距离
- Map<Integer, Double> distances = dq.getDistanceFilter()
- .getDistances();
- for (int i = 0; i < hits.totalHits; i++) {
- final int docID = hits.scoreDocs[i].doc;
- final Document doc = indexSearcher.doc(docID);
- final StringBuilder builder = new StringBuilder();
- builder.append("找到了: ")
- .append(doc.get("title"))
- .append(", 距离: ")
- .append(mile2Meter(distances.get(docID)))
- .append("米。");
- System.out.println(builder.toString());
- result.add(builder.toString());
- }
- return result;
- }
- private Query buildQuery(String keyword) throws Exception {
- //如果没有指定关键字,则返回范围内的所有结果
- if (keyword == null || keyword.isEmpty()) {
- return new MatchAllDocsQuery();
- }
- QueryParser parser = new QueryParser(Version.LUCENE_32, "title",
- analyzer);
- parser.setDefaultOperator(Operator.AND);
- return parser.parse(keyword.toString());
- }
执行测试用例,可以得到下面的结果:
- 找到了: 时尚码头美容美发热烫特价, 距离: 0米。
- 找到了: 都美造型烫染美发护理套餐, 距离: 210米。
- 找到了: 审美个人美容美发套餐, 距离: 426米。
- 找到了: 小区东门时尚烫染个人护理美发套餐, 距离: 439米。
- 4个匹配结果,共耗时 119毫秒。
- 找到了: 时尚码头美容美发热烫特价, 距离: 0米。
- 找到了: 仅98元!享原价335元李老爹, 距离: 68米。
- 找到了: 海底捞吃300送300, 距离: 210米。
- 找到了: 都美造型烫染美发护理套餐, 距离: 210米。
- 找到了: 审美个人美容美发套餐, 距离: 426米。
- 找到了: 小区东门时尚烫染个人护理美发套餐, 距离: 439米。
- 6个匹配结果,共耗时 3毫秒.
参考文献:
Lucene-Spatial的原理介绍:http://www.nsshutdown.com/projects/lucene/whitepaper/locallucene.htm
GeoHash:http://en.wikipedia.org/wiki/Geohash
两篇示例(其中大部分代码就来自于这里):
Lucene Spatial Example
使用 Apache Lucene 和 Solr 进行位置感知搜索
zookeeper+dubbo+dubbo管理集群的简要配置[单机] - goliathray的专栏 - 博客频道 - CSDN.NET
考虑到单机部署运行,在此文档中RegisterGroup 是单例的Zookeeper,部署集群模式的registerGroup请参考Zookeeper集群 http://wenku.baidu.com/view/641998d649649b6648d747a7.html
代码下载[不含 app的lib]http://download.csdn.net/detail/goliathray/5048969
需要的工具 eclipse tomcat

ProviderGroup:可以存在多个ProviderGroup,每个Group由多台Node组成,每个Node需要保证以下配置
1. 采用相同的application name
2. 保证provider的连接地址互不相同(在单机上部署多个provider需要保证端口不同)
3. 注册中心地址一致
ConsumerGroup:可以存在多个ConsumerGroup,每个Group由多台Node组成,每个Node需要保证能网络连接到所需业务的Provider并保证以下配置
1. 采用相同的application name
2. 注册中心地址一致
ProviderNode可以作为ConsumerNode调用别的ProviderGroup组的业务,相对的ConsumerNode也可以作为ProviderNode
RegisterGroup:注册中心组作为服务调用的分配者,每个RegisterNode监听除自身以外所有节点是否存活和健康(包括其RegisterGroup),本文档以Zookeeper单例部署为例子说明。
DubboAdmin:管理节点,可选节点,只作为一个管理者和观察者。
部署说明:
1. 在Eclipse中引入DubboConsumerNode1 - 3 和DubboProviderNode1 -3 共6个项目
2. 将DubboAdmin中的文件复制到apache-tomcat\webapps\ROOT下
3. Zookeeper已经做了基础配置,只需在 \zookeeper-3.4.4\bin启动 zkServer.cmd
Zoo.cfg配置说明
#tickTime:这个时间是作为 Zookeeper 服务器之间或客户端与服务器之间维持心跳的时间间隔,也就是每个 tickTime 毫秒时间就会发送一个心跳。
tickTime=2000
#dataDir:Zookeeper 保存数据的目录,默认情况下,Zookeeper 将写数据的日志文件也保存在这个目录里。
dataDir=/tmp/zookeeper
#dataLogDir:日志文件保存的位置(未配置)
dataLogDir=/tmp/zookeeper/log
#clientPort:这个端口就是客户端连接Zookeeper 服务器的端口,Zookeeper 会监听这个端口,接受客户端的访问请求。
clientPort=2181
#initLimit:这个配置项是用来配置 Zookeeper接受客户端(这里所说的客户端不是用户连接 Zookeeper 服务器的客户端,而是 Zookeeper 服务器集群中连接到 Leader 的 Follower 服务器)初始化连接时最长能忍受多少个心跳时间间隔数。
#当已经超过 10 个心跳的时间(也就是tickTime)长度后 Zookeeper 服务器还没有收到客户端的返回信息,那么表明这个客户端连接失败。总的时间长度就是 10*2000=20 秒。
initLimit=10
启动顺序:
这个部署并不严格要求启动的前后顺序,建议启动顺序
1. 启动Zookeeper ,显示

2. 启动Tomcat,若先启动Tomcat则会一直监听Zookeeper服务是否启动,当Zookeeper启动后才会加载完成,启动完成后访问127.0.0.1:8080,以root/root 登陆,显示
3. 启动Provider,在eclipse中找到Provider1-3.java,直接运行main方法,每启动一个节点,显示

同时在提供者列表中会增加一个节点信息
3个Provider全启动后

4. 启动Consumer, 在eclipse中找到Consumer1-3.java,直接运行main方法,每启动一个节点,可以见到console有输出

在Provider的Console中有显示

同时在消费者列表有新增节点信息

3个Consumer全启动后

节点的异常:
ProviderNode异常:当某台ProviderNode宕机后,Register无法再获取此Provider的信息,但是在进行initLimit个心跳连接之前,Register会认为这个Node只是暂时出错,并不会把他剔除出Provider的列表,Consumer的调用会报错(在未配置容错的情况下),某台Consumer可能会显示

但是在经过initLimit次的心跳后,此节点会被剔除出Provider列表,访问恢复


ConsumerNode异常:除非存在P-C-P的循环,不会对此部署产生影响,在经过initLimit次的心跳后,在Consumer列表中被剔除

RegisterNode异常:参考Zookeeper集群异常
异常恢复:对于每个ProviderNode和ConsumerNode,只需要重启动后连接上Register,既可以恢复原有的服务状态。
DubboAdmin管理:
DubboAdmin本身的配置采用的是文件的方式保存配置信息,配置的结果信息会由各个节点保存到临时文件,以保证在重启服务后恢复到原有状态
权重负载均衡:默认采用的是随机权重的负载均衡,对于第一次加载的Provider服务,权重为100,服务的访问率为(节点服务权重/服务重权重)*100%,可以通过增减权重的方式改变节点的访问几率,在对1号节点增加4倍权重后,1号节点的访问概率变为66.7%,可以在3个Provider节点的Console中看到信息的增幅速度明显改变,1号节点的速度远大于其他2个节点。
自定义的负载均衡:可以新增负载均衡的规则,优先于默认的负载均衡,有随机,伦循,按最小并发3种规则,可以细化到方法。

消费者的容错:在Provider端出现异常时,可以默认返回一个容错值,默认为Null,可以自己配置,通过对Provider的Service设置mock类

启动容错后若Provider端出错,返回Null,优先于禁用
可以看到Consumer的Console报错

消费者的禁用:对于ConsumerNode,禁用后则不能访问任何Provider

若设置了容错,则返回NULL

若无容错,则返回调用异常

恢复后显示数据可以正常访问

提供者的禁用:禁止此Provider提供服务,(对下次启动生效),在重启动这个服务后显示

服务无法被访问,在点击启用后服务恢复

向oracle中导入导出 *.csv文件 - Eolande - 博客园
在 Oracle 数据库中,我们通常在不同数据库的表间记录进行复制或迁移时会用以下几种方法:
1. A 表的记录导出为一条条分号隔开的 insert 语句,然后执行插入到 B 表中
2. 建立数据库间的 dblink,然后用 create table B as select * from A@dblink where ...,或 insert into B select * from A@dblink where ...
3. exp A 表,再 imp 到 B 表,exp 时可加查询条件
4. 程序实现 select from A ..,然后 insert into B ...,也要分批提交
5. 再就是本篇要说到的 Sql Loader(sqlldr) 来导入数据,效果比起逐条 insert 来很明显
第 1 种方法在记录多时是个噩梦,需三五百条的分批提交,否则客户端会死掉,而且导入过程很慢。如果要不产生 REDO 来提高 insert into 的性能,就要下面那样做:
2
3 insert /* +APPEND */ into B(c1,c2) values(x,xx);
4 insert /* +APPEND */ into B select * from A@dblink where .....;
5
好啦,前面简述了 Oracle 中数据导入导出的各种方法,我想一定还有更高明的。下面重点讲讲 Oracle 的 Sql Loader (sqlldr) 的用法。
在命令行下执行 Oracle 的 sqlldr 命令,可以看到它的详细参数说明,要着重关注以下几个参数:
userid -- Oracle 的 username/password[@servicename]
control -- 控制文件,可能包含表的数据
-------------------------------------------------------------------------------------------------------
log -- 记录导入时的日志文件,默认为 控制文件(去除扩展名).log
bad -- 坏数据文件,默认为 控制文件(去除扩展名).bad
data -- 数据文件,一般在控制文件中指定。用参数控制文件中不指定数据文件更适于自动操作
errors -- 允许的错误记录数,可以用他来控制一条记录都不能错
rows -- 多少条记录提交一次,默认为 64
skip -- 跳过的行数,比如导出的数据文件前面几行是表头或其他描述
还有更多的 sqlldr 的参数说明请参考:sql loader的用法。
用例子来演示 sqlldr 的使用,有两种使用方法:
1. 只使用一个控制文件,在这个控制文件中包含数据
2. 使用一个控制文件(作为模板) 和一个数据文件
一般为了利于模板和数据的分离,以及程序的不同分工会使用第二种方式,所以先来看这种用法。数据文件可以是 CSV 文件或者以其他分割符分隔的,数据文件可以用 PL/SQL Developer 或者 Toad 导出,也可以用 SQL *Plus 的 spool 格式化产出,或是 UTL_FILE 包生成。另外,用 Toad 还能直接生成包含数据的控制文件。
首先,假定有这么一个表 users,并插入五条记录:
SQL*Loader: Release 9.2.0.1.0 - Production on 星期三 1月 7 22:26:25 2009 Copyright (c) 1982, 2002, Oracle Corporation. All rights reserved. 达到提交点,逻辑记录计数4 1) ROWS 的默认值为 64,你可以根据实际指定更合适的 ROWS 参数来指定每次提交记录数。(体验过在 PL/SQL Developer 中一次执行几条条以上的 insert 语句的情形吗?) 2)常规导入可以通过使用 INSERT语句来导入数据。Direct导入可以跳过数据库的相关逻辑(DIRECT=TRUE),而直接将数据导入到数据文件中,可以提高导入数据的性能。当然,在很多情况下,不能使用此参数(如果主键重复的话会使索引的状态变成UNUSABLE!)。 3) 通过指定 UNRECOVERABLE选项,可以关闭数据库的日志(是否要 alter table table1 nologging 呢?)。这个选项只能和 direct 一起使用。 4) 对于超大数据文件的导入就要用并发操作了,即同时运行多个导入任务. sqlldr userid=/ control=result1.ctl direct=true parallel=true 当加载大量数据时(大约超过10GB),最好抑制日志的产生: spool方法 导出数据时,如果用plsql导,数据的记录如果太大,速度慢的影响就会很明显,我们可以用spool方法。 spool常用的设置 以下是我的例子:第一步是写一个sql的文件,里面是spool的各种配置信息 $ cat test_spool.sql 第二步是写一个脚本,包括有连接的数据库信息等,例子如下: $ cat test_spool.sh 第三步是曾加test_spool.sh的执行权限,并执行test_spool.sh $ chmod +x test_spool.sh $./test_spool.sh 这里只介绍了spool的一种用法,另外还有其他的方法和设置,不过从网上的介绍来看,这个方法是比较好的,另外的方法的的主要区别是在sql语句的写法上,还增加了域分隔符的设置而已,出错概率高一些。 参考:Oracle spool 用法小结http://www.diybl.com/course/7_databases/oracle/oraclejs/2008918/143288.html http://fanzf24.blog.163.com/blog/static/33127648200912411428325/
insert into users values(2,NULL,5,to_date('2008-10-15','YYYY-MM-DD'));
insert into users values(3,'隔叶黄莺',8,to_date('2009-01-02','YYYY-MM-DD'));
insert into users values(4,'Kypfos',NULL,NULL);
insert into users values(5,'不知秋',1,to_date('2008-12-23','YYYY-MM-DD'));
1) 建立数据文件,我们这里用 PL/SQL Developer 导出表 users 的记录为 users_data.csv 文件,内容如下:
"1","1","Unmi","3","2009-1-5 20:34:44"
"2","2","","5","2008-10-15"
"3","3","隔叶黄莺","8","2009-1-2"
"4","4","Kypfos","",""
"5","5","不知秋","1","2008-12-23"

LOAD DATA
INFILE * -- 因为数据同控制文件在一起,所以用 * 表示
append -- 这里用了 append 来操作,在表 users 中附加记录
INTO TABLE users
when LOGIN_TIMES<>'8' -- 还可以用 when 子句选择导入符合条件的记录
Fields terminated by ","
trailing nullcols
(
virtual_column FILLER, --跳过由 PL/SQL Developer 生成的第一列序号
user_id "user_seq.nextval", --这一列直接取序列的下一值,而不用数据中提供的值
user_name "'Hi '||upper(:user_name)",--,还能用SQL函数或运算对数据进行加工处理
login_times terminated by ",", NULLIF(login_times='NULL') --可为列单独指定分隔符
last_login DATE "YYYY-MM-DD HH24:MI:SS" NULLIF (last_login="NULL") -- 当字段为"NULL"时就是 NULL
)
BEGINDATA --数据从这里开始
,USER_ID,USER_NAME,LOGIN_TIMES,LAST_LOGIN
1,1,Unmi,3,2009-1-5 20:34
2,2,Fantasia,5,2008-10-15
3,3,隔叶黄莺,8,2009-1-2
4,4,Kypfos,NULL,NULL
5,5,不知秋,1,2008-12-23
sqlldr dbuser/dbpass@dbservice control=users.ctl
比如,在控制台会显示这样的信息:
C:\>sqlldr dbuser/dbpass@dbservice control=users.ctl
达到提交点,逻辑记录计数5
上面的控制文件包含的内容比较复杂(演示目的),请根据注释理解每个参数的意义。还能由此发掘更多用法。
最后说下有关 SQL *Loader 的性能与并发操作
sqlldr userid=/ control=result2.ctl direct=true parallel=true
sqlldr userid=/ control=result2.ctl direct=true parallel=true
SQL>ALTER TABLE RESULTXT nologging;
这样不产生REDO LOG,可以提高效率。然后在 CONTROL 文件中 load data 上面加一行:unrecoverable, 此选项必须要与DIRECT共同应用。
在并发操作时,ORACLE声称可以达到每小时处理100GB数据的能力!其实,估计能到 1-10G 就算不错了,开始可用结构 相同的文件,但只有少量数据,成功后开始加载大量数据,这样可以避免时间的浪费。
参考:1. Oracle SQL*Loader -- 英文,Sql Loader 的官方使用说明,包含多种类型的 Demo
2. sql loader的用法 -- 列出了 sql loader 的选择参数的中文说明
3. 使用SQL Loader导入大量数据,避免使用SQL频繁写库 -- 一个简单的例子,快带了解 Sql Loader 的用法
4. Oracle SQL Loader的详细语法
5. oracle sql loader全攻略 -- 还算名符其实。并讲了如何用 SQL *Plus 的 spool 或 UTL_FILE 包生成数据文件
6. SQL*Loader Control File Reference -- 英文,控制文件使用参考
7. 学习oracle sql loader 的使用
8. 用sqlloader(sqlldr)装载LOB数据 -- LOB 的内类是一个外部文件,用 sql loader 导入到数据库
9. SQLLDR直接加载几个参数的测试
10.Maximizing SQL*Loader Performance
set colsep' '; //域输出分隔符
set echo off; //显示start启动的脚本中的每个sql命令,缺省为on
set feedback off; //回显本次sql命令处理的记录条数,缺省为on
set heading off; //输出域标题,缺省为on
set pagesize 0; //输出每页行数,缺省为24,为了避免分页,可设定为0。
set termout off; //显示脚本中的命令的执行结果,缺省为on
set trimout on; //去除标准输出每行的拖尾空格,缺省为off
set trimspool on; //去除重定向(spool)输出每行的拖尾空格,缺省为off
set feedback off
set heading off
set termout off
set pagesize 0
set linesize 150
set verify off
set echo off
spool /home/test/test_spool_out_file.sql --spool输出的文件
select field1||'|'||field2 from test_spool;
spool off
/home/oracle_app/bin/sqlplus test_user/test_pass << eof
@/home/test/test_spool.sql
exit;
eof
【log4jdbc】log4jdbc日志框架介绍_梁小坏Leo_新浪博客
配置方法
1.导入log4jdbcjar
JDK1.4 JDK1.5 选择 log4jdbc3-1.2.jar
JDK1.6 JDK1.7 选择 log4jdbc4-1.2.jar
2.导入SLF4J的jar
下载最新SLF4J
http://www.slf4j.org/download.html
下载之后将得到2个jar文件,导入项目classpath
3.修改你的项目的JDBC驱动
Driver Class
oracle.jdbc.driver.OracleDriver
oracle.jdbc.OracleDriver
com.sybase.jdbc2.jdbc.SybDriver
net.sourceforge.jtds.jdbc.Driver
com.microsoft.jdbc.sqlserver.SQLServerDriver
com.microsoft.sqlserver.jdbc.SQLServerDriver
weblogic.jdbc.sqlserver.SQLServerDriver
com.informix.jdbc.IfxDriver
org.apache.derby.jdbc.ClientDriver
org.apache.derby.jdbc.EmbeddedDriver
com.mysql.jdbc.Driver
org.postgresql.Driver
org.hsqldb.jdbcDriver
org.h2.Driver
4.修改JDBC连接URL
比如你的URL为
那么修改为
jdbc:log4jdbc:derby://localhost:1527//db-derby-10.2.2.0-bin/databases/MyDatabase
5.设置日志Logger在log4jdbc里面,新添加了5个Logger。
logger
jdbc.sqlonly
jdbc.sqltiming
jdbc.audit
jdbc.resultset
jdbc.connection
这里给出log4j.xml和log4j.properties的例子
log4j.xml
<?xml version="1.0" encoding="UTF-8" ?>
<!DOCTYPE log4j:configuration SYSTEM "log4j.dtd">
<!-- An example log4j configuration xml file for log4jdbc -->
<!-- Logging levels are:
<!-- DEBUG < INFO < WARN < ERROR < FATAL
<log4j:configuration xmlns:log4j="http://jakarta.apache.org/log4j/">
</log4j:configuration>
log4j.properties
!==============================================================================
! log4j.properties - An example configuration properties file for log4j.
!
! Logging levels are:
! DEBUG < INFO < WARN < ERROR < FATAL
!==============================================================================
! turn on the internal log4j debugging flag so we can see what it is doing
log4j.debug=true
!==============================================================================
! JDBC API layer call logging :
! INFO shows logging, DEBUG also shows where in code the jdbc calls were made,
! setting DEBUG to true might cause minor slow-down in some environments.
! If you experience too much slowness, use INFO instead.
! Log all JDBC calls except for ResultSet calls
log4j.logger.jdbc.audit=INFO,jdbc
log4j.additivity.jdbc.audit=false
! Log only JDBC calls to ResultSet objects
log4j.logger.jdbc.resultset=INFO,jdbc
log4j.additivity.jdbc.resultset=false
! Log only the SQL that is executed.
log4j.logger.jdbc.sqlonly=DEBUG,sql
log4j.additivity.jdbc.sqlonly=false
! Log timing information about the SQL that is executed.
log4j.logger.jdbc.sqltiming=DEBUG,sqltiming
log4j.additivity.jdbc.sqltiming=false
! Log connection open/close events and connection number dump
log4j.logger.jdbc.connection=FATAL,connection
log4j.additivity.jdbc.connection=false
! the appender used for the JDBC API layer call logging above, sql only
log4j.appender.sql=org.apache.log4j.FileAppender
log4j.appender.sql.File=./logs/sql.log
log4j.appender.sql.Append=false
log4j.appender.sql.layout=org.apache.log4j.PatternLayout
log4j.appender.sql.layout.ConversionPattern=-----> %d{yyyy-MM-dd HH:mm:ss.SSS} %m%n%n
! the appender used for the JDBC API layer call logging above, sql timing
log4j.appender.sqltiming=org.apache.log4j.FileAppender
log4j.appender.sqltiming.File=./logs/sqltiming.log
log4j.appender.sqltiming.Append=false
log4j.appender.sqltiming.layout=org.apache.log4j.PatternLayout
log4j.appender.sqltiming.layout.ConversionPattern=-----> %d{yyyy-MM-dd HH:mm:ss.SSS} %m%n%n
! the appender used for the JDBC API layer call logging above
log4j.appender.jdbc=org.apache.log4j.FileAppender
log4j.appender.jdbc.File=./logs/jdbc.log
log4j.appender.jdbc.Append=false
log4j.appender.jdbc.layout=org.apache.log4j.PatternLayout
log4j.appender.jdbc.layout.ConversionPattern=%d{yyyy-MM-dd HH:mm:ss.SSS} %m%n
! the appender used for the JDBC Connection open and close events
log4j.appender.connection=org.apache.log4j.FileAppender
log4j.appender.connection.File=./logs/connection.log
log4j.appender.connection.Append=false
log4j.appender.connection.layout=org.apache.log4j.PatternLayout
log4j.appender.connection.layout.ConversionPattern=%d{yyyy-MM-dd HH:mm:ss.SSS} %m%n
6.更多细节以及设置,请参照主页
参照log4jdbc的文档,在log4jdbc.properties文件中配置参数。\
- log4jdbc.debug.stack.prefix,只显示含调用栈的包名的语句。
- log4jdbc.sqltiming.warn.threshold,执行时间阀值,单位为ms,将Log级别调为Warning,则只会打印执行较慢的语句。
- log4jdbc.dump.sql.select/insert/update/delete, 过滤掉某些类型的语句。
Gottox/socket.io-java-client · GitHub
Socket.IO-Client for Java
socket.io-java-client is an easy to use implementation of socket.io for Java.
It uses Weberknecht as transport backend, but it's easy to write your own transport. See description below. An XHR-Transport is included, too. But it's not functional in its current state.
The API is inspired by java-socket.io.client.
Features:
- transparent reconnecting - The API cares about re-establishing the connection to the server when the transport is interrupted.
- easy to use API - implement an interface, instantiate a class - you're done.
- output buffer - send data while the transport is still connecting. No problem, socket.io-java-client handles that.
- meaningful exceptions - If something goes wrong, SocketIO tries to throw meaningful exceptions with hints for fixing.
Status: Connecting with Websocket is production ready. XHR is in beta.
How to use
Using socket.io-java-client is quite simple. But lets see:
Checkout and compile the project:
git clone git://github.com/Gottox/socket.io-java-client.git
cd socket.io-java-client
ant jar
mv jar/socketio.jar /path/to/your/libs/project
If you're using ant, change your build.xml to include socketio.jar. If you're eclipse, add the jar to your project buildpath.
Afterwards, you'll be able to use this library:
        SocketIO socket = new SocketIO("http://127.0.0.1:3001/");
        socket.connect(new IOCallback() {
            @Override
            public void onMessage(JSONObject json, IOAcknowledge ack) {
                try {
                    System.out.println("Server said:" + json.toString(2));
                } catch (JSONException e) {
                    e.printStackTrace();
                }
            }

            @Override
            public void onMessage(String data, IOAcknowledge ack) {
                System.out.println("Server said: " + data);
            }

            @Override
            public void onError(SocketIOException socketIOException) {
                System.out.println("an Error occured");
                socketIOException.printStackTrace();
            }

            @Override
            public void onDisconnect() {
                System.out.println("Connection terminated.");
            }

            @Override
            public void onConnect() {
                System.out.println("Connection established");
            }

            @Override
            public void on(String event, IOAcknowledge ack, Object... args) {
                System.out.println("Server triggered event '" + event + "'");
            }
        });

        // This line is cached until the connection is establisched.
        socket.send("Hello Server!");
For further informations, read the Javadoc.
Checkout
-
with git
git clone git://github.com/Gottox/socket.io-java-client.git -
with mercurial
hg clone https://bitbucket.org/Gottox/socket.io-java-client
Both repositories are synchronized and up to date.
Building
to build a jar-file:
cd $PATH_TO_SOCKETIO_JAVA ant jar ls jar/socketio.jar You'll find the socket.io-jar in jar/socketio.jar
Bugs
Please report any bugs feature requests to the Github issue tracker
Frameworks
This Library was designed with portability in mind.
- Android is fully supported.
- JRE is fully supported.
- GWT does not work at the moment, but a port would be possible.
- Java ME does not work at the moment, but a port would be possible.
- ... is there anything else out there?
Testing
There comes a JUnit test suite with socket.io-java-client. Currently it's tested with Eclipse.
You need node installed in PATH.
- open the project with eclipse
- open tests/io.socket/AllTests.java
- run it as JUnit4 test.
netty-socketio使用namespace - 烟火_ - 博客园
一、简介
netty-socketio中的namespace可以用于区别在相同连接地址下的不同用户,当两个不同的用户打开同一个页面的时候,可以使用namespace用来标记不同用户。例如我们可以在用户中心页面动态的获取用户的消息数目。这里就可以使用到namespace。因为每个用户的id都是不一样的,我们可以使用id来标识每个用户的namespace。
二、示例
服务器端代码:
package com.test.socket;
import com.corundumstudio.socketio.Configuration;
import com.corundumstudio.socketio.SocketIONamespace;
import com.corundumstudio.socketio.SocketIOServer;
public class SocketServer2 {
public static void main(String[] args) throws InterruptedException {
Configuration config = new Configuration();
config.setHostname("localhost");
config.setPort(9092);
final SocketIOServer server = new SocketIOServer(config);
server.start();
String uid = "1111";
String namespace = String.format("/%s_%s", "msg", uid);//构建命名空间
SocketIONamespace chat1namespace = server.addNamespace(namespace); //设置命名空间

        for (int i = 0; i < 50; i++) {
Thread.sleep(2000);
chat1namespace.getBroadcastOperations().sendEvent("message", 1); //每次发送数字一
        }
Thread.sleep(Integer.MAX_VALUE);
server.stop();
}
}
客户端message.html代码:
 1 <!DOCTYPE html PUBLIC "-//W3C//DTD HTML 4.01 Transitional//EN" "http://www.w3.org/TR/html4/loose.dtd">
 2 <html>
 3 <head>
 4 <meta http-equiv="Content-Type" content="text/html; charset=UTF-8">
 5 <title>Insert title here</title>
 6    <script src="./jquery-1.9.1.js" type="text/javascript"></script>
 7   <script type="text/javascript" src="./socket.io/socket.io.js"></script>
 8
 9     <style>
10         body {
11             padding:20px;
12         }
13         #console {
14             overflow: auto;
15         }
16         .username-msg {color:orange;}
17         .connect-msg {color:green;}
18         .disconnect-msg {color:red;}
19         .send-msg {color:#888}
20     </style>
21
22 </head>
23
24 <body>
25
26     <h1>Netty-socketio Demo Chat</h1>
27
28     <br/>
29
30     <div id="console" class="well">
31     </div>
32     消息总数:<div id="msgnum">0</di>
33 </body>
34
35
36
37 <script type="text/javascript">
38         var socket =  io.connect('http://localhost:9092/msg_1111');
39
40         socket.on('connect', function() {
41             output('<span class="connect-msg">Client has connected to the server!</span>');
42         });
43
44         socket.on('message', function(data) {//收到消息后,将消息总数加一
45             var num = $("#msgnum").html();
46             num = parseInt(num) + data;
47             $("#msgnum").html(num);
48         });
49
50         socket.on('disconnect', function() {
51             output('<span class="disconnect-msg">The client has disconnected!</span>');
52         });
53         function sendDisconnect() {
54             socket.disconnect();
55         }
56
57         function output(message) {
58             var currentTime = "<span class='time'>" +  new Date() + "</span>";
59             var element = $("<div>" + currentTime + " " + message + "</div>");
60             $('#console').prepend(element);
61         }
62
63     </script>
64 </html>
启动服务器,访问该网页,消息总数会每次加1。
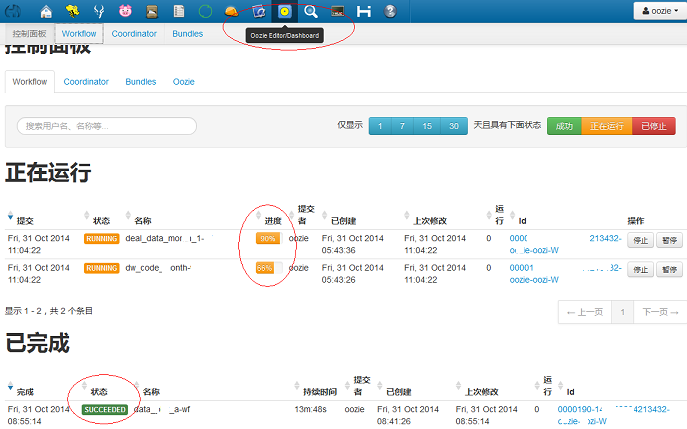
#数据技术选型#即席查询Shib+Presto,集群任务调度HUE+Oozie - 旁观者 - 博客园
使用者是产品/运营/销售运营的数据分析师;要求数据分析师掌握查询SQL查询脚本编写技巧,掌握不同业务的数据存储在不同的数据集市里;不管他们的计算任务是提交给 数据库 还是 Hadoop,计算时间都可能会很长,不可能在线等待;所以,使用者提交了一个计算任务(PIG/SQL/Hive SQL),控制台告知任务已排队,给出大致的计算时间等友情提示, 这些作业的权重较低,使用者和管理员可以查看排队中的计算任务,包括已执行任务的执行时间、运行时长和运行结果;当计算任务有结果后,控制台界面有通知提示,或者发邮件提示,使用者可以在线查看和下载数据。
Presto 简化的架构如下图1所示,客户端将 SQL 查询发送到 Presto 的协调器。协调器会进行语法检查、分析和规划查询计划。调度器将执行的管道组合在一起,将任务分配给那些离数据最近的节点,然后监控执行过程。客户端从输出段中将数据取出,这些数据是从更底层的处理段中依次取出的。
Presto 的运行模型与 Hive 有着本质的区别。Hive 将查询翻译成多阶段的 Map-Reduce 任务,一个接着一个地运行。 每一个任务从磁盘上读取输入数据并且将中间结果输出到磁盘上。然而 Presto 引擎没有使用 Map-Reduce。它使用了一个定制的查询执行引擎和响应操作符来支持SQL的语法。除了改进的调度算法之外,所有的数据处理都是在内存中进行的。不同的处理端通过网络组成处理的流水线。这样会避免不必要的磁盘读写和额外的延迟。这种流水线式的执行模型会在同一时间运行多个数据处理段,一旦数据可用的时候就会将数据从一个处理段传入到下一个处理段。
这样的方式会大大的减少各种查询的端到端响应时间。
同时,Presto 设计了一个简单的数据存储抽象层,来满足在不同数据存储系统之上都可以使用 SQL 进行查询。存储连接器目前支持除 Hive/HDFS 外,还支持 HBase、Scribe 和定制开发的系统。
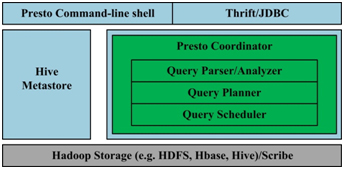
图1. Presto架构
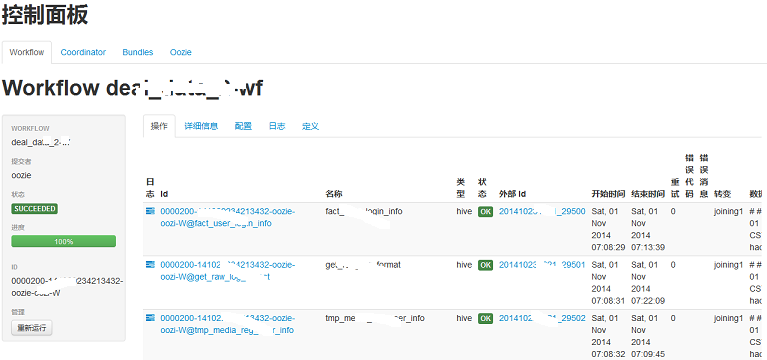
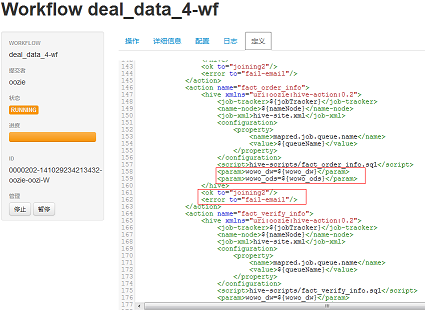
- Oozie允许失败的工作流从任意点重新运行,这对于处理工作流中由于前一个耗时活动而出现瞬态错误的情况非常有用。
- 工作流执行过程可视化。
- 工作流的每一步的日志、错误信息都可以点击查看,并实时滚动,便于排查问题。
Nginx优化教程 实现突破十万并发_源码_站长之家ChinaZ.com
nginx指令中的优化(配置文件)
worker_processes 8;
nginx进程数,建议按照cpu数目来指定,一般为它的倍数。
worker_cpu_affinity 00000001 00000010 00000100 00001000 00010000 00100000 01000000 10000000;
为每个进程分配cpu,上例中将8个进程分配到8个cpu,当然可以写多个,或者将一个进程分配到多个cpu。
worker_rlimit_nofile 102400;
这个指令是指当一个nginx进程打开的最多文件描述符数目,理论值应该是最多打开文件数(ulimit -n)与nginx进程数相除,但是nginx分配请求并不是那么均匀,所以最好与ulimit -n的值保持一致。
use epoll;
使用epoll的I/O模型,这个不用说了吧。
worker_connections 102400;
每个进程允许的最多连接数,理论上每台nginx服务器的最大连接数为worker_processes*worker_connections。
keepalive_timeout 60;
keepalive超时时间。
client_header_buffer_size 4k;
客户端请求头部的缓冲区大小,这个可以根据你的系统分页大小来设置,一般一个请求的头部大小不会超过1k,不过由于一般系统分页都要大于1k,所以这里设置为分页大小。分页大小可以用命令getconf PAGESIZE取得。
open_file_cache max=102400 inactive=20s;
这个将为打开文件指定缓存,默认是没有启用的,max指定缓存数量,建议和打开文件数一致,inactive是指经过多长时间文件没被请求后删除缓存。
open_file_cache_valid 30s;
这个是指多长时间检查一次缓存的有效信息。
open_file_cache_min_uses 1;
open_file_cache指令中的inactive参数时间内文件的最少使用次数,如果超过这个数字,文件描述符一直是在缓存中打开的,如上例,如果有一个文件在inactive时间内一次没被使用,它将被移除。
内核参数的优化
net.ipv4.tcp_max_tw_buckets = 6000
timewait的数量,默认是180000。
net.ipv4.ip_local_port_range = 1024 65000
允许系统打开的端口范围。
net.ipv4.tcp_tw_recycle = 1
启用timewait快速回收。
net.ipv4.tcp_tw_reuse = 1
开启重用。允许将TIME-WAIT sockets重新用于新的TCP连接。
net.ipv4.tcp_syncookies = 1
开启SYN Cookies,当出现SYN等待队列溢出时,启用cookies来处理。
net.core.somaxconn = 262144
web应用中listen函数的backlog默认会给我们内核参数的net.core.somaxconn限制到128,而nginx定义的NGX_LISTEN_BACKLOG默认为511,所以有必要调整这个值。
net.core.netdev_max_backlog = 262144
每个网络接口接收数据包的速率比内核处理这些包的速率快时,允许送到队列的数据包的最大数目。
net.ipv4.tcp_max_orphans = 262144
系统中最多有多少个TCP套接字不被关联到任何一个用户文件句柄上。如果超过这个数字,孤儿连接将即刻被复位并打印出警告信息。这个限制仅仅是为了防止简单的DoS攻击,不能过分依靠它或者人为地减小这个值,更应该增加这个值(如果增加了内存之后)。
net.ipv4.tcp_max_syn_backlog = 262144
记录的那些尚未收到客户端确认信息的连接请求的最大值。对于有128M内存的系统而言,缺省值是1024,小内存的系统则是128。
net.ipv4.tcp_timestamps = 0
时间戳可以避免序列号的卷绕。一个1Gbps的链路肯定会遇到以前用过的序列号。时间戳能够让内核接受这种"异常"的数据包。这里需要将其关掉。
net.ipv4.tcp_synack_retries = 1
为了打开对端的连接,内核需要发送一个SYN并附带一个回应前面一个SYN的ACK。也就是所谓三次握手中的第二次握手。这个设置决定了内核放弃连接之前发送SYN+ACK包的数量。
net.ipv4.tcp_syn_retries = 1
在内核放弃建立连接之前发送SYN包的数量。
net.ipv4.tcp_fin_timeout = 1
如果套接字由本端要求关闭,这个参数决定了它保持在FIN-WAIT-2状态的时间。对端可以出错并永远不关闭连接,甚至意外当机。缺省值是60秒。2.2 内核的通常值是180秒,你可以按这个设置,但要记住的是,即使你的机器是一个轻载的WEB服务器,也有因为大量的死套接字而内存溢出的风险,FIN- WAIT-2的危险性比FIN-WAIT-1要小,因为它最多只能吃掉1.5K内存,但是它们的生存期长些。
net.ipv4.tcp_keepalive_time = 30
当keepalive起用的时候,TCP发送keepalive消息的频度。缺省是2小时。
一个完整的内核优化配置
net.ipv4.ip_forward = 0
net.ipv4.conf.default.rp_filter = 1
net.ipv4.conf.default.accept_source_route = 0
kernel.sysrq = 0
kernel.core_uses_pid = 1
net.ipv4.tcp_syncookies = 1
kernel.msgmnb = 65536
kernel.msgmax = 65536
kernel.shmmax = 68719476736
kernel.shmall = 4294967296
net.ipv4.tcp_max_tw_buckets = 6000
net.ipv4.tcp_sack = 1
net.ipv4.tcp_window_scaling = 1
net.ipv4.tcp_rmem = 4096        87380   4194304
net.ipv4.tcp_wmem = 4096        16384   4194304
net.core.wmem_default = 8388608
net.core.rmem_default = 8388608
net.core.rmem_max = 16777216
net.core.wmem_max = 16777216
net.core.netdev_max_backlog = 262144
net.core.somaxconn = 262144
net.ipv4.tcp_max_orphans = 3276800
net.ipv4.tcp_max_syn_backlog = 262144
net.ipv4.tcp_timestamps = 0
net.ipv4.tcp_synack_retries = 1
net.ipv4.tcp_syn_retries = 1
net.ipv4.tcp_tw_recycle = 1
net.ipv4.tcp_tw_reuse = 1
net.ipv4.tcp_mem = 94500000 915000000 927000000
net.ipv4.tcp_fin_timeout = 1
net.ipv4.tcp_keepalive_time = 30
net.ipv4.ip_local_port_range = 1024    65000
一个简单的nginx优化配置文件
user  www www;
worker_processes 8;
worker_cpu_affinity 00000001 00000010 00000100 00001000 00010000 00100000 01000000;
error_log  /www/log/nginx_error.log  crit;
pid        /usr/local/nginx/nginx.pid;
worker_rlimit_nofile 204800;

events
{
  use epoll;
  worker_connections 204800;
}

http
{
  include       mime.types;
  default_type  application/octet-stream;

  charset  utf-8;

  server_names_hash_bucket_size 128;
  client_header_buffer_size 2k;
  large_client_header_buffers 4 4k;
  client_max_body_size 8m;

  sendfile on;
  tcp_nopush     on;

  keepalive_timeout 60;

  fastcgi_cache_path /usr/local/nginx/fastcgi_cache levels=1:2
                keys_zone=TEST:10m
                inactive=5m;
  fastcgi_connect_timeout 300;
  fastcgi_send_timeout 300;
  fastcgi_read_timeout 300;
  fastcgi_buffer_size 16k;
  fastcgi_buffers 16 16k;
  fastcgi_busy_buffers_size 16k;
  fastcgi_temp_file_write_size 16k;
  fastcgi_cache TEST;
  fastcgi_cache_valid 200 302 1h;
  fastcgi_cache_valid 301 1d;
  fastcgi_cache_valid any 1m;
  fastcgi_cache_min_uses 1;
  fastcgi_cache_use_stale error timeout invalid_header http_500;

  open_file_cache max=204800 inactive=20s;
  open_file_cache_min_uses 1;
  open_file_cache_valid 30s;


  tcp_nodelay on;

  gzip on;
  gzip_min_length  1k;
  gzip_buffers     4 16k;
  gzip_http_version 1.0;
  gzip_comp_level 2;
  gzip_types       text/plain application/x-javascript text/css application/xml;
  gzip_vary on;


  server
  {
    listen       8080;
    server_name  ad.test.com;
    index index.php index.htm;
    root  /www/html/;

    location /status
    {
        stub_status on;
    }

    location ~ .*\.(php|php5)?$
    {
        fastcgi_pass 127.0.0.1:9000;
        fastcgi_index index.php;
        include fcgi.conf;
    }

    location ~ .*\.(gif|jpg|jpeg|png|bmp|swf|js|css)$
    {
      expires      30d;
    }

    log_format  access  '$remote_addr - $remote_user [$time_local] "$request" '
              '$status $body_bytes_sent "$http_referer" '
              '"$http_user_agent" $http_x_forwarded_for';
    access_log  /www/log/access.log  access;
      }
}
关于FastCGI的几个指令
fastcgi_cache_path /usr/local/nginx/fastcgi_cache levels=1:2 keys_zone=TEST:10m inactive=5m;
这个指令为FastCGI缓存指定一个路径,目录结构等级,关键字区域存储时间和非活动删除时间。
fastcgi_connect_timeout 300;
指定连接到后端FastCGI的超时时间。
fastcgi_send_timeout 300;
向FastCGI传送请求的超时时间,这个值是指已经完成两次握手后向FastCGI传送请求的超时时间。
fastcgi_read_timeout 300;
接收FastCGI应答的超时时间,这个值是指已经完成两次握手后接收FastCGI应答的超时时间。
fastcgi_buffer_size 16k;
指定读取FastCGI应答第一部分需要用多大的缓冲区,这里可以设置为fastcgi_buffers指令指定的缓冲区大小,上面的指令指定它将使用1个16k的缓冲区去读取应答的第一部分,即应答头,其实这个应答头一般情况下都很小(不会超过1k),但是你如果在fastcgi_buffers指令中指定了缓冲区的大小,那么它也会分配一个fastcgi_buffers指定的缓冲区大小去缓存。
fastcgi_buffers 16 16k;
指定本地需要用多少和多大的缓冲区来缓冲FastCGI的应答,如上所示,如果一个php脚本所产生的页面大小为256k,则会为其分配16个16k的缓冲区来缓存,如果大于256k,增大于256k的部分会缓存到fastcgi_temp指定的路径中,当然这对服务器负载来说是不明智的方案,因为内存中处理数据速度要快于硬盘,通常这个值的设置应该选择一个你的站点中的php脚本所产生的页面大小的中间值,比如你的站点大部分脚本所产生的页面大小为256k就可以把这个值设置为16 16k,或者4 64k 或者64 4k,但很显然,后两种并不是好的设置方法,因为如果产生的页面只有32k,如果用4 64k它会分配1个64k的缓冲区去缓存,而如果使用64 4k它会分配8个4k的缓冲区去缓存,而如果使用16 16k则它会分配2个16k去缓存页面,这样看起来似乎更加合理。
fastcgi_busy_buffers_size 32k;
这个指令我也不知道是做什么用,只知道默认值是fastcgi_buffers的两倍。
fastcgi_temp_file_write_size 32k;
在写入fastcgi_temp_path时将用多大的数据块,默认值是fastcgi_buffers的两倍。
fastcgi_cache TEST
开启FastCGI缓存并且为其制定一个名称。个人感觉开启缓存非常有用,可以有效降低CPU负载,并且防止502错误。但是这个缓存会引起很多问题,因为它缓存的是动态页面。具体使用还需根据自己的需求。
fastcgi_cache_valid 200 302 1h;
fastcgi_cache_valid 301 1d;
fastcgi_cache_valid any 1m;
为指定的应答代码指定缓存时间,如上例中将200,302应答缓存一小时,301应答缓存1天,其他为1分钟。
fastcgi_cache_min_uses 1;
缓存在fastcgi_cache_path指令inactive参数值时间内的最少使用次数,如上例,如果在5分钟内某文件1次也没有被使用,那么这个文件将被移除。
fastcgi_cache_use_stale error timeout invalid_header http_500;
不知道这个参数的作用,猜想应该是让nginx知道哪些类型的缓存是没用的。 以上为nginx中FastCGI相关参数,另外,FastCGI自身也有一些配置需要进行优化,如果你使用php-fpm来管理FastCGI,可以修改配置文件中的以下值:
<value name="max_children">60</value>
同时处理的并发请求数,即它将开启最多60个子线程来处理并发连接。
<value name="rlimit_files">102400</value>
最多打开文件数。
<value name="max_requests">204800</value>
每个进程在重置之前能够执行的最多请求数。
Anychart图表系列五之事件监听 - 上善若水任方圆 - ITeye技术网站
创建图表事件监听非常简单:首先是通过addEventListener('监听类型',js监听方法)添加事件监听,然后在js监听方法中定义具体监听逻辑。
以钻取操作为例,当用户点击图表某一个point的时候弹出point的name和value,代码如下:
- <script>
- //创建AnyChart
- var chart = new AnyChart();
- //添加钻取操作"pointClick"事件监听
- chart.addEventListener('pointClick', onPointClick);
- //钻取操作事件Event Handler
- function onPointClick(e) {
- // 读取point name
- var name=e.data.Name;
- // 读取point value
- var value=e.data.YValue;
- // 读取自定义属性point attribute
- var attribute = e.data.Attributes['test'];
- //弹出提示框
- alert("point_name="+name+" point_value="+value);
- }
- </script>
我们项目有一个需求是:点击图表某一个point的时候可以穿透打开一个新页面,这个新页面其实就是统计数据的详细列表,那么要做这样的功能就必须在图表中传入一个URL,图表在穿透时获取这个URL并打开详细列表页面。最后我是这样实现这个功能的:给每个point定义id属性,而这个id就是URL,然后在js中创建钻取事件监听,钻取时取id值再进行跳转。
- <!--AnyChart配置-->
- <point id="http://xxx/xxx.do?method=xx?id=xx" name="" value="">
- <script>
- //创建AnyChart
- var chart = new AnyChart();
- //添加钻取操作"pointClick"事件监听
- chart.addEventListener('pointClick', onPointClick);
- //钻取操作事件Event Handler
- function onPointClick(e) {
- //读取point id
- var url=e.data.id;
- //创建弹出框并访问指定地址
- openDialog(url);
- }
- </script>
当然有一点细节需要注意:如果id是通过后台代码拼装的,最好进行一次字符转换,否则很可能会出现XML解析错误,以java代码为例:
- String url = "http://xxxx";
- url = StringEscapeUtils.escapeHtml(url);
AnyChart支持图表“钻取”功能,除此之外还提供了鼠标移入、移出、图表创建、渲染中、渲染结束等等事件的监听,开发可以根据不同事件点去做一些特殊操作。
一个图可以监听多个不同的事件,要想监听多个,则只需要执行多次addEventListener即可。
- function init() {
- // Create new chart
- var chart = new AnyChart();
- // Add event handlers for all point events
- chart.addEventListener('pointClick', onPointClick);
- chart.addEventListener('pointSelect', onPointSelect);
- chart.addEventListener('pointMouseOver', onPointMouseOver);
- chart.addEventListener('pointMouseOut', onPointMouseOut);
- // Set data XML File
- chart.setXMLFile('./data.xml');
- //Output chart to "chartContainer" div
- chart.write('chartContainer');
- }
更多的事件监听在这就不做赘述,大家可以访问AnyChart帮助文档学习,里面说得非常详细
使用HBase EndPoint(coprocessor)进行计算 « 搜索技术博客-淘宝
如果要统对hbase中的数据,进行某种统计,比如统计某个字段最大值,统计满足某种条件的记录数,统计各种记录特点,并按照记录特点分类(类似于sql的group by)~
常规的做法就是把hbase中整个表的数据scan出来,或者稍微环保一点,加一个filter,进行一些初步的过滤(对于rowcounter来说,就加了FirstKeyOnlyFilter),但是这么做来说还是会有很大的副作用,比如占用大量的网络带宽(当标级别到达千万级别,亿级别之后)尤为明显,RPC的量也是不容小觑的。
理想的方式应该是怎样?
拿row counter这个简单例子来说,我要统计总行数,如果每个region 告诉我他又多少行,然后把结果告诉我,我再将他们的结果汇总一下,不就行了么?
现在的问题是hbase没有提供这种接口,来统计每个region的行数,那是否我们可以自己来实现一个呢?
没错,正如本文标题所说,我们可以自己来实现一个Endpoint,然后让hbase加载起来,然后我们远程调用即可。
什么是Endpoint?
先弄清楚什么是hbase coprocessor
hbase有两种coprocessor,一种是Observer(观察者),类似于关系数据库的trigger(触发器),另外一种就是EndPoint,类似于关系数据库的存储过程。
观察者这里就多做介绍了,这里介绍Endpoint。
EndPoint是动态RPC插件的接口,它的实现代码被部署在服务器端(regionServer),从而能够通过HBase RPC调用。客户端类库提供了非常方便的方法来调用这些动态接口,它们可以在任意时候调用一个EndPoint,它们的实现代码会被目标region远程执行,结果会返回到终端。用户可以结合使用这些强大的插件接口,为HBase添加全新的特性。
怎么实现一个EndPoint
1. 定义一个新的protocol接口,必须继承CoprocessorProtocol.
2. 实现终端接口,继承抽象类BaseEndpointCoprocessor,改实现代码需要部署到
3. 在客户端,终端可以被两个新的HBase Client API调用 。单个region:HTableInterface.coprocessorProxy(Class<T> protocol, byte[] row) 。rigons区域:HTableInterface.coprocessorExec(Class<T> protocol, byte[] startKey, byte[] endKey, Batch.Call<T,R> callable),这里的region是通过一个row来标示的,就是说,改row落到那个region,RPC就发给哪个region,对于start-end的,[start,end)范围内的region都会受到RPC调用。
如图
|
1
2
3
|
public interface CounterProtocol extends CoprocessorProtocol { public long count(byte[] start, byte[] end) throws IOException;} |
|
1
2
3
4
5
6
7
8
9
10
11
12
13
14
15
16
17
18
19
20
21
22
23
24
25
26
27
28
29
30
31
|
public class CounterEndPoint extends BaseEndpointCoprocessor implements CounterProtocol { @Override public long count(byte[] start, byte []end) throws IOException { // aggregate at each region Scan scan = new Scan(); long numRow = 0; InternalScanner scanner = ((RegionCoprocessorEnvironment) getEnvironment()).getRegion() .getScanner(scan); try { List<KeyValue> curVals = new ArrayList<KeyValue>(); boolean hasMore = false; do { curVals.clear(); hasMore = scanner.next(curVals); if (Bytes.compareTo(curVals.get(0).getRow(), start)<0) { continue; } if (Bytes.compareTo(curVals.get(0).getRow(), end)>= 0) { break; } numRow++; } while (hasMore); } finally { scanner.close(); } return numRow; }} |
|
1
2
3
4
5
6
7
8
9
10
11
12
13
14
15
16
17
18
19
20
21
22
23
24
25
26
|
public class CounterEndPointDemo { public static void main(String[] args) throws IOException, Throwable { final String startRow = args[0]; final String endRow = args[1]; @SuppressWarnings("resource") HTableInterface table = new HTable(HBaseConfiguration.create(), "tc"); Map<byte[], Long> results; // scan: for all regions results = table.coprocessorExec(CounterProtocol.class, startRow.getBytes(), endRow.getBytes(), new Batch.Call<CounterProtocol, Long>() { public Long call(CounterProtocol instance) throws IOException { return instance.count(startRow.getBytes(), endRow.getBytes()); } }); long total = 0; for (Map.Entry<byte[], Long> e : results.entrySet()) { System.out.println(e.getValue()); total += e.getValue(); } System.out.println("total:" + total); }} |
整个程序的框架其实又是另外一个mapreduce,只是运行在region server上面,reduce运行在客户端,其中map计算量较大,reduce计算量很小!
另外需要提醒的是:
protocol的返回类型,可以是基本类型。
如果是一个自定义的类型需要实现org.apache.hadoop.io.Writable接口。
关于详细的支持类型,请参考代码hbase源码:org.apache.hadoop.hbase.io.HbaseObjectWritable
怎么部署?
1. 通过hbase-site.xml增加
|
1
2
3
4
|
<property> <name>hbase.coprocessor.region.classes</name> <value>xxxx.CounterEndPoint </value></property> |
- 如果要配置多个,就用逗号(,)分割。
- 包含此类的jar必须位于hbase的classpath
- 这种coprocessor是作用于所有的表,如果你只想作用于部分表,请使用下面一种方式。
2. 通过shell方式
增加:
|
1
2
3
4
5
6
|
hbase(main):005:0> alter 't1', METHOD => 'table_att',Updating all regions with the new schema...1/1 regions updated.Done.0 row(s) in 1.0730 seconds |
coprocessor格式为:
[FilePath]|ClassName|Priority|arguments
arguments: k=v[,k=v]+
- 其中FilePath是hdfs路径,例如/tmp/zhenhe/cp/zhenhe-1.0.jar
- ClassNameEndPoint实现类的全名
- Priority为,整数,框架会根据这个数据决定多个cp的执行顺序
- Arguments,传给cp的参数
- 如果hbase的classpath包含改类,FilePath可以留空
卸载:
- 先describe “tableName‘,查看你要卸载的cp的编号
- 然后alter 't1', METHOD => 'table_att_unset', NAME=> 'coprocessor$3',coprocessor$3可变。
应用场景
这是一个最简单的例子,另外还有很多统计场景,可以用在这种方式实现,有如下好处:
- 节省网络带宽
- 减少RPC调用(scan的调用随着CacheSzie的变小而线性增加),减轻hbase压力
- 可以提高统计效率,那我之前写过的一个groupby类型的例子来说,大约可以提高50%以上的统计速度。
其他应用场景?
- 一个保存着用户信息的表,可以统计每个用户信息(counter job)
- 统计最大值,最小值,平均值,参考:https://issues.apache.org/jira/browse/HBASE-1512
- 批量删除记录,批量删除某个时间戳的记录
参考:
1. http://blogs.apache.org/hbase/entry/coprocessor_introduction
2. https://issues.apache.org/jira/browse/HBASE-1512
hbase用coprocessor实现二级索引 | 邓的博客
HBase在0.92之后引入了coprocessors,提供了一系列的钩子,让我们能够轻易实现访问控制和二级索引的特性。下面简单介绍下两种coprocessors,第一种是Observers,它实际类似于触发器,第二种是Endpoint,它类似与存储过程。由于这里只用到了Observers,所以只介绍Observers,想要更详细的介绍请查阅(https://blogs.apache.org/hbase/entry/coprocessor_introduction)。observers分为三种:
RegionObserver:提供数据操作事件钩子;
WALObserver:提供WAL(write ahead log)相关操作事件钩子;
MasterObserver:提供DDL操作事件钩子。
相关接口请参阅hbase api。
下面给出一个例子,该例子使用RegionObserver实现在写主表之前将索引数据先写到另外一个表:
1 |
package com.dengchuanhua.testhbase; |
2 |
3 |
import java.io.IOException; |
4 |
import java.util.Iterator; |
5 |
import java.util.List; |
6 |
7 |
import org.apache.hadoop.conf.Configuration; |
8 |
import org.apache.hadoop.hbase.KeyValue; |
9 |
import org.apache.hadoop.hbase.client.HTable; |
10 |
import org.apache.hadoop.hbase.client.Put; |
11 |
import org.apache.hadoop.hbase.coprocessor.BaseRegionObserver; |
12 |
import org.apache.hadoop.hbase.coprocessor.ObserverContext; |
13 |
import org.apache.hadoop.hbase.coprocessor.RegionCoprocessorEnvironment; |
14 |
import org.apache.hadoop.hbase.regionserver.wal.WALEdit; |
15 |
16 |
public class TestCoprocessor extends BaseRegionObserver { |
17 |
18 |
@Override |
19 |
public void prePut(final ObserverContext<RegionCoprocessorEnvironment> e, |
20 |
final Put put, final WALEdit edit, final boolean writeToWAL) |
21 |
throws IOException { |
22 |
//set configuration |
23 |
Configuration conf = new Configuration(); |
24 |
//need conf.set... |
25 |
26 |
HTable table = new HTable(conf, "indexTableName"); |
27 |
List<KeyValue> kv = put.get("familyName".getBytes(), "columnName".getBytes()); |
28 |
Iterator<KeyValue> kvItor = kv.iterator(); |
29 |
while (kvItor.hasNext()) { |
30 |
KeyValue tmp = kvItor.next(); |
31 |
Put indexPut = new Put(tmp.getValue()); |
32 |
indexPut.add("familyName".getBytes(), "columnName".getBytes(), tmp.getRow()); |
33 |
table.put(indexPut); |
34 |
} |
35 |
table.close(); |
36 |
} |
37 |
38 |
} |
写完后要加载到table里面去,先把该文件打包成test.jar并上传到hdfs的/demo路径下,然后操作如下:
1. disable ‘testTable’
2. alter ‘testTable’, METHOD=>’table_att’,’coprocessor’=>’hdfs:///demo/test.jar|com.dengchuanhua.testhbase.TestCoprocessor|1001′
3. enable ‘testTable’
然后往testTable里面插数据就会自动往indexTableName写数据了。
总结:本文主要介绍了一个用coprocessor实现二级索引的例子。
[HBase] Hbase Coprocessors - 芒果先生Mango的专栏 - 博客频道 - CSDN.NET
本文是笔者学习过程中的简单笔记,日后会逐渐增加内容,主要参考资料是《Hbase The Definitive Guide》。
我们可以通过Filter来减少从Server到Client在网络上传输的数据总量,以提升效率。通过HBase的Coprocessor特性,我们甚至可以将计算(computation)移动到数据所在的节点。
Introduction to Coprocessors
coprocessor使你能够直接在每个region server上执行任意的代码。更精确地说,它提供一些通过事件触发的功能,以region为基础执行code;这很像关系型数据库系统中的procedures(存储过程)。
在使用coprocessor时,你需要基于特定的interface创建专门的类,以jar包的形式提供给region server (如:可以将jar包放到$HBASE_HOME/lib/目录下)。这些coprocessor类可以通过配置文件静态加载,也可以在程序代码中动态加载。
corpocessor 框架提供了两种coprocessor基类:
1.Observer
这种coprocessor跟触发器相像:当特定的时间发生时,回调函数就会执行。
RegionObserver
处理数据操纵事件(data manipulationevents),这种coprocessor是和表的region紧密相连的。可以看作DML Coprocessor
MasterObserver
处理数据管理事件,是cluster范围的coprocessor。可以看做DDL Coprocessor
WALObserver
处理 write-ahead log processing 事件
2.Endpoint
The Coprocessor Class
所有的coprocessor类必须实现org.apache.hadoop.hbase.Coprocessor接口。
1.属性
PRIORITY_HIGHEST,PRIORITY_SYSTEM,PRIORITY_USER,PRIORITY_LOWEST四个静态常量表示coprocessor的优先级.值越低优先级越高。
2.方法
start(env) stop(env) :这两个方法在coprocessor开始及退役的时候被调用(these two methods are called when the coprocessor class is started,and eventually when it is decommissioned)
evn参数用来保存coprocessor整个生命周期的状态。
- package org.apache.hadoop.hbase;
- import java.io.IOException;
- /**
- * Coprocess interface.
- */
- public interface Coprocessor {
- static final int VERSION = 1;
- /** Highest installation priority */
- static final int PRIORITY_HIGHEST = 0;
- /** High (system) installation priority */
- static final int PRIORITY_SYSTEM = Integer.MAX_VALUE / 4;
- /** Default installation priority for user coprocessors */
- static final int PRIORITY_USER = Integer.MAX_VALUE / 2;
- /** Lowest installation priority */
- static final int PRIORITY_LOWEST = Integer.MAX_VALUE;
- /**
- * Lifecycle state of a given coprocessor instance.
- */
- public enum State {
- UNINSTALLED,
- INSTALLED,
- STARTING,
- ACTIVE,
- STOPPING,
- STOPPED
- }
- // Interface
- void start(CoprocessorEnvironment env) throws IOException;
- void stop(CoprocessorEnvironment env) throws IOException;
- }
Coprocessor Loading 加载coprocessor
静态加载和动态加载。
静态加载:在hbase-site.xml中做类似下面的配置
- <property>
- <name>hbase.coprocessor.region.classes</name>
- <value>coprocessor.RegionObserverExample,coprocessor.AnotherCoprocessor</value>
- </property>
- <property>
- <name>hbase.coprocessor.master.classes</name>
- <value>coprocessor.MasterObserverExample</value>
- </property>
- <property>
- <name>hbase.coprocessor.wal.classes</name>
- <value>coprocessor.WALObserverExample,bar.foo.MyWALObserver</value>
- </property>
动态加载:通过table descriptor提供的接口实现;看下面的例子,创建表testtable,动态加载RegionObserverExample到该表的region
- public class LoadWithTableDescriptorExample {
- public static void main(String[] args) throws IOException
- {
- Configuration conf = HBaseConfiguration.create();
- FileSystem fs = FileSystem.get(conf);
- //coprocessor所在的jar包的存放路径
- Path path = new Path(fs.getUri() + Path.SEPARATOR +"test/coprocessor/"+
- "test.jar");
- //HTableDescriptor
- HTableDescriptor htd = new HTableDescriptor("testtable");
- //addFamily
- htd.addFamily(new HColumnDescriptor("colfam1"));
- //
- //设置要加载的corpocessor
- htd.setValue("COPROCESSOR$1", path.toString() +
- "|" + RegionObserverExample.class.getCanonicalName() +
- "|" + Coprocessor.PRIORITY_USER);
- //
- HBaseAdmin admin = new HBaseAdmin(conf);
- //创建表"testtable"
- admin.createTable(htd);
- System.out.println("end");
- }
- }
下面是RegionObserverExample类的实现, 编译通过后,将该类打包成test.jar,并上传到hdfs://master:9000/test/coprocessor目录下
- package coprocessor;
- import java.io.IOException;
- import java.sql.Date;
- import java.util.List;
- import org.apache.commons.net.ntp.TimeStamp;
- import org.apache.hadoop.hbase.KeyValue;
- import org.apache.hadoop.hbase.client.Get;
- import org.apache.hadoop.hbase.coprocessor.BaseRegionObserver;
- import org.apache.hadoop.hbase.coprocessor.ObserverContext;
- import org.apache.hadoop.hbase.coprocessor.RegionCoprocessorEnvironment;
- import org.apache.hadoop.hbase.util.Bytes;
- public class RegionObserverExample extends
- BaseRegionObserver {
- public static final byte[] FIXED_ROW =
- Bytes.toBytes("@@@GETTIME@@@");
- //实现功能:用get查询 "@@@GETTIME@@@"行时,以字节数组形式返回系统时间
- @Override
- public void preGet(
- final ObserverContext<RegionCoprocessorEnvironment> e,
- final Get get, final List<KeyValue> results) throws
- IOException {
- if (Bytes.equals(get.getRow(), FIXED_ROW)) {
- KeyValue kv = new KeyValue(get.getRow(), FIXED_ROW,
- FIXED_ROW,
- Bytes.toBytes(System.currentTimeMillis()));
- results.add(kv);
- }
- }
- public static void main(String args[]){
- System.out.println("complete!");
- }
- }
Endpoints
前面提到的RegionObserver例子通过已知的row key参数,将列计算功能添加到get请求期间。看起来这足以实现其他功能,比如恩能够返回所有给定列的value的和的聚合函数。然而,RegionObserver并不能实现上述功能,因为row key 决定了由哪个region处理request,这样就只能将计算请求(computation request)发送到单一的server上。
HBase为了克服上述RegionObserver的局限性,由coprocessor框架提供了一个动态调用实现(a dynamic call implementation),称作endpoint concept.
The CoprocessorProtocol interface
The BaseEndpointCoprocessor class
实现一个endpoint包括以下两个步骤
1.Extend the CoprocessorProtocol interface
2.Extend the BaseEndpointCoprocessor class
下面是一个小例子,实现功能:客户端通过远程调用检索每个region的行数和KeyValue的个数。
1.RowCountProtocol interface, code:
- public interface RowCountProtocol extends CoprocessorProtocol {
- //获取行数
- long getRowCount() throws IOException;
- //获取应用Filter后的结果集的行数
- long getRowCount(Filter filter) throws IOException;
- //获取KeyValue的个数
- long getKeyValueCount() throws IOException;
- }
2.RowCountEndPoint class, code:
- public class RowCountEndPoint extends BaseEndpointCoprocessor implements
- RowCountProtocol {
- public RowCountEndPoint() {
- // TODO Auto-generated constructor stub
- }
- @Override
- public long getRowCount() throws IOException {
- // TODO Auto-generated method stub
- return this.getRowCount(new FirstKeyOnlyFilter());
- }
- @Override
- public long getRowCount(Filter filter) throws IOException {
- // TODO Auto-generated method stub
- return this.getRowCount(filter,false);
- }
- @Override
- public long getKeyValueCount() throws IOException {
- // TODO Auto-generated method stub
- return this.getRowCount(null,true);
- }
- public long getRowCount(Filter filter,boolean countKeyValue) throws IOException {
- // TODO Auto-generated method stub
- Scan scan =new Scan();
- scan.setMaxVersions(1);
- if(filter !=null){
- scan.setFilter(filter);
- }
- RegionCoprocessorEnvironment environment=
- (RegionCoprocessorEnvironment) this.getEnvironment();
- //使用内部scanner做扫描。
- InternalScanner scanner = environment.getRegion().getScanner(scan);
- //
- long result=0;
- //计数
- try{
- boolean done=false;
- List<KeyValue> curValue = new ArrayList<KeyValue>();
- do{
- curValue.clear();
- done=scanner.next(curValue);
- result+=countKeyValue?curValue.size():1;
- }while(done);
- }catch(Exception e){
- e.printStackTrace();
- }finally{
- scanner.close();
- }
- return result;
- }
- /**
- * @param args
- */
- public static void main(String[] args) {
- // TODO Auto-generated method stub
- System.out.println("success!");
- }
- }
3.
3.1将上述类打包到my_coprocessor.jar, copy到各个RegionServer节点的 $HBASE_HOME/lib目录下;
3.2修改$HBASE_HOME/conf/hbase-site.xml配置文件,添加如下信息:
- <property>
- <name>hbase.coprocessor.region.classes</name>
- <value>
- coprocessor.RegionObserverExample,
- coprocessor.RowCountEndPoint
- </value>
- </property>
3.3 重启HBase Cluster
4.通过客户端调用之前定义的EndPoint Coprocessor
- public class EndPointExample {
- /**
- * @author mango_song
- * @param args
- * @throws IOException
- */
- public static void main(String[] args) throws IOException {
- // TODO Auto-generated method stub
- Configuration conf = HBaseConfiguration.create();
- HTable table =new HTable(conf,"test");
- try {
- //
- /*table.coprocessorExec 函数的描述信息:
- * <RowCountProtocol, Long> Map<byte[], Long> org.apache.hadoop.hbase.client.HTable.coprocessorExec(
- * Class<RowCountProtocol> protocol,
- * byte[] startKey, byte[] endKey,
- * Call<RowCountProtocol, Long> callable)
- * throws IOException, Throwable
- Invoke the passed org.apache.hadoop.hbase.client.coprocessor.Batch.Call
- against the CoprocessorProtocol instances running in the selected regions.
- All regions beginning with the region containing the startKey row,
- through to the region containing the endKey row (inclusive) will be used.
- If startKey or endKey is null, the first and last regions in the table,
- respectively, will be used in the range selection.
- Specified by: coprocessorExec(...) in HTableInterface
- Parameters:
- protocol the CoprocessorProtocol implementation to call
- startKey start region selection with region containing this row
- endKey select regions up to and including the region containing this row
- callable wraps the CoprocessorProtocol implementation method calls made per-region
- Returns:
- a Map of region names to org.apache.hadoop.hbase.client.coprocessor.Batch.Call.call(Object) return values
- Throws:
- IOException
- Throwable
- */
- Map<byte[], Long> results=table.coprocessorExec(
- RowCountProtocol.class,
- null,
- null,
- new Batch.Call<RowCountProtocol, Long>() {
- @Override
- public Long call(RowCountProtocol instance)
- throws IOException {
- // TODO Auto-generated method stub
- return instance.getRowCount();
- }
- }
- );
- long total =0;
- //打印出每个region的行数及总行数
- for(Map.Entry<byte[], Long> entry:results.entrySet() ){
- total += entry.getValue();
- System.out.println("Region: "+Bytes.toString(entry.getKey()) +
- ", Count: "+entry.getValue());
- }
- System.out.println("Total Count: "+total);
- } catch (Throwable e) {
- // TODO Auto-generated catch block
- e.printStackTrace();
- }
- }
- }
运行结果如下,可以看出test表共由三个region组成,每个region拥有的行数分别为9,13,78
- 13/01/26 18:59:53 INFO zookeeper.ClientCnxn: Opening socket connection to server master/172.21.15.21:2181. Will not attempt to authenticate using SASL (无法定位登录配置)
- 13/01/26 18:59:53 INFO zookeeper.ClientCnxn: Socket connection established to master/172.21.15.21:2181, initiating session
- 13/01/26 18:59:53 INFO zookeeper.ClientCnxn: Session establishment complete on server master/172.21.15.21:2181, sessionid = 0x13c6a82639f000c, negotiated timeout = 40000
- Region: test,,1358337586380.f3e04b8b43d073a509e9a374f643277a., Count: 9
- Region: test,209,1358337769870.be5a99319eca6f2881ccd73789bfafb0., Count: 13
- Region: test,222,1358337769870.94685f417a95e91d0c9185a95974f866., Count: 78
- Total Count: 100
Batch类提供了一个更方便的方法来获取远程endpoint, Batch.forMethod() ,你可以得到一个配置好的Batch.Call实例用来传递到远程的region servers. 下面对EndPointExample做了修改,看起来是不是好看多了~~
- Batch.Call call =Batch.forMethod(RowCountEndPoint.class, "getKeyValueCount");
- Map<byte[], Long> results=table.coprocessorExec(
- RowCountProtocol.class,
- null,
- null,
- call
- );
然而,通过直接implementing Batch.Call 更加灵活和强大,(you can perform additional processing on the results ,implementing Batch.call directly will provide more power and flexibility.) 下面的例子,同时获取rowCount和keyvalueCount
- Map<byte[],Pair<Long,Long>> results=table.coprocessorExec(
- RowCountProtocol.class,
- null,
- null,
- new Batch.Call<RowCountProtocol,Pair<Long,Long>>() {
- @Override
- public Pair<Long, Long> call(RowCountProtocol instance)
- throws IOException {
- // TODO Auto-generated method stub
- return new Pair<Long, Long>(
- instance.getRowCount(),
- instance.getKeyValueCount()
- );
- }
- }
- );
- //
- long totalRows=0;
- long totalKeyValues=0;
- for(Map.Entry<byte[], Pair<Long,Long>> entry:results.entrySet() ){
- totalRows+=entry.getValue().getFirst();
- totalKeyValues+=entry.getValue().getSecond();
- System.out.println("region="+Bytes.toString(entry.getKey())+
- " , rowCount="+entry.getValue().getFirst()+
- " , keyValueCount="+entry.getValue().getSecond());
- }
- System.out.println("totalRows="+totalRows+
- ",totalKeyValues="+totalKeyValues);
当然,我们也可以通过coprocessorProxy()方法获取endpoint的client-side 代理,通过该代理,可以在给定的row key所在的region做你想要的操作 (如果row key不存在,则该对应的region为rowkey范围包含该row key的region)。
- RowCountProtocol protocol=table.coprocessorProxy(RowCountProtocol.class, Bytes.toBytes("202"));
- long rowsInRegion = protocol.getRowCount();
- System.out.println("Region Row Count: "+rowsInRegion);
另一种动态加载方法,通过modifytable修改表方式:
- public static void main(String[] args) throws MasterNotRunningException,
- Exception {
- // TODO Auto-generated method stub
- byte[] tableName = Bytes.toBytes("userinfo");
- Configuration conf = HBaseConfiguration.create();
- HBaseAdmin admin = new HBaseAdmin(conf);
- admin.disableTable(tableName);
- HTableDescriptor htd = admin.getTableDescriptor(tableName);
- htd.addCoprocessor(AggregateImplementation.class.getName(), new Path("hdfs://master68:8020/sharelib/aggregate.jar"), 1001, null);
- //htd.removeCoprocessor(RowCountEndpoint.class.getName());
- admin.modifyTable(tableName, htd);
- admin.enableTable(tableName);
- admin.close();
- }
HBase Coprocessor 剖析与编程实践 - 林场 - 博客园
1.起因(Why HBase Coprocessor)
HBase作为列族数据库最经常被人诟病的特性包括:无法轻易建立“二级索引”,难以执行求和、计数、排序等操作。比如,在旧版本的(<0.92)Hbase中,统计数据表的总行数,需要使用Counter方法,执行一次MapReduce Job才能得到。虽然HBase在数据存储层中集成了MapReduce,能够有效用于数据表的分布式计算。然而在很多情况下,做一些简单的相加或者聚合计算的时候,如果直接将计算过程放置在server端,能够减少通讯开销,从而获得很好的性能提升。于是,HBase在0.92之后引入了协处理器(coprocessors),实现一些激动人心的新特性:能够轻易建立二次索引、复杂过滤器(谓词下推)以及访问控制等。
2.灵感来源( Source of Inspration)
HBase协处理器的灵感来自于Jeff Dean 09年的演讲( P66-67)。它根据该演讲实现了类似于bigtable的协处理器,包括以下特性:
- 每个表服务器的任意子表都可以运行代码
- 客户端的高层调用接口(客户端能够直接访问数据表的行地址,多行读写会自动分片成多个并行的RPC调用)
- 提供一个非常灵活的、可用于建立分布式服务的数据模型
- 能够自动化扩展、负载均衡、应用请求路由
3.细节剖析(Implementation)
协处理器分两种类型,系统协处理器可以全局导入region server上的所有数据表,表协处理器即是用户可以指定一张表使用协处理器。协处理器框架为了更好支持其行为的灵活性,提供了两个不同方面的插件。一个是观察者(observer),类似于关系数据库的触发器。另一个是终端(endpoint),动态的终端有点像存储过程。
3.1观察者(Observer)
观察者的设计意图是允许用户通过插入代码来重载协处理器框架的upcall方法,而具体的事件触发的callback方法由HBase的核心代码来执行。协处理器框架处理所有的callback调用细节,协处理器自身只需要插入添加或者改变的功能。
以HBase0.92版本为例,它提供了三种观察者接口:
- RegionObserver:提供客户端的数据操纵事件钩子:Get、Put、Delete、Scan等。
- WALObserver:提供WAL相关操作钩子。
- MasterObserver:提供DDL-类型的操作钩子。如创建、删除、修改数据表等。
这些接口可以同时使用在同一个地方,按照不同优先级顺序执行.用户可以任意基于协处理器实现复杂的HBase功能层。HBase有很多种事件可以触发观察者方法,这些事件与方法从HBase0.92版本起,都会集成在HBase API中。不过这些API可能会由于各种原因有所改动,不同版本的接口改动比较大,具体参考Java Doc。
RegionObserver工作原理,如图1所示。更多关于Observer细节请参见HBaseBook的第9.6.3章节。
图1 RegionObserver工作原理
3.2终端(Endpoint)
终端是动态RPC插件的接口,它的实现代码被安装在服务器端,从而能够通过HBase RPC唤醒。客户端类库提供了非常方便的方法来调用这些动态接口,它们可以在任意时候调用一个终端,它们的实现代码会被目标region远程执行,结果会返回到终端。用户可以结合使用这些强大的插件接口,为HBase添加全新的特性。终端的使用,如下面流程所示:
- 定义一个新的protocol接口,必须继承CoprocessorProtocol.
- 实现终端接口,该实现会被导入region环境执行。
- 继承抽象类BaseEndpointCoprocessor.
- 在客户端,终端可以被两个新的HBase Client API调用 。单个region:HTableInterface.coprocessorProxy(Class<T> protocol, byte[] row) 。rigons区域:HTableInterface.coprocessorExec(Class<T> protocol, byte[] startKey, byte[] endKey, Batch.Call<T,R> callable)
整体的终端调用过程范例,如图2所示:
图2 终端调用过程范例
4.编程实践(Code Example)
在该实例中,我们通过计算HBase表中行数的一个实例,来真实感受协处理器 的方便和强大。在旧版的HBase我们需要编写MapReduce代码来汇总数据表中的行数,在0.92以上的版本HBase中,只需要编写客户端的代码即可实现,非常适合用在WebService的封装上。
4.1启用协处理器 Aggregation(Enable Coprocessor Aggregation)
我们有两个方法:1.启动全局aggregation,能过操纵所有的表上的数据。通过修改hbase-site.xml这个文件来实现,只需要添加如下代码:
<property>
   <name>hbase.coprocessor.user.region.classes</name>
   <value>org.apache.hadoop.hbase.coprocessor.AggregateImplementation</value>
 </property>
2.启用表aggregation,只对特定的表生效。通过HBase Shell 来实现。
(1)disable指定表。hbase> disable 'mytable'
(2)添加aggregation hbase> alter 'mytable', METHOD => 'table_att','coprocessor'=>'|org.apache.hadoop.hbase.coprocessor.AggregateImplementation||'
(3)重启指定表 hbase> enable 'mytable'
4.2统计行数代码(Code Snippet)
public class MyAggregationClient {
private static final byte[] TABLE_NAME = Bytes.toBytes("mytable");
private static final byte[] CF = Bytes.toBytes("vent");
public static void main(String[] args) throws Throwable {
Configuration customConf = new Configuration();
customConf.setStrings("hbase.zookeeper.quorum", "node0,node1,node2"); //提高RPC通信时长
customConf.setLong("hbase.rpc.timeout", 600000); //设置Scan缓存
customConf.setLong("hbase.client.scanner.caching", 1000);
Configuration configuration = HBaseConfiguration.create(customConf);
AggregationClient aggregationClient = new AggregationClient( configuration);
Scan scan = new Scan(); //指定扫描列族,唯一值
scan.addFamily(CF);
long rowCount = aggregationClient.rowCount(TABLE_NAME, null, scan);
System.out.println("row count is " + rowCount);
}
}
5.参考文献(References)
[1]Lai, et al.,(2012-02-01),"Coprocessor Introduction : Apache HBase".Available:https://blogs.apache.org/hbase/entry/coprocessor_introduction
[2]Apache.(2012-08-10),"The Apache HBase Reference Guide".Available:http://hbase.apache.org/book.html#coprocessors
如何使用Hadoop的Partitioner - 三劫散仙 - ITeye技术网站
Partitioner的作用:
对map端输出的数据key作一个散列,使数据能够均匀分布在各个reduce上进行后续操作,避免产生热点区。
Hadoop默认使用的分区函数是Hash Partitioner,源码如下:
- /**
- * Licensed to the Apache Software Foundation (ASF) under one
- * or more contributor license agreements. See the NOTICE file
- * distributed with this work for additional information
- * regarding copyright ownership. The ASF licenses this file
- * to you under the Apache License, Version 2.0 (the
- * "License"); you may not use this file except in compliance
- * with the License. You may obtain a copy of the License at
- *
- * http://www.apache.org/licenses/LICENSE-2.0
- *
- * Unless required by applicable law or agreed to in writing, software
- * distributed under the License is distributed on an "AS IS" BASIS,
- * WITHOUT WARRANTIES OR CONDITIONS OF ANY KIND, either express or implied.
- * See the License for the specific language governing permissions and
- * limitations under the License.
- */
- package org.apache.hadoop.mapreduce.lib.partition;
- import org.apache.hadoop.mapreduce.Partitioner;
- /** Partition keys by their {@link Object#hashCode()}. */
- public class HashPartitioner<K, V> extends Partitioner<K, V> {
- /** Use {@link Object#hashCode()} to partition. */
- public int getPartition(K key, V value,
- int numReduceTasks) {
- //默认使用key的hash值与上int的最大值,避免出现数据溢出 的情况
- return (key.hashCode() & Integer.MAX_VALUE) % numReduceTasks;
- }
- }
大部分情况下,我们都会使用默认的分区函数,但有时我们又有一些,特殊的需求,而需要定制Partition来完成我们的业务,案例如下:
对如下数据,按字符串的长度分区,长度为1的放在一个,2的一个,3的各一个。
- 河南省;1
- 河南;2
- 中国;3
- 中国人;4
- 大;1
- 小;3
- 中;11
这时候,我们使用默认的分区函数,就不行了,所以需要我们定制自己的Partition,首先分析下,我们需要3个分区输出,所以在设置reduce的个数时,一定要设置为3,其次在partition里,进行分区时,要根据长度具体分区,而不是根据字符串的hash码来分区。核心代码如下:
- /**
- * Partitioner
- *
- *
- * */
- public static class PPartition extends Partitioner<Text, Text>{
- @Override
- public int getPartition(Text arg0, Text arg1, int arg2) {
- /**
- * 自定义分区,实现长度不同的字符串,分到不同的reduce里面
- *
- * 现在只有3个长度的字符串,所以可以把reduce的个数设置为3
- * 有几个分区,就设置为几
- * */
- String key=arg0.toString();
- if(key.length()==1){
- return 1%arg2;
- }else if(key.length()==2){
- return 2%arg2;
- }else if(key.length()==3){
- return 3%arg2;
- }
- return 0;
- }
- }
全部代码如下:
- package com.partition.test;
- import java.io.IOException;
- import org.apache.hadoop.fs.FileSystem;
- import org.apache.hadoop.fs.Path;
- import org.apache.hadoop.io.LongWritable;
- import org.apache.hadoop.io.Text;
- import org.apache.hadoop.mapred.JobConf;
- import org.apache.hadoop.mapreduce.Job;
- import org.apache.hadoop.mapreduce.Mapper;
- import org.apache.hadoop.mapreduce.Partitioner;
- import org.apache.hadoop.mapreduce.Reducer;
- import org.apache.hadoop.mapreduce.lib.db.DBConfiguration;
- import org.apache.hadoop.mapreduce.lib.db.DBInputFormat;
- import org.apache.hadoop.mapreduce.lib.input.FileInputFormat;
- import org.apache.hadoop.mapreduce.lib.output.FileOutputFormat;
- import org.apache.hadoop.mapreduce.lib.output.MultipleOutputs;
- import org.apache.hadoop.mapreduce.lib.output.TextOutputFormat;
- import com.qin.operadb.PersonRecoder;
- import com.qin.operadb.ReadMapDB;
- /**
- * @author qindongliang
- *
- * 大数据交流群:376932160
- *
- *
- * **/
- public class MyTestPartition {
- /**
- * map任务
- *
- * */
- public static class PMapper extends Mapper<LongWritable, Text, Text, Text>{
- @Override
- protected void map(LongWritable key, Text value,Context context)
- throws IOException, InterruptedException {
- // System.out.println("进map了");
- //mos.write(namedOutput, key, value);
- String ss[]=value.toString().split(";");
- context.write(new Text(ss[0]), new Text(ss[1]));
- }
- }
- /**
- * Partitioner
- *
- *
- * */
- public static class PPartition extends Partitioner<Text, Text>{
- @Override
- public int getPartition(Text arg0, Text arg1, int arg2) {
- /**
- * 自定义分区,实现长度不同的字符串,分到不同的reduce里面
- *
- * 现在只有3个长度的字符串,所以可以把reduce的个数设置为3
- * 有几个分区,就设置为几
- * */
- String key=arg0.toString();
- if(key.length()==1){
- return 1%arg2;
- }else if(key.length()==2){
- return 2%arg2;
- }else if(key.length()==3){
- return 3%arg2;
- }
- return 0;
- }
- }
- /***
- * Reduce任务
- *
- * **/
- public static class PReduce extends Reducer<Text, Text, Text, Text>{
- @Override
- protected void reduce(Text arg0, Iterable<Text> arg1, Context arg2)
- throws IOException, InterruptedException {
- String key=arg0.toString().split(",")[0];
- System.out.println("key==> "+key);
- for(Text t:arg1){
- //System.out.println("Reduce: "+arg0.toString()+" "+t.toString());
- arg2.write(arg0, t);
- }
- }
- }
- public static void main(String[] args) throws Exception{
- JobConf conf=new JobConf(ReadMapDB.class);
- //Configuration conf=new Configuration();
- conf.set("mapred.job.tracker","192.168.75.130:9001");
- //读取person中的数据字段
- conf.setJar("tt.jar");
- //注意这行代码放在最前面,进行初始化,否则会报
- /**Job任务**/
- Job job=new Job(conf, "testpartion");
- job.setJarByClass(MyTestPartition.class);
- System.out.println("模式: "+conf.get("mapred.job.tracker"));;
- // job.setCombinerClass(PCombine.class);
- job.setPartitionerClass(PPartition.class);
- job.setNumReduceTasks(3);//设置为3
- job.setMapperClass(PMapper.class);
- // MultipleOutputs.addNamedOutput(job, "hebei", TextOutputFormat.class, Text.class, Text.class);
- // MultipleOutputs.addNamedOutput(job, "henan", TextOutputFormat.class, Text.class, Text.class);
- job.setReducerClass(PReduce.class);
- job.setOutputKeyClass(Text.class);
- job.setOutputValueClass(Text.class);
- String path="hdfs://192.168.75.130:9000/root/outputdb";
- FileSystem fs=FileSystem.get(conf);
- Path p=new Path(path);
- if(fs.exists(p)){
- fs.delete(p, true);
- System.out.println("输出路径存在,已删除!");
- }
- FileInputFormat.setInputPaths(job, "hdfs://192.168.75.130:9000/root/input");
- FileOutputFormat.setOutputPath(job,p );
- System.exit(job.waitForCompletion(true) ? 0 : 1);
- }
- }
MapReduce:详解Shuffle过程 - 每天一小步 - ITeye技术网站
Shuffle过程是MapReduce的核心,也被称为奇迹发生的地方。要想理解MapReduce, Shuffle是必须要了解的。我看过很多相关的资料,但每次看完都云里雾里的绕着,很难理清大致的逻辑,反而越搅越混。前段时间在做MapReduce job 性能调优的工作,需要深入代码研究MapReduce的运行机制,这才对Shuffle探了个究竟。考虑到之前我在看相关资料而看不懂时很恼火,所以在这里我尽最大的可能试着把Shuffle说清楚,让每一位想了解它原理的朋友都能有所收获。如果你对这篇文章有任何疑问或建议请留言到后面,谢谢!
Shuffle的正常意思是洗牌或弄乱,可能大家更熟悉的是Java API里的Collections.shuffle(List)方法,它会随机地打乱参数list里的元素顺序。如果你不知道MapReduce里Shuffle是什么,那么请看这张图:

这张是官方对Shuffle过程的描述。但我可以肯定的是,单从这张图你基本不可能明白Shuffle的过程,因为它与事实相差挺多,细节也是错乱的。后面我会具体描述Shuffle的事实情况,所以这里你只要清楚Shuffle的大致范围就成-怎样把map task的输出结果有效地传送到reduce端。也可以这样理解, Shuffle描述着数据从map task输出到reduce task输入的这段过程。
在Hadoop这样的集群环境中,大部分map task与reduce task的执行是在不同的节点上。当然很多情况下Reduce执行时需要跨节点去拉取其它节点上的map task结果。如果集群正在运行的job有很多,那么task的正常执行对集群内部的网络资源消耗会很严重。这种网络消耗是正常的,我们不能限制,能做的就是最大化地减少不必要的消耗。还有在节点内,相比于内存,磁盘IO对job完成时间的影响也是可观的。从最基本的要求来说,我们对Shuffle过程的期望可以有:
OK,看到这里时,大家可以先停下来想想,如果是自己来设计这段Shuffle过程,那么你的设计目标是什么。我想能优化的地方主要在于减少拉取数据的量及尽量使用内存而不是磁盘。
我的分析是基于Hadoop0.21.0的源码,如果与你所认识的Shuffle过程有差别,不吝指出。我会以WordCount为例,并假设它有8个map task和3个reduce task。从上图看出,Shuffle过程横跨map与reduce两端,所以下面我也会分两部分来展开。
先看看map端的情况,如下图:

上图可能是某个map task的运行情况。拿它与官方图的左半边比较,会发现很多不一致。官方图没有清楚地说明partition, sort与combiner到底作用在哪个阶段。我画了这张图,希望让大家清晰地了解从map数据输入到map端所有数据准备好的全过程。
整个流程我分了四步。简单些可以这样说,每个map task都有一个内存缓冲区,存储着map的输出结果,当缓冲区快满的时候需要将缓冲区的数据以一个临时文件的方式存放到磁盘,当整个map task结束后再对磁盘中这个map task产生的所有临时文件做合并,生成最终的正式输出文件,然后等待reduce task来拉数据。
当然这里的每一步都可能包含着多个步骤与细节,下面我对细节来一一说明:
1. 在map task执行时,它的输入数据来源于HDFS的block,当然在MapReduce概念中,map task只读取split。Split与block的对应关系可能是多对一,默认是一对一。在WordCount例子里,假设map的输入数据都是像“aaa”这样的字符串。
2. 在经过mapper的运行后,我们得知mapper的输出是这样一个key/value对: key是“aaa”, value是数值1。因为当前map端只做加1的操作,在reduce task里才去合并结果集。前面我们知道这个job有3个reduce task,到底当前的“aaa”应该交由哪个reduce去做呢,是需要现在决定的。
MapReduce提供Partitioner接口,它的作用就是根据key或value及reduce的数量来决定当前的这对输出数据最终应该交由哪个reduce task处理。默认对key hash后再以reduce task数量取模。默认的取模方式只是为了平均reduce的处理能力,如果用户自己对Partitioner有需求,可以订制并设置到job上。
在我们的例子中,“aaa”经过Partitioner后返回0,也就是这对值应当交由第一个reducer来处理。接下来,需要将数据写入内存缓冲区中,缓冲区的作用是批量收集map结果,减少磁盘IO的影响。我们的key/value对以及Partition的结果都会被写入缓冲区。当然写入之前,key与value值都会被序列化成字节数组。
整个内存缓冲区就是一个字节数组,它的字节索引及key/value存储结构我没有研究过。如果有朋友对它有研究,那么请大致描述下它的细节吧。
3. 这个内存缓冲区是有大小限制的,默认是100MB。当map task的输出结果很多时,就可能会撑爆内存,所以需要在一定条件下将缓冲区中的数据临时写入磁盘,然后重新利用这块缓冲区。这个从内存往磁盘写数据的过程被称为Spill,中文可译为溢写,字面意思很直观。这个溢写是由单独线程来完成,不影响往缓冲区写map结果的线程。溢写线程启动时不应该阻止map的结果输出,所以整个缓冲区有个溢写的比例spill.percent。这个比例默认是0.8,也就是当缓冲区的数据已经达到阈值(buffer size * spill percent = 100MB * 0.8 = 80MB),溢写线程启动,锁定这80MB的内存,执行溢写过程。Map task的输出结果还可以往剩下的20MB内存中写,互不影响。
当溢写线程启动后,需要对这80MB空间内的key做排序(Sort)。排序是MapReduce模型默认的行为,这里的排序也是对序列化的字节做的排序。
在这里我们可以想想,因为map task的输出是需要发送到不同的reduce端去,而内存缓冲区没有对将发送到相同reduce端的数据做合并,那么这种合并应该是体现是磁盘文件中的。从官方图上也可以看到写到磁盘中的溢写文件是对不同的reduce端的数值做过合并。所以溢写过程一个很重要的细节在于,如果有很多个key/value对需要发送到某个reduce端去,那么需要将这些key/value值拼接到一块,减少与partition相关的索引记录。
在针对每个reduce端而合并数据时,有些数据可能像这样:“aaa”/1, “aaa”/1。对于WordCount例子,就是简单地统计单词出现的次数,如果在同一个map task的结果中有很多个像“aaa”一样出现多次的key,我们就应该把它们的值合并到一块,这个过程叫reduce也叫combine。但MapReduce的术语中,reduce只指reduce端执行从多个map task取数据做计算的过程。除reduce外,非正式地合并数据只能算做combine了。其实大家知道的,MapReduce中将Combiner等同于Reducer。
如果client设置过Combiner,那么现在就是使用Combiner的时候了。将有相同key的key/value对的value加起来,减少溢写到磁盘的数据量。Combiner会优化MapReduce的中间结果,所以它在整个模型中会多次使用。那哪些场景才能使用Combiner呢?从这里分析,Combiner的输出是Reducer的输入,Combiner绝不能改变最终的计算结果。所以从我的想法来看,Combiner只应该用于那种Reduce的输入key/value与输出key/value类型完全一致,且不影响最终结果的场景。比如累加,最大值等。Combiner的使用一定得慎重,如果用好,它对job执行效率有帮助,反之会影响reduce的最终结果。
4. 每次溢写会在磁盘上生成一个溢写文件,如果map的输出结果真的很大,有多次这样的溢写发生,磁盘上相应的就会有多个溢写文件存在。当map task真正完成时,内存缓冲区中的数据也全部溢写到磁盘中形成一个溢写文件。最终磁盘中会至少有一个这样的溢写文件存在(如果map的输出结果很少,当map执行完成时,只会产生一个溢写文件),因为最终的文件只有一个,所以需要将这些溢写文件归并到一起,这个过程就叫做Merge。Merge是怎样的?如前面的例子,“aaa”从某个map task读取过来时值是5,从另外一个map 读取时值是8,因为它们有相同的key,所以得merge成group。什么是group。对于“aaa”就是像这样的:{“aaa”, [5, 8, 2, …]},数组中的值就是从不同溢写文件中读取出来的,然后再把这些值加起来。请注意,因为merge是将多个溢写文件合并到一个文件,所以可能也有相同的key存在,在这个过程中如果client设置过Combiner,也会使用Combiner来合并相同的key。
至此,map端的所有工作都已结束,最终生成的这个文件也存放在TaskTracker够得着的某个本地目录内。每个reduce task不断地通过RPC从JobTracker那里获取map task是否完成的信息,如果reduce task得到通知,获知某台TaskTracker上的map task执行完成,Shuffle的后半段过程开始启动。
简单地说,reduce task在执行之前的工作就是不断地拉取当前job里每个map task的最终结果,然后对从不同地方拉取过来的数据不断地做merge,也最终形成一个文件作为reduce task的输入文件。见下图:

如map 端的细节图,Shuffle在reduce端的过程也能用图上标明的三点来概括。当前reduce copy数据的前提是它要从JobTracker获得有哪些map task已执行结束,这段过程不表,有兴趣的朋友可以关注下。Reducer真正运行之前,所有的时间都是在拉取数据,做merge,且不断重复地在做。如前面的方式一样,下面我也分段地描述reduce 端的Shuffle细节:
1. Copy过程,简单地拉取数据。Reduce进程启动一些数据copy线程(Fetcher),通过HTTP方式请求map task所在的TaskTracker获取map task的输出文件。因为map task早已结束,这些文件就归TaskTracker管理在本地磁盘中。
2. Merge阶段。这里的merge如map端的merge动作,只是数组中存放的是不同map端copy来的数值。Copy过来的数据会先放入内存缓冲区中,这里的缓冲区大小要比map端的更为灵活,它基于JVM的heap size设置,因为Shuffle阶段Reducer不运行,所以应该把绝大部分的内存都给Shuffle用。这里需要强调的是,merge有三种形式:1)内存到内存 2)内存到磁盘 3)磁盘到磁盘。默认情况下第一种形式不启用,让人比较困惑,是吧。当内存中的数据量到达一定阈值,就启动内存到磁盘的merge。与map 端类似,这也是溢写的过程,这个过程中如果你设置有Combiner,也是会启用的,然后在磁盘中生成了众多的溢写文件。第二种merge方式一直在运行,直到没有map端的数据时才结束,然后启动第三种磁盘到磁盘的merge方式生成最终的那个文件。
3. Reducer的输入文件。不断地merge后,最后会生成一个“最终文件”。为什么加引号?因为这个文件可能存在于磁盘上,也可能存在于内存中。对我们来说,当然希望它存放于内存中,直接作为Reducer的输入,但默认情况下,这个文件是存放于磁盘中的。至于怎样才能让这个文件出现在内存中,之后的性能优化篇我再说。当Reducer的输入文件已定,整个Shuffle才最终结束。然后就是Reducer执行,把结果放到HDFS上。
上面就是整个Shuffle的过程。细节很多,我很多都略过了,只试着把要点说明白。当然,我可能也有理解或表述上的很多问题,不吝指点。我希望不断地完善和修改这篇文章,能让它通俗、易懂,看完就能知道Shuffle的方方面面。至于具体的实现原理,各位有兴趣就自己去探索,如果不方便的话,留言给我,我再来研究并反馈。
hadoop中MapReduce多种join实现实例分析 - 蚂蚁 - 51CTO技术博客
对于RDBMS中的join操作大伙一定非常熟悉,写sql的时候要十分注意细节,稍有差池就会耗时巨久造成很大的性能瓶颈,而在Hadoop中使用MapReduce框架进行join的操作时同样耗时,但是由于hadoop的分布式设计理念的特殊性,因此对于这种join操作同样也具备了一定的特殊性。本文主要对MapReduce框架对表之间的join操作的几种实现方式进行详细分析,并且根据我在实际开发过程中遇到的实际例子来进行进一步的说明。
二、实现原理
1、在Reudce端进行连接。
在Reudce端进行连接是MapReduce框架进行表之间join操作最为常见的模式,其具体的实现原理如下:
Map端的主要工作:为来自不同表(文件)的key/value对打标签以区别不同来源的记录。然后用连接字段作为key,其余部分和新加的标志作为value,最后进行输出。
reduce端的主要工作:在reduce端以连接字段作为key的分组已经完成,我们只需要在每一个分组当中将那些来源于不同文件的记录(在map阶段已经打标志)分开,最后进行笛卡尔只就ok了。原理非常简单,下面来看一个实例:
(1)自定义一个value返回类型:
|
1
2
3
4
5
6
7
8
9
10
11
12
13
14
15
16
17
18
19
20
21
22
23
24
25
26
27
28
29
30
31
32
33
34
35
36
37
38
39
40
41
42
43
44
45
46
47
48
49
50
51
52
53
54
55
56
57
|
package com.mr.reduceSizeJoin;
import java.io.DataInput;
import java.io.DataOutput;
import java.io.IOException;
import org.apache.hadoop.io.Text;
import org.apache.hadoop.io.WritableComparable;
public class CombineValues implements WritableComparable<CombineValues>{
//private static final Logger logger = LoggerFactory.getLogger(CombineValues.class);
private Text joinKey;//链接关键字
private Text flag;//文件来源标志
private Text secondPart;//除了链接键外的其他部分
public void setJoinKey(Text joinKey) {
this.joinKey = joinKey;
}
public void setFlag(Text flag) {
this.flag = flag;
}
public void setSecondPart(Text secondPart) {
this.secondPart = secondPart;
}
public Text getFlag() {
return flag;
}
public Text getSecondPart() {
return secondPart;
}
public Text getJoinKey() {
return joinKey;
}
public CombineValues() {
this.joinKey = new Text();
this.flag = new Text();
this.secondPart = new Text();
}
@Override
public void write(DataOutput out) throws IOException {
this.joinKey.write(out);
this.flag.write(out);
this.secondPart.write(out);
}
@Override
public void readFields(DataInput in) throws IOException {
this.joinKey.readFields(in);
this.flag.readFields(in);
this.secondPart.readFields(in);
}
@Override
public int compareTo(CombineValues o) {
return this.joinKey.compareTo(o.getJoinKey());
}
@Override
public String toString() {
// TODO Auto-generated method stub
return "[flag="+this.flag.toString()+",joinKey="+this.joinKey.toString()+",secondPart="+this.secondPart.toString()+"]";
}
}
|
(2)map、reduce主体代码
|
1
2
3
4
5
6
7
8
9
10
11
12
13
14
15
16
17
18
19
20
21
22
23
24
25
26
27
28
29
30
31
32
33
34
35
36
37
38
39
40
41
42
43
44
45
46
47
48
49
50
51
52
53
54
55
56
57
58
59
60
61
62
63
64
65
66
67
68
69
70
71
72
73
74
75
76
77
78
79
80
81
82
83
84
85
86
87
88
89
90
91
92
93
94
95
96
97
98
99
100
101
102
103
104
105
106
107
108
109
110
111
112
113
114
115
116
117
118
119
120
121
122
123
124
125
126
127
128
129
130
131
132
133
134
135
136
137
138
139
140
141
142
143
144
145
146
147
148
149
150
151
152
153
154
155
156
157
158
159
160
161
162
163
164
165
166
167
168
169
170
171
172
173
174
175
176
177
178
|
package com.mr.reduceSizeJoin;
import java.io.IOException;
import java.util.ArrayList;
import org.apache.hadoop.conf.Configuration;
import org.apache.hadoop.conf.Configured;
import org.apache.hadoop.fs.Path;
import org.apache.hadoop.io.Text;
import org.apache.hadoop.mapreduce.Job;
import org.apache.hadoop.mapreduce.Mapper;
import org.apache.hadoop.mapreduce.Reducer;
import org.apache.hadoop.mapreduce.lib.input.FileInputFormat;
import org.apache.hadoop.mapreduce.lib.input.FileSplit;
import org.apache.hadoop.mapreduce.lib.input.TextInputFormat;
import org.apache.hadoop.mapreduce.lib.output.FileOutputFormat;
import org.apache.hadoop.mapreduce.lib.output.TextOutputFormat;
import org.apache.hadoop.util.Tool;
import org.apache.hadoop.util.ToolRunner;
import org.slf4j.Logger;
import org.slf4j.LoggerFactory;
/**
* @author zengzhaozheng
* 用途说明:
* reudce side join中的left outer join
* 左连接,两个文件分别代表2个表,连接字段table1的id字段和table2的cityID字段
* table1(左表):tb_dim_city(id int,name string,orderid int,city_code,is_show)
* tb_dim_city.dat文件内容,分隔符为"|":
* id name orderid city_code is_show
* 0 其他 9999 9999 0
* 1 长春 1 901 1
* 2 吉林 2 902 1
* 3 四平 3 903 1
* 4 松原 4 904 1
* 5 通化 5 905 1
* 6 辽源 6 906 1
* 7 白城 7 907 1
* 8 白山 8 908 1
* 9 延吉 9 909 1
* -------------------------风骚的分割线-------------------------------
* table2(右表):tb_user_profiles(userID int,userName string,network string,double flow,cityID int)
* tb_user_profiles.dat文件内容,分隔符为"|":
* userID network flow cityID
* 1 2G 123 1
* 2 3G 333 2
* 3 3G 555 1
* 4 2G 777 3
* 5 3G 666 4
*
* -------------------------风骚的分割线-------------------------------
* 结果:
* 1 长春 1 901 1 1 2G 123
* 1 长春 1 901 1 3 3G 555
* 2 吉林 2 902 1 2 3G 333
* 3 四平 3 903 1 4 2G 777
* 4 松原 4 904 1 5 3G 666
*/
public class ReduceSideJoin_LeftOuterJoin extends Configured implements Tool{
private static final Logger logger = LoggerFactory.getLogger(ReduceSideJoin_LeftOuterJoin.class);
public static class LeftOutJoinMapper extends Mapper<Object, Text, Text, CombineValues> {
private CombineValues combineValues = new CombineValues();
private Text flag = new Text();
private Text joinKey = new Text();
private Text secondPart = new Text();
@Override
protected void map(Object key, Text value, Context context)
throws IOException, InterruptedException {
//获得文件输入路径
String pathName = ((FileSplit) context.getInputSplit()).getPath().toString();
//数据来自tb_dim_city.dat文件,标志即为"0"
if(pathName.endsWith("tb_dim_city.dat")){
String[] valueItems = value.toString().split("\\|");
//过滤格式错误的记录
if(valueItems.length != 5){
return;
}
flag.set("0");
joinKey.set(valueItems[0]);
secondPart.set(valueItems[1]+"\t"+valueItems[2]+"\t"+valueItems[3]+"\t"+valueItems[4]);
combineValues.setFlag(flag);
combineValues.setJoinKey(joinKey);
combineValues.setSecondPart(secondPart);
context.write(combineValues.getJoinKey(), combineValues);
}//数据来自于tb_user_profiles.dat,标志即为"1"
else if(pathName.endsWith("tb_user_profiles.dat")){
String[] valueItems = value.toString().split("\\|");
//过滤格式错误的记录
if(valueItems.length != 4){
return;
}
flag.set("1");
joinKey.set(valueItems[3]);
secondPart.set(valueItems[0]+"\t"+valueItems[1]+"\t"+valueItems[2]);
combineValues.setFlag(flag);
combineValues.setJoinKey(joinKey);
combineValues.setSecondPart(secondPart);
context.write(combineValues.getJoinKey(), combineValues);
}
}
}
public static class LeftOutJoinReducer extends Reducer<Text, CombineValues, Text, Text> {
//存储一个分组中的左表信息
private ArrayList<Text> leftTable = new ArrayList<Text>();
//存储一个分组中的右表信息
private ArrayList<Text> rightTable = new ArrayList<Text>();
private Text secondPar = null;
private Text output = new Text();
/**
* 一个分组调用一次reduce函数
*/
@Override
protected void reduce(Text key, Iterable<CombineValues> value, Context context)
throws IOException, InterruptedException {
leftTable.clear();
rightTable.clear();
/**
* 将分组中的元素按照文件分别进行存放
* 这种方法要注意的问题:
* 如果一个分组内的元素太多的话,可能会导致在reduce阶段出现OOM,
* 在处理分布式问题之前最好先了解数据的分布情况,根据不同的分布采取最
* 适当的处理方法,这样可以有效的防止导致OOM和数据过度倾斜问题。
*/
for(CombineValues cv : value){
secondPar = new Text(cv.getSecondPart().toString());
//左表tb_dim_city
if("0".equals(cv.getFlag().toString().trim())){
leftTable.add(secondPar);
}
//右表tb_user_profiles
else if("1".equals(cv.getFlag().toString().trim())){
rightTable.add(secondPar);
}
}
logger.info("tb_dim_city:"+leftTable.toString());
logger.info("tb_user_profiles:"+rightTable.toString());
for(Text leftPart : leftTable){
for(Text rightPart : rightTable){
output.set(leftPart+ "\t" + rightPart);
context.write(key, output);
}
}
}
}
@Override
public int run(String[] args) throws Exception {
Configuration conf=getConf(); //获得配置文件对象
Job job=new Job(conf,"LeftOutJoinMR");
job.setJarByClass(ReduceSideJoin_LeftOuterJoin.class);
FileInputFormat.addInputPath(job, new Path(args[0])); //设置map输入文件路径
FileOutputFormat.setOutputPath(job, new Path(args[1])); //设置reduce输出文件路径
job.setMapperClass(LeftOutJoinMapper.class);
job.setReducerClass(LeftOutJoinReducer.class);
job.setInputFormatClass(TextInputFormat.class); //设置文件输入格式
job.setOutputFormatClass(TextOutputFormat.class);//使用默认的output格式
//设置map的输出key和value类型
job.setMapOutputKeyClass(Text.class);
job.setMapOutputValueClass(CombineValues.class);
//设置reduce的输出key和value类型
job.setOutputKeyClass(Text.class);
job.setOutputValueClass(Text.class);
job.waitForCompletion(true);
return job.isSuccessful()?0:1;
}
public static void main(String[] args) throws IOException,
ClassNotFoundException, InterruptedException {
try {
int returnCode = ToolRunner.run(new ReduceSideJoin_LeftOuterJoin(),args);
System.exit(returnCode);
} catch (Exception e) {
// TODO Auto-generated catch block
logger.error(e.getMessage());
}
}
}
|
其中具体的分析以及数据的输出输入请看代码中的注释已经写得比较清楚了,这里主要分析一下reduce join的一些不足。之所以会存在reduce join这种方式,我们可以很明显的看出原:因为整体数据被分割了,每个map task只处理一部分数据而不能够获取到所有需要的join字段,因此我们需要在讲join key作为reduce端的分组将所有join key相同的记录集中起来进行处理,所以reduce join这种方式就出现了。这种方式的缺点很明显就是会造成map和reduce端也就是shuffle阶段出现大量的数据传输,效率很低。
2、在Map端进行连接。
使用场景:一张表十分小、一张表很大。
用法:在提交作业的时候先将小表文件放到该作业的DistributedCache中,然后从DistributeCache中取出该小表进行join key / value解释分割放到内存中(可以放大Hash Map等等容器中)。然后扫描大表,看大表中的每条记录的join key /value值是否能够在内存中找到相同join key的记录,如果有则直接输出结果。
直接上代码,比较简单:
|
1
2
3
4
5
6
7
8
9
10
11
12
13
14
15
16
17
18
19
20
21
22
23
24
25
26
27
28
29
30
31
32
33
34
35
36
37
38
39
40
41
42
43
44
45
46
47
48
49
50
51
52
53
54
55
56
57
58
59
60
61
62
63
64
65
66
67
68
69
70
71
72
73
74
75
76
77
78
79
80
81
82
83
84
85
86
87
88
89
90
91
92
93
94
95
96
97
98
99
100
101
102
103
104
105
106
107
108
109
110
111
112
113
114
115
116
117
118
119
120
121
122
123
124
125
126
127
128
129
130
131
132
133
134
135
136
137
138
139
140
141
142
143
144
145
146
147
148
149
150
151
152
153
|
package com.mr.mapSideJoin;
import java.io.BufferedReader;
import java.io.FileReader;
import java.io.IOException;
import java.util.HashMap;
import org.apache.hadoop.conf.Configuration;
import org.apache.hadoop.conf.Configured;
import org.apache.hadoop.filecache.DistributedCache;
import org.apache.hadoop.fs.Path;
import org.apache.hadoop.io.Text;
import org.apache.hadoop.mapreduce.Job;
import org.apache.hadoop.mapreduce.Mapper;
import org.apache.hadoop.mapreduce.lib.input.FileInputFormat;
import org.apache.hadoop.mapreduce.lib.input.TextInputFormat;
import org.apache.hadoop.mapreduce.lib.output.FileOutputFormat;
import org.apache.hadoop.mapreduce.lib.output.TextOutputFormat;
import org.apache.hadoop.util.Tool;
import org.apache.hadoop.util.ToolRunner;
import org.slf4j.Logger;
import org.slf4j.LoggerFactory;
/**
* @author zengzhaozheng
*
* 用途说明:
* Map side join中的left outer join
* 左连接,两个文件分别代表2个表,连接字段table1的id字段和table2的cityID字段
* table1(左表):tb_dim_city(id int,name string,orderid int,city_code,is_show),
* 假设tb_dim_city文件记录数很少,tb_dim_city.dat文件内容,分隔符为"|":
* id name orderid city_code is_show
* 0 其他 9999 9999 0
* 1 长春 1 901 1
* 2 吉林 2 902 1
* 3 四平 3 903 1
* 4 松原 4 904 1
* 5 通化 5 905 1
* 6 辽源 6 906 1
* 7 白城 7 907 1
* 8 白山 8 908 1
* 9 延吉 9 909 1
* -------------------------风骚的分割线-------------------------------
* table2(右表):tb_user_profiles(userID int,userName string,network string,double flow,cityID int)
* tb_user_profiles.dat文件内容,分隔符为"|":
* userID network flow cityID
* 1 2G 123 1
* 2 3G 333 2
* 3 3G 555 1
* 4 2G 777 3
* 5 3G 666 4
* -------------------------风骚的分割线-------------------------------
* 结果:
* 1 长春 1 901 1 1 2G 123
* 1 长春 1 901 1 3 3G 555
* 2 吉林 2 902 1 2 3G 333
* 3 四平 3 903 1 4 2G 777
* 4 松原 4 904 1 5 3G 666
*/
public class MapSideJoinMain extends Configured implements Tool{
private static final Logger logger = LoggerFactory.getLogger(MapSideJoinMain.class);
public static class LeftOutJoinMapper extends Mapper<Object, Text, Text, Text> {
private HashMap<String,String> city_info = new HashMap<String, String>();
private Text outPutKey = new Text();
private Text outPutValue = new Text();
private String mapInputStr = null;
private String mapInputSpit[] = null;
private String city_secondPart = null;
/**
* 此方法在每个task开始之前执行,这里主要用作从DistributedCache
* 中取到tb_dim_city文件,并将里边记录取出放到内存中。
*/
@Override
protected void setup(Context context)
throws IOException, InterruptedException {
BufferedReader br = null;
//获得当前作业的DistributedCache相关文件
Path[] distributePaths = DistributedCache.getLocalCacheFiles(context.getConfiguration());
String cityInfo = null;
for(Path p : distributePaths){
if(p.toString().endsWith("tb_dim_city.dat")){
//读缓存文件,并放到mem中
br = new BufferedReader(new FileReader(p.toString()));
while(null!=(cityInfo=br.readLine())){
String[] cityPart = cityInfo.split("\\|",5);
if(cityPart.length ==5){
city_info.put(cityPart[0], cityPart[1]+"\t"+cityPart[2]+"\t"+cityPart[3]+"\t"+cityPart[4]);
}
}
}
}
}
/**
* Map端的实现相当简单,直接判断tb_user_profiles.dat中的
* cityID是否存在我的map中就ok了,这样就可以实现Map Join了
*/
@Override
protected void map(Object key, Text value, Context context)
throws IOException, InterruptedException {
//排掉空行
if(value == null || value.toString().equals("")){
return;
}
mapInputStr = value.toString();
mapInputSpit = mapInputStr.split("\\|",4);
//过滤非法记录
if(mapInputSpit.length != 4){
return;
}
//判断链接字段是否在map中存在
city_secondPart = city_info.get(mapInputSpit[3]);
if(city_secondPart != null){
this.outPutKey.set(mapInputSpit[3]);
this.outPutValue.set(city_secondPart+"\t"+mapInputSpit[0]+"\t"+mapInputSpit[1]+"\t"+mapInputSpit[2]);
context.write(outPutKey, outPutValue);
}
}
}
@Override
public int run(String[] args) throws Exception {
Configuration conf=getConf(); //获得配置文件对象
DistributedCache.addCacheFile(new Path(args[1]).toUri(), conf);//为该job添加缓存文件
Job job=new Job(conf,"MapJoinMR");
job.setNumReduceTasks(0);
FileInputFormat.addInputPath(job, new Path(args[0])); //设置map输入文件路径
FileOutputFormat.setOutputPath(job, new Path(args[2])); //设置reduce输出文件路径
job.setJarByClass(MapSideJoinMain.class);
job.setMapperClass(LeftOutJoinMapper.class);
job.setInputFormatClass(TextInputFormat.class); //设置文件输入格式
job.setOutputFormatClass(TextOutputFormat.class);//使用默认的output格式
//设置map的输出key和value类型
job.setMapOutputKeyClass(Text.class);
//设置reduce的输出key和value类型
job.setOutputKeyClass(Text.class);
job.setOutputValueClass(Text.class);
job.waitForCompletion(true);
return job.isSuccessful()?0:1;
}
public static void main(String[] args) throws IOException,
ClassNotFoundException, InterruptedException {
try {
int returnCode = ToolRunner.run(new MapSideJoinMain(),args);
System.exit(returnCode);
} catch (Exception e) {
// TODO Auto-generated catch block
logger.error(e.getMessage());
}
}
}
|
这里说说DistributedCache。DistributedCache是分布式缓存的一种实现,它在整个MapReduce框架中起着相当重要的作用,他可以支撑我们写一些相当复杂高效的分布式程序。说回到这里,JobTracker在作业启动之前会获取到DistributedCache的资源uri列表,并将对应的文件分发到各个涉及到该作业的任务的TaskTracker上。另外,关于DistributedCache和作业的关系,比如权限、存储路径区分、public和private等属性,接下来有用再整理研究一下写一篇blog,这里就不详细说了。
另外还有一种比较变态的Map Join方式,就是结合HBase来做Map Join操作。这种方式完全可以突破内存的控制,使你毫无忌惮的使用Map Join,而且效率也非常不错。
3、SemiJoin。
SemiJoin就是所谓的半连接,其实仔细一看就是reduce join的一个变种,就是在map端过滤掉一些数据,在网络中只传输参与连接的数据不参与连接的数据不必在网络中进行传输,从而减少了shuffle的网络传输量,使整体效率得到提高,其他思想和reduce join是一模一样的。说得更加接地气一点就是将小表中参与join的key单独抽出来通过DistributedCach分发到相关节点,然后将其取出放到内存中(可以放到HashSet中),在map阶段扫描连接表,将join key不在内存HashSet中的记录过滤掉,让那些参与join的记录通过shuffle传输到reduce端进行join操作,其他的和reduce join都是一样的。看代码:
|
1
2
3
4
5
6
7
8
9
10
11
12
13
14
15
16
17
18
19
20
21
22
23
24
25
26
27
28
29
30
31
32
33
34
35
36
37
38
39
40
41
42
43
44
45
46
47
48
49
50
51
52
53
54
55
56
57
58
59
60
61
62
63
64
65
66
67
68
69
70
71
72
73
74
75
76
77
78
79
80
81
82
83
84
85
86
87
88
89
90
91
92
93
94
95
96
97
98
99
100
101
102
103
104
105
106
107
108
109
110
111
112
113
114
115
116
117
118
119
120
121
122
123
124
125
126
127
128
129
130
131
132
133
134
135
136
137
138
139
140
141
142
143
144
145
146
147
148
149
150
151
152
153
154
155
156
157
158
159
160
161
162
163
164
165
166
167
168
169
170
171
172
173
174
175
176
177
178
179
180
181
182
183
184
185
186
187
188
189
190
191
192
193
194
195
196
197
198
199
200
201
202
203
204
205
206
207
208
209
210
211
212
213
214
215
216
217
218
219
220
|
package com.mr.SemiJoin;
import java.io.BufferedReader;
import java.io.FileReader;
import java.io.IOException;
import java.util.ArrayList;
import java.util.HashSet;
import org.apache.hadoop.conf.Configuration;
import org.apache.hadoop.conf.Configured;
import org.apache.hadoop.filecache.DistributedCache;
import org.apache.hadoop.fs.Path;
import org.apache.hadoop.io.Text;
import org.apache.hadoop.mapreduce.Job;
import org.apache.hadoop.mapreduce.Mapper;
import org.apache.hadoop.mapreduce.Reducer;
import org.apache.hadoop.mapreduce.lib.input.FileInputFormat;
import org.apache.hadoop.mapreduce.lib.input.FileSplit;
import org.apache.hadoop.mapreduce.lib.input.TextInputFormat;
import org.apache.hadoop.mapreduce.lib.output.FileOutputFormat;
import org.apache.hadoop.mapreduce.lib.output.TextOutputFormat;
import org.apache.hadoop.util.Tool;
import org.apache.hadoop.util.ToolRunner;
import org.slf4j.Logger;
import org.slf4j.LoggerFactory;
/**
* @author zengzhaozheng
*
* 用途说明:
* reudce side join中的left outer join
* 左连接,两个文件分别代表2个表,连接字段table1的id字段和table2的cityID字段
* table1(左表):tb_dim_city(id int,name string,orderid int,city_code,is_show)
* tb_dim_city.dat文件内容,分隔符为"|":
* id name orderid city_code is_show
* 0 其他 9999 9999 0
* 1 长春 1 901 1
* 2 吉林 2 902 1
* 3 四平 3 903 1
* 4 松原 4 904 1
* 5 通化 5 905 1
* 6 辽源 6 906 1
* 7 白城 7 907 1
* 8 白山 8 908 1
* 9 延吉 9 909 1
* -------------------------风骚的分割线-------------------------------
* table2(右表):tb_user_profiles(userID int,userName string,network string,double flow,cityID int)
* tb_user_profiles.dat文件内容,分隔符为"|":
* userID network flow cityID
* 1 2G 123 1
* 2 3G 333 2
* 3 3G 555 1
* 4 2G 777 3
* 5 3G 666 4
* -------------------------风骚的分割线-------------------------------
* joinKey.dat内容:
* city_code
* 1
* 2
* 3
* 4
* -------------------------风骚的分割线-------------------------------
* 结果:
* 1 长春 1 901 1 1 2G 123
* 1 长春 1 901 1 3 3G 555
* 2 吉林 2 902 1 2 3G 333
* 3 四平 3 903 1 4 2G 777
* 4 松原 4 904 1 5 3G 666
*/
public class SemiJoin extends Configured implements Tool{
private static final Logger logger = LoggerFactory.getLogger(SemiJoin.class);
public static class SemiJoinMapper extends Mapper<Object, Text, Text, CombineValues> {
private CombineValues combineValues = new CombineValues();
private HashSet<String> joinKeySet = new HashSet<String>();
private Text flag = new Text();
private Text joinKey = new Text();
private Text secondPart = new Text();
/**
* 将参加join的key从DistributedCache取出放到内存中,以便在map端将要参加join的key过滤出来。b
*/
@Override
protected void setup(Context context)
throws IOException, InterruptedException {
BufferedReader br = null;
//获得当前作业的DistributedCache相关文件
Path[] distributePaths = DistributedCache.getLocalCacheFiles(context.getConfiguration());
String joinKeyStr = null;
for(Path p : distributePaths){
if(p.toString().endsWith("joinKey.dat")){
//读缓存文件,并放到mem中
br = new BufferedReader(new FileReader(p.toString()));
while(null!=(joinKeyStr=br.readLine())){
joinKeySet.add(joinKeyStr);
}
}
}
}
@Override
protected void map(Object key, Text value, Context context)
throws IOException, InterruptedException {
//获得文件输入路径
String pathName = ((FileSplit) context.getInputSplit()).getPath().toString();
//数据来自tb_dim_city.dat文件,标志即为"0"
if(pathName.endsWith("tb_dim_city.dat")){
String[] valueItems = value.toString().split("\\|");
//过滤格式错误的记录
if(valueItems.length != 5){
return;
}
//过滤掉不需要参加join的记录
if(joinKeySet.contains(valueItems[0])){
flag.set("0");
joinKey.set(valueItems[0]);
secondPart.set(valueItems[1]+"\t"+valueItems[2]+"\t"+valueItems[3]+"\t"+valueItems[4]);
combineValues.setFlag(flag);
combineValues.setJoinKey(joinKey);
combineValues.setSecondPart(secondPart);
context.write(combineValues.getJoinKey(), combineValues);
}else{
return ;
}
}//数据来自于tb_user_profiles.dat,标志即为"1"
else if(pathName.endsWith("tb_user_profiles.dat")){
String[] valueItems = value.toString().split("\\|");
//过滤格式错误的记录
if(valueItems.length != 4){
return;
}
//过滤掉不需要参加join的记录
if(joinKeySet.contains(valueItems[3])){
flag.set("1");
joinKey.set(valueItems[3]);
secondPart.set(valueItems[0]+"\t"+valueItems[1]+"\t"+valueItems[2]);
combineValues.setFlag(flag);
combineValues.setJoinKey(joinKey);
combineValues.setSecondPart(secondPart);
context.write(combineValues.getJoinKey(), combineValues);
}else{
return ;
}
}
}
}
public static class SemiJoinReducer extends Reducer<Text, CombineValues, Text, Text> {
//存储一个分组中的左表信息
private ArrayList<Text> leftTable = new ArrayList<Text>();
//存储一个分组中的右表信息
private ArrayList<Text> rightTable = new ArrayList<Text>();
private Text secondPar = null;
private Text output = new Text();
/**
* 一个分组调用一次reduce函数
*/
@Override
protected void reduce(Text key, Iterable<CombineValues> value, Context context)
throws IOException, InterruptedException {
leftTable.clear();
rightTable.clear();
/**
* 将分组中的元素按照文件分别进行存放
* 这种方法要注意的问题:
* 如果一个分组内的元素太多的话,可能会导致在reduce阶段出现OOM,
* 在处理分布式问题之前最好先了解数据的分布情况,根据不同的分布采取最
* 适当的处理方法,这样可以有效的防止导致OOM和数据过度倾斜问题。
*/
for(CombineValues cv : value){
secondPar = new Text(cv.getSecondPart().toString());
//左表tb_dim_city
if("0".equals(cv.getFlag().toString().trim())){
leftTable.add(secondPar);
}
//右表tb_user_profiles
else if("1".equals(cv.getFlag().toString().trim())){
rightTable.add(secondPar);
}
}
logger.info("tb_dim_city:"+leftTable.toString());
logger.info("tb_user_profiles:"+rightTable.toString());
for(Text leftPart : leftTable){
for(Text rightPart : rightTable){
output.set(leftPart+ "\t" + rightPart);
context.write(key, output);
}
}
}
}
@Override
public int run(String[] args) throws Exception {
Configuration conf=getConf(); //获得配置文件对象
DistributedCache.addCacheFile(new Path(args[2]).toUri(), conf);
Job job=new Job(conf,"LeftOutJoinMR");
job.setJarByClass(SemiJoin.class);
FileInputFormat.addInputPath(job, new Path(args[0])); //设置map输入文件路径
FileOutputFormat.setOutputPath(job, new Path(args[1])); //设置reduce输出文件路径
job.setMapperClass(SemiJoinMapper.class);
job.setReducerClass(SemiJoinReducer.class);
job.setInputFormatClass(TextInputFormat.class); //设置文件输入格式
job.setOutputFormatClass(TextOutputFormat.class);//使用默认的output格式
//设置map的输出key和value类型
job.setMapOutputKeyClass(Text.class);
job.setMapOutputValueClass(CombineValues.class);
//设置reduce的输出key和value类型
job.setOutputKeyClass(Text.class);
job.setOutputValueClass(Text.class);
job.waitForCompletion(true);
return job.isSuccessful()?0:1;
}
public static void main(String[] args) throws IOException,
ClassNotFoundException, InterruptedException {
try {
int returnCode = ToolRunner.run(new SemiJoin(),args);
System.exit(returnCode);
} catch (Exception e) {
logger.error(e.getMessage());
}
}
}
|
这里还说说SemiJoin也是有一定的适用范围的,其抽取出来进行join的key是要放到内存中的,所以不能够太大,容易在Map端造成OOM。
三、总结
blog介绍了三种join方式。这三种join方式适用于不同的场景,其处理效率上的相差还是蛮大的,其中主要导致因素是网络传输。Map join效率最高,其次是SemiJoin,最低的是reduce join。另外,写分布式大数据处理程序的时最好要对整体要处理的数据分布情况作一个了解,这可以提高我们代码的效率,使数据的倾斜度降到最低,使我们的代码倾向性更好。
参考文献:
为你的 Hadoop 集群选择合适的硬件 - 技术翻译 - 开源中国社区
这是在一个平衡Hadoop集群中,为数据节点/任务追踪器提供的推荐规格:
- 在一个磁盘阵列中要有12到24个1~4TB硬盘
- 2个频率为2~2.5GHz的四核、六核或八核CPU
- 64~512GB的内存
- 有保障的千兆或万兆以太网(存储密度越大,需要的网络吞吐量越高)
名字节点角色负责协调集群上的数据存储,作业追踪器协调数据处理(备用的名字节点不应与集群中的名字节点共存,并且运行在与之相同的硬件环境上。)。Cloudera推荐客户购买在RAID1或10配置上有足够功率和企业级磁盘数的商用机器来运行名字节点和作业追踪器。
NameNode也会直接需要与群集中的数据块的数量成比列的RAM。一个好的但不精确的规则是对于存储在分布式文件系统里面的每一个1百万的数据块,分配1GB的NameNode内存。于在一个群集里面的100个DataNodes而言,NameNode上的64GB的RAM提供了足够的空间来保证群集的增长。我们也推荐把HA同时配置在NameNode和JobTracker上,
这里就是为NameNode/JobTracker/Standby NameNode节点群推荐的技术细节。驱动器的数量或多或少,将取决于冗余数量的需要。
- 4–6 1TB 硬盘驱动器 采用 一个 JBOD 配置 (1个用于OS, 2个用于文件系统映像[RAID 1], 1个用于Apache ZooKeeper, 1个用于Journal节点)
- 2 4-/16-/8-核心 CPUs, 至少运行于 2-2.5GHz
- 64-128GB 随机存储器
- Bonded Gigabit 以太网卡 or 10Gigabit 以太网卡
记住, 在思想上,Hadoop 体系设计为用于一种并行环境。
如果你希望Hadoop集群扩展到20台机器以上,那么我们推荐最初配置的集群应分布在两个机架,而且每个机架都有一个位于机架顶部的10G的以太网交换。当这个集群跨越多个机架的时候,你将需要添加核心交换机使用40G的以太网来连接位于机架顶部的交换机。两个逻辑上分离的机架可以让维护团队更好地理解机架内部和机架间通信对网络需求。
Hadoop集群安装好后,维护团队就可以开始确定工作负载,并准备对这些工作负载进行基准测试以确定硬件瓶颈。经过一段时间的基准测试和监视,维护团队将会明白如何配置添加的机器。异构的Hadoop集群是很常见的,尤其是在集群中用户机器的容量和数量不断增长的时候更常见-因此为你的工作负载所配置的“不理想”开始时的那组机器不是在浪费时间。Cloudera管理器提供了允许分组管理不同硬件配置的模板,通过这些模板你就可以简单地管理异构集群了。
下面是针对不同的工作负载所采用对应的各种硬件配置的列表,包括我们最初推荐的“负载均衡”的配置:
- 轻量处理方式的配置(1U的机器):两个16核的CPU,24-64GB的内存以及8张硬盘(每张1TB或者2TB)。
- 负载均衡方式的配置(1U的机器):两个16核的CPU,48-128GB的内存以及由主板控制器直接连接的12-16张硬盘(每张1TB或者2TB)。通常在一个2U的柜子里使用2个主板和24张硬盘实现相互备份。
- 超大存储方式的配置(2U的机器):两个16核的CPU,48-96GB的内存以及16-26张硬盘(每张2TB-4TB)。这种配置在多个节点/机架失效时会产生大量的网络流量。
- 强力运算方式的配置(2U的机器):两个16核的CPU,64-512GB的内存以及4-8张硬盘(每张1TB或者2TB)。
(注意Cloudera期望你配置它可以使用的2x8,2x10和2x12核心CPU的配置。)
下图向你展示了如何根据工作负载来配置一台机器:

超越MapReduce
Hadoop不仅仅是HDFS和MapReduce;它是一个无所不包的数据平台。因此CDH包含许多不同的生态系统产品(实际上很少仅仅做为MapReduce使用)。当你在为集群选型的时候,需要考虑的附加软件组件包括Apache HBase、Cloudera Impala和Cloudera Search。它们应该都运行在DataNode中来维护数据局部性。
由于垃圾回收器(GC)的超时,HBase的用户应该留意堆的大小的限制。别的JVM列存储也面临这个问题。因此,我们推荐每一个区域服务器的堆最大不超过16GB。HBase不需要太多别的资源而运行于Hadoop之上,但是维护一个实时的SLAs,你应该使用多个调度器,比如使用fair and capacity 调度器,并协同Linux Cgroups使用。HBase是一个可靠的列数据存储系统,它提供一致性、低延迟和随机读写。Cloudera Search解决了CDH中存储内容的全文本搜索的需求,为新类型用户简化了访问,但是也为Hadoop中新类型数据存储提供了机会。Cloudera Search基于Apache Lucene/Solr Cloud和Apache Tika,并且为与CDH广泛集成的搜索扩展了有价值的功能和灵活性。基于Apache协议的Impala项目为Hadoop带来了可扩展的并行数据库技术,使得用户可以向HDFS和HBase中存储的数据发起低延迟的SQL查询,而且不需要数据移动或转换。
Impala使用内存以完成其大多数的功能,在默认的配置下,将最多使用80%的可用RAM资源,所以我们推荐,最少每一个节点使用96GB的RAM。与MapReduce一起使用Impala的用户,可以参考我们的建议 - “Configuring Impala and MapReduce for Multi-tenant Performance.” 也可以为Impala指定特定进程所需的内存或者特定查询所需的内存。
搜索是最有趣的订制大小的组件。推荐的订制大小的实践操作是购买一个节点,安装Solr和Lucene,然后载入你的文档群。一旦文档群被以期望的方式来索引和搜索,可伸缩性将开始作用。持续不断的载入文档群,直到索引和查询的延迟,对于项目而言超出了必要的数值 - 此时,这让你得到了在可用的资源上每一个节点所能处理的最大文档数目的基数,以及不包括欲期的集群复制此因素的节点的数量总计基数。
以下为淘宝Hadoop集群机器硬件配置:
淘宝Hadoop集群现在超过1700个节点,服务于用于整个阿里巴巴集团各部门,数据来源于各部门产品的线上数据库(Oracle, MySQL)备份,系统日志以及爬虫数据,数量总量已经超过17个PB,每天净增长20T左右。每天在Hadoop集群运行的 MapReduce任务有超过4万(有时会超过6万),其中大部分任务是每天定期执行的统计任务,例如数据魔方、量子统计、推荐系统、排行榜等等。这些任务一般在凌晨1点左右开始执行,3-4个小时内全部完成。每天读数据在2PB左右,写数据在1PB左右。
Hadoop包括两类节点Master和Slave节点,
-
Master节点包括Jobtracker,Namenode, SecondName, Standby,
-
硬件配置:16CPU*4核,96G内存。
-
-
Slave节点主要是TaskTracker和DataNode,
-
硬件配置存在一定的差别:8CPU*4核-16CPU*4核,16G-24G内存
-
(注:通常是一个slave节点同时是TaskTracker和DataNode,目的是提高数据本地性data locality)。
-
每个slave节点会划分成12~24个slots。整个集群约34,916个slots,其中Map slots是19,643个,Reduce slots是15,273个
-
所有作业会进行分成多个Group,按照部门或小组划分,总共有38个Group。整个集群的资源也是按各个Group进行划分,定义每个Group的最大并发任务数,Map slots与Reduce slots的使用上限。每个作业只能使用自己组的slots资源。
Dubbo Zookeeper 初探
2. 服务提供者的工程
a. dubbo-demo-api 定义接口
|
1
2
3
|
public interface IProcessData { public String deal(String data);} |
b. dubbo-demo-provider 服务提供者
|
1
2
3
4
5
6
7
8
9
10
11
12
13
14
|
public class ProcessDataImpl implements IProcessData { /* * @see com.xxx.bubbo.provider.IProcessData#deal(java.lang.String) */ @Override public String deal(String data) { try { Thread.sleep(1000); } catch (InterruptedException e) { e.printStackTrace(); } return "Finished:" + data; }} |
c. applicationProvider.xml配置
|
1
2
3
4
5
6
7
8
9
10
11
12
13
14
15
16
17
18
19
20
21
22
23
24
25
26
27
28
29
30
31
32
33
34
35
36
37
|
<?xml version="1.0" encoding="UTF-8"?> xmlns:xsi="http://www.w3.org/2001/XMLSchema-instance" xmlns:dubbo="http://code.alibabatech.com/schema/dubbo" xsi:schemaLocation="http://www.springframework.org/schema/beans "> <!-- Application name --> <dubbo:application name="hello-world-app" /> <!-- registry address, used for service to register itself --> <!-- expose this service through dubbo protocol, through port 20880 --> <!-- <dubbo:protocol name="dubbo" port="20880" /> <dubbo:protocol name="dubbo" port="9090" server="netty" client="netty" codec="dubbo" serialization="hessian2" charset="UTF-8" threadpool="fixed" threads="100" queues="0" iothreads="9" buffer="8192" accepts="1000" payload="8388608" /> --> <!-- Service interface Concurrent Control --> <dubbo:service interface="com.huangjie.dubbo_Service.service.IProcessData" ref="demoService" executes="10" /> <!-- Default Protocol --> <!-- <dubbo:protocol server="netty" /> --> <!-- designate implementation --> <bean id="demoService" class="com.huangjie.dubbo_Service.service.impl.ProcessDataImpl" /> </beans> |
d. 启动服务
|
1
2
3
4
5
6
7
8
9
10
|
public class DubboProviderMain { public static void main(String[] args) throws Exception { ClassPathXmlApplicationContext context = new ClassPathXmlApplicationContext( new String[]{"applicationProvider.xml"}); context.start(); System.out.println("Press any key to exit."); System.in.read(); } } |
3. 服务调用者的工程
a. 调用类
|
1
2
3
4
5
6
7
8
9
10
11
12
13
14
15
16
17
18
19
20
21
22
23
24
25
26
27
28
|
public class ConsumerThd implements Runnable { /* * @see java.lang.Runnable#run() */ @Override public void run() { ClassPathXmlApplicationContext context = new ClassPathXmlApplicationContext( new String[]{"applicationConsumer.xml"}); context.start(); IProcessData demoService = (IProcessData) context.getBean("demoService"); // get // service // invocation // proxy String hello = demoService.deal("nihao"); // do invoke! System.out.println(Thread.currentThread().getName() + " "+hello); } public static void main(String[] args) { new Thread(new ConsumerThd()).start(); /** * 输出结果: * Thread-0 Finished:nihao */ }} |
b. applicationConsumer.xml配置
|
1
2
3
4
5
6
7
8
9
10
11
12
13
14
15
16
17
18
|
<?xml version="1.0" encoding="UTF-8"?> xmlns:xsi="http://www.w3.org/2001/XMLSchema-instance" xmlns:dubbo="http://code.alibabatech.com/schema/dubbo" xsi:schemaLocation="http://www.springframework.org/schema/beans "> <!-- consumer application name --> <dubbo:application name="consumer-of-helloworld-app" /> <!-- registry address, used for consumer to discover services --> <dubbo:consumer timeout="5000"/> <!-- which service to consume? --> <dubbo:reference id="demoService" interface="com.huangjie.dubbo_Service.service.IProcessData" /> </beans> |
4. 最后需要把zookeeper的服务给启动,在zookeeper安装文件夹下面的bin目录里面的zkServer.cmd给点击运行。不要关闭窗口,保持服务运行

这样整个调用就完成了,这样的好处是只要远程提供ip地址及端口号,以及对外调用的类,客户端就可以调用,客户端不必知道服务端的地址之类的。
而且服务端可以开多个zookeeper服务,这样如果其中一个zookeeper 服务死掉了,其他服务还能正常运行。
电力系统的销售怎么做?
一电力系统的组织架构
目前我国的电力公司主要分为:
国家电网(覆盖全国26个省、自治区、直辖市,简称“国网”)
南方电网(覆盖广东、广西、云南、贵州和海南五省,简称“南网”)。
下面,以国网公司来阐述:
1、国家电网:
国家电网公司又分为华北、华东、华中、东北、西北五个网省公司。各个电网公司又专设超高压运输公司(主要负责大的电网建设中输电线路的铺设)、各电力设计院、高压研究所(西安高压研究所、武汉高压研究所)、及各省市电力公司等。
(点击图片可以查看大图)
2、省电力公司
在省电力公司的业务开拓中,主要接触的部门有生产计划处和物资部(负责招投标工作)。生产计划处简称生计处,主要职能是对电网建设、改造和维护进行计划制订和出具技术方案,并对所属的各地市电力公司申报的计划方案和技术方案进行审核。这其中也包括了对电力物资供应商资格的审查和对产品质量和技术的鉴定。物资部的主要职能是电力物资的采购办理入网选型、举办招标活动、制订招标书、制订采购计划等。(在近年来的机构改革中有些部门的名称会有所变化......)
(点击图片可以查看大图)
3、各地市电力公司:
一般设主管局长,分管局长(人事组织、农电、生产计划),总工(分管技术)。下设生计科、物资科、设计院、供电分局、变电分局、农电分局和财务结算中心等......(现在都改叫公司了)
生计科:和省局生产计划处的基本职能是一样的,生计科的直接领导一般都是总工。每个地区的具体情况不一样,有的地方甚至出现生计科和物资科争夺采购实权的情况。
物资科:和省局电力物资公司的基本职能是一样的。一般合同的签订、回款的初始程序都是在物资科,物资科也是销售人员最直接的客户对象。
设计院:负责电网建设改造中的出具设计方案和设计图纸的工作,对于产品的需求信息,可以在这里最早得知。
供电分局:负责整个城市的电网建设改造和维护工作。也是产品的直接用户之一。
变电分局:也叫输变电分局,负责整个地区的输电线路和变电站的建设维护工作。也是产品的直接用户之一。
农电分局:负责整个农村电网的建设改造和维护工作。也是产品的直接用户之一,但中高压的产品用量较少,架空线和低压产品的用量较大。
财务结算中心:回款是办理转帐手续的部门。
“电气小强”观点:
1.做工业电器或者电气设备,其实就是B2B,越是B的企业销售工作越是要针对个人,这不是说对组织的利益保障(质量、技术先进性、性价比)不重要,而是说“做好产品做好人”。
2.对电力公司的组织架构的剖析有利于系统性的开展销售沟通,我的理解物资处相当于一般企业的采购部,生计部门相当于计划部门。大家都知道,哪怕是一个生产开关柜的工厂,要采购几百万的钣金设备,也是需要经过采购部发标、制造部初步选型、技术部参谋、财务报预算等复杂的工业品采购流程。
下面展开......
二电力系统的前期接触
1、入网选型:
所谓“入网选型”,是指各省市电力公司定期或不定期的召开电力物资供应商参加的会议,以确定可在该地区销售的电力物资供应商名单及其产品的规格型号。只有进入选型名单的电力物资供应商才能在该地区进行销售。所以每年的选型工作是非常重要的。一般来说,每个省、地市电力公司都有选型名单。主管选型的部门是生计科和物资科。
2、初期拜访:
在初期拜访时,对涉及到产品销售的部门都要尽可能的拜访到。主要是获取以下几个方面的信息:
A:局长和总工以及各部门的人员组成以及他们的姓名、电话(手机和住宅电话)、家庭住址、社会关系等。
B:各局长及部门间的实权人物之间的相互关系。
C:对于可能升至实权人物对象要有预测和格外的重视。
D:随时关注电力系统内部人员的调动、升迁,格外注意电力系统人员外出旅游或开会的情况。
E:通过电力系统内部的人员来了解竞争对手的情况。
F:培养1-2个低级职员的良好客情关系,以便信息的获取更及时和准确。
G:确定需要深入接触的对象,即公关目标。
重点:把握全局,选好“教练”
3、拜访客户:
需要极大的耐心和一定的技巧,要善于察言观色,在很小的细节中捕获对自己有帮助的信息。更重要的是要勤于拜访客户,机会总是在不断的接触中产生的。
4、广泛接触:
多接触电力系统的员工,包括和业务没直接联系的部门;自己的竞争对手;其他行业的电力物资供应厂家的销售人员。尽可能的扩大自己的信息来源和通道。
三电力系统的深入拓展
1、利用一切可利用的资源来接近客户。
2、至少要和一位分管局长或总工级别的客户建立良好的客情关系。从上往下的营销摸式才是最好的。
3、注意利用客户外出旅游或开会的机会。一般来说不在办公室的客户相对好接近一些。
4、注意各部门的客情关系是否通畅,这里的工作一定要细致,客户对象甚至要考虑到对方的仓库管理一级的人员。
5、要时刻关注竞争对手的动态,在行动上争取要比对手快一步,以达到削弱对手竞争力的目的。
四电力系统的合同签订
1、报价之前,一定要和客户进行良好和有成效的沟通,探听竞争对手的动态,但要注意不要泄露真正的底价给任何人。
2、要去了解客户以往的采购价格,竞争对手以前的报价,只要客情关系到位,这些信息都可以收集到。再根据竞争对手在别的地区的报价对竞争对手的价格进行预估,预估时也要考虑到竞争对手销售人员的组成情况以及他们具体定价人员的性格,以免出现大的偏差......
3、要注意破坏竞争对手的客情关系,但一定要注意技巧和方法,在没有一定的把握之前不要尝试,以免适得其反。..
4、报价之前要对供货产品的规格型号、数量、供货日期、要求的技术标准和公司沟通,避免无法供货和损坏客情关系。....
5、签订合同时要注意对合同条款的审阅,了解回款程序和细节,并要拜访回款所要涉及的部门。
6、签订完合同后,要对客户进行回访和感谢。
五电力系统的回款
1、通常回款都是由物资科办理相关手续,再到财务结算中心办理汇票,完成回款。但是回款的程序往往是在局长或其他实权人物的影响下才开始的。所以良好的客情关系和信息渠道的通畅才是及时回款的有力保证。
2、回款之前要及时和客户沟通,确定开票金额,尽量避免开票金额过大而实际回款较小,给公司的流动资金带来困难。...
3、客户回款时往往会出现“僧多粥少”的情况,信息的通畅能让你比对手的行动更快,良好的客情关系让你的回款份额比对手更多。..
4、在平时的业务往来中就要注意做好回款工作,包括对回款程序中涉及到的每一个环节的客情关系的沟通和培养。..
5、在要求客户回款时,一定要注意技巧,并注意环境、对象、时间等因素,避免因回款而损害客情关系。..
6、回款的方式应用银行汇票方式,尽量避免电汇方式,如电汇一定要取回对方的电汇凭证的复印件。
7、在对方回款以后,应对相关人员进行回访,表示感谢。
六可能出现的困难及对策
1、了解情况,不要被表面情况所迷惑,要找出问题发生的根源。可以通过对不同部门的相关人员的多次走访,来了解实际情况。
2、对于因自己工作不到位的情况而产生的麻烦,要及时补救,除了自己加大拜访次数,用诚意感动客户之外,还可以利用电力系统内部的人际关系来协调和解决。
3、对于因客户内部的人际斗争而产生的困难要注意转移矛盾,切不可用权力高的一方来压制权力低的一方。因为电力系统采购中往往会出现“一票否决权”,即因某一个人有抵触情绪而导致整个销售工作的失败。
4、对于因为自己公司内部协调的问题而产生的困难,应注意及时的沟通。提出自己的意见和解决办法。
5、可以利用公司、同事、客户以及其他的电力供应厂家的资源来解决自己遇到的问题。
电力客户是很大一部分电气产品生产企业的重要目标客户之一,虽然目前电力系统的招投标中存在很多“人为的因素”,但我想,随着社会的进步和机构的改革,作为电力设备生产企业要想分得这杯羹,首先要做好自己,做好产品、做好服务、做好为人。坚持不懈,客户一定会青睐你的!