<< 2014年8月5日 | 首页 | 2014年8月7日 >>

Spring整合JMS(二)——三种消息监听器 - 好好学习,天天向上 - ITeye技术网站

消息监听器MessageListener

       在Spring整合JMS的应用中我们在定义消息监听器的时候一共可以定义三种类型的消息监听器,分别是MessageListener、SessionAwareMessageListener和MessageListenerAdapter。下面就分别来介绍一下这几种类型的区别。

1.3.1  MessageListener

MessageListener是最原始的消息监听器,它是JMS规范中定义的一个接口。其中定义了一个用于处理接收到的消息的onMessage方法,该方法只接收一个Message参数。我们前面在讲配置消费者的时候用的消息监听器就是MessageListener,代码如下:


Java代码  收藏代码
  1. import javax.jms.JMSException;  
  2. import javax.jms.Message;  
  3. import javax.jms.MessageListener;  
  4. import javax.jms.TextMessage;  
  5.    
  6. public class ConsumerMessageListener implements MessageListener {  
  7.    
  8.     public void onMessage(Message message) {  
  9.         //这里我们知道生产者发送的就是一个纯文本消息,所以这里可以直接进行强制转换,或者直接把onMessage方法的参数改成Message的子类TextMessage  
  10.         TextMessage textMsg = (TextMessage) message;  
  11.         System.out.println("接收到一个纯文本消息。");  
  12.         try {  
  13.             System.out.println("消息内容是:" + textMsg.getText());  
  14.         } catch (JMSException e) {  
  15.             e.printStackTrace();  
  16.         }  
  17.     }  
  18.    
  19. }  


1.3.2  SessionAwareMessageListener

SessionAwareMessageListener是Spring为我们提供的,它不是标准的JMS MessageListener。MessageListener的设计只是纯粹用来接收消息的,假如我们在使用MessageListener处理接收到的消息时我们需要发送一个消息通知对方我们已经收到这个消息了,那么这个时候我们就需要在代码里面去重新获取一个Connection或Session。SessionAwareMessageListener的设计就是为了方便我们在接收到消息后发送一个回复的消息,它同样为我们提供了一个处理接收到的消息的onMessage方法,但是这个方法可以同时接收两个参数,一个是表示当前接收到的消息Message,另一个就是可以用来发送消息的Session对象。先来看一段代码:

Java代码  收藏代码
  1. package com.tiantian.springintejms.listener;  
  2.    
  3. import javax.jms.Destination;  
  4. import javax.jms.JMSException;  
  5. import javax.jms.Message;  
  6. import javax.jms.MessageProducer;  
  7. import javax.jms.Session;  
  8. import javax.jms.TextMessage;  
  9.    
  10. import org.springframework.jms.listener.SessionAwareMessageListener;  
  11.    
  12. public class ConsumerSessionAwareMessageListener implements  
  13.         SessionAwareMessageListener<TextMessage> {  
  14.    
  15.     private Destination destination;  
  16.       
  17.     public void onMessage(TextMessage message, Session session) throws JMSException {  
  18.         System.out.println("收到一条消息");  
  19.         System.out.println("消息内容是:" + message.getText());  
  20.         MessageProducer producer = session.createProducer(destination);  
  21.         Message textMessage = session.createTextMessage("ConsumerSessionAwareMessageListener。。。");  
  22.         producer.send(textMessage);  
  23.     }  
  24.    
  25.     public Destination getDestination() {  
  26.         returndestination;  
  27.     }  
  28.    
  29.     public void setDestination(Destination destination) {  
  30.         this.destination = destination;  
  31.     }  
  32.    
  33. }  


       在上面代码中我们定义了一个SessionAwareMessageListener,在这个Listener中我们在接收到了一个消息之后,利用对应的Session创建了一个到destination的生产者和对应的消息,然后利用创建好的生产者发送对应的消息。

       接着我们在Spring的配置文件中配置该消息监听器将处理来自一个叫sessionAwareQueue的目的地的消息,并且往该MessageListener中通过set方法注入其属性destination的值为queueDestination。这样当我们的SessionAwareMessageListener接收到消息之后就会往queueDestination发送一个消息。

Xml代码  收藏代码
  1. <?xml version="1.0" encoding="UTF-8"?>  
  2. <beans xmlns="http://www.springframework.org/schema/beans"  
  3.     xmlns:xsi="http://www.w3.org/2001/XMLSchema-instance" xmlns:context="http://www.springframework.org/schema/context"  
  4.     xmlns:jms="http://www.springframework.org/schema/jms"  
  5.     xsi:schemaLocation="http://www.springframework.org/schema/beans  
  6.      http://www.springframework.org/schema/beans/spring-beans-3.0.xsd  
  7.      http://www.springframework.org/schema/context  
  8.      http://www.springframework.org/schema/context/spring-context-3.0.xsd  
  9.     http://www.springframework.org/schema/beans http://www.springframework.org/schema/beans/spring-beans-3.0.xsd  
  10.     http://www.springframework.org/schema/jms http://www.springframework.org/schema/jms/spring-jms-3.0.xsd">  
  11.    
  12.     <context:component-scan base-package="com.tiantian" />   
  13.     <!-- Spring提供的JMS工具类,它可以进行消息发送、接收等 -->  
  14.     <bean id="jmsTemplate" class="org.springframework.jms.core.JmsTemplate">  
  15.         <!-- 这个connectionFactory对应的是我们定义的Spring提供的那个ConnectionFactory对象 -->  
  16.         <property name="connectionFactory" ref="connectionFactory"/>  
  17.     </bean>  
  18.       
  19.     <!-- 真正可以产生Connection的ConnectionFactory,由对应的 JMS服务厂商提供-->  
  20.     <bean id="targetConnectionFactory" class="org.apache.activemq.ActiveMQConnectionFactory">  
  21.         <property name="brokerURL" value="tcp://localhost:61616"/>  
  22.     </bean>  
  23.       
  24.     <!-- Spring用于管理真正的ConnectionFactory的ConnectionFactory -->  
  25.     <bean id="connectionFactory" class="org.springframework.jms.connection.SingleConnectionFactory">  
  26.         <!-- 目标ConnectionFactory对应真实的可以产生JMS Connection的ConnectionFactory -->  
  27.         <property name="targetConnectionFactory" ref="targetConnectionFactory"/>  
  28.     </bean>  
  29.       
  30.     <!--这个是队列目的地-->  
  31.     <bean id="queueDestination" class="org.apache.activemq.command.ActiveMQQueue">  
  32.         <constructor-arg>  
  33.             <value>queue</value>  
  34.         </constructor-arg>  
  35.     </bean>  
  36.     <!--这个是sessionAwareQueue目的地-->  
  37.     <bean id="sessionAwareQueue" class="org.apache.activemq.command.ActiveMQQueue">  
  38.         <constructor-arg>  
  39.             <value>sessionAwareQueue</value>  
  40.         </constructor-arg>  
  41.     </bean>  
  42.     <!-- 消息监听器 -->  
  43.     <bean id="consumerMessageListener" class="com.tiantian.springintejms.listener.ConsumerMessageListener"/>  
  44.     <!-- 可以获取session的MessageListener -->  
  45.     <bean id="consumerSessionAwareMessageListener" class="com.tiantian.springintejms.listener.ConsumerSessionAwareMessageListener">  
  46.         <property name="destination" ref="queueDestination"/>  
  47.     </bean>  
  48.     <!-- 消息监听容器 -->  
  49.     <bean id="jmsContainer"        class="org.springframework.jms.listener.DefaultMessageListenerContainer">  
  50.         <property name="connectionFactory" ref="connectionFactory" />  
  51.         <property name="destination" ref="queueDestination" />  
  52.         <property name="messageListener" ref="consumerMessageListener" />  
  53.     </bean>  
  54.       
  55.     <bean id="sessionAwareListenerContainer"  
  56.         class="org.springframework.jms.listener.DefaultMessageListenerContainer">  
  57.         <property name="connectionFactory" ref="connectionFactory" />  
  58.         <property name="destination" ref="sessionAwareQueue" />  
  59.         <property name="messageListener" ref="consumerSessionAwareMessageListener" />  
  60.     </bean>  
  61. </beans>  


       接着我们来做一个测试,测试代码如下:

Java代码  收藏代码
  1. @RunWith(SpringJUnit4ClassRunner.class)  
  2. @ContextConfiguration("/applicationContext.xml")  
  3. public class ProducerConsumerTest {  
  4.    
  5.     @Autowired  
  6.     private ProducerService producerService;  
  7.     @Autowired  
  8.     @Qualifier("sessionAwareQueue")  
  9.     private Destination sessionAwareQueue;  
  10.       
  11.     @Test  
  12.     public void testSessionAwareMessageListener() {  
  13.         producerService.sendMessage(sessionAwareQueue, "测试SessionAwareMessageListener");  
  14.     }  
  15.       
  16. }  


       在上述测试代码中,我们通过前面定义好的生产者往我们定义好的SessionAwareMessageListener监听的sessionAwareQueue发送了一个消息。程序运行之后控制台输出如下:


       这说明我们已经成功的往sessionAwareQueue发送了一条纯文本消息,消息会被ConsumerSessionAwareMessageListener的onMessage方法进行处理,在onMessage方法中ConsumerSessionAwareMessageListener就是简单的把接收到的纯文本信息的内容打印出来了,之后再往queueDestination发送了一个纯文本消息,消息内容是“ConsumerSessionAwareMessageListener…”,该消息随后就被ConsumerMessageListener处理了,根据我们的定义,在ConsumerMessageListener中也只是简单的打印了一下接收到的消息内容。

1.3.3  MessageListenerAdapter

MessageListenerAdapter类实现了MessageListener接口和SessionAwareMessageListener接口,它的主要作用是将接收到的消息进行类型转换,然后通过反射的形式把它交给一个普通的Java类进行处理。

       MessageListenerAdapter会把接收到的消息做如下转换:

       TextMessage转换为String对象;

       BytesMessage转换为byte数组;

       MapMessage转换为Map对象;

       ObjectMessage转换为对应的Serializable对象。

       既然前面说了MessageListenerAdapter会把接收到的消息做一个类型转换,然后利用反射把它交给真正的目标处理器——一个普通的Java类进行处理(如果真正的目标处理器是一个MessageListener或者是一个SessionAwareMessageListener,那么Spring将直接使用接收到的Message对象作为参数调用它们的onMessage方法,而不会再利用反射去进行调用),那么我们在定义一个MessageListenerAdapter的时候就需要为它指定这样一个目标类。这个目标类我们可以通过MessageListenerAdapter的构造方法参数指定,如:

Xml代码  收藏代码
  1. <!-- 消息监听适配器 -->  
  2.     <bean id="messageListenerAdapter" class="org.springframework.jms.listener.adapter.MessageListenerAdapter">  
  3.         <constructor-arg>  
  4.             <bean class="com.tiantian.springintejms.listener.ConsumerListener"/>  
  5.         </constructor-arg>  
  6.     </bean>  


       也可以通过它的delegate属性来指定,如:

Xml代码  收藏代码
  1. <!-- 消息监听适配器 -->  
  2.     <bean id="messageListenerAdapter" class="org.springframework.jms.listener.adapter.MessageListenerAdapter">  
  3.         <property name="delegate">  
  4.             <bean class="com.tiantian.springintejms.listener.ConsumerListener"/>  
  5.         </property>  
  6.         <property name="defaultListenerMethod" value="receiveMessage"/>  
  7.     </bean>  


       前面说了如果我们指定的这个目标处理器是一个MessageListener或者是一个SessionAwareMessageListener的时候Spring将直接利用接收到的Message对象作为方法参数调用它们的onMessage方法。但是如果指定的目标处理器是一个普通的Java类时Spring将利用Message进行了类型转换之后的对象作为参数通过反射去调用真正的目标处理器的处理方法,那么Spring是如何知道该调用哪个方法呢?这是通过MessageListenerAdapter的defaultListenerMethod属性来决定的,当我们没有指定该属性时,Spring会默认调用目标处理器的handleMessage方法。

       接下来我们来看一个示例,假设我们有一个普通的Java类ConsumerListener,其对应有两个方法,handleMessage和receiveMessage,其代码如下:

Java代码  收藏代码
  1. package com.tiantian.springintejms.listener;  
  2.    
  3. public class ConsumerListener {  
  4.    
  5.     public void handleMessage(String message) {  
  6.         System.out.println("ConsumerListener通过handleMessage接收到一个纯文本消息,消息内容是:" + message);  
  7.     }  
  8.       
  9.     public void receiveMessage(String message) {  
  10.         System.out.println("ConsumerListener通过receiveMessage接收到一个纯文本消息,消息内容是:" + message);  
  11.     }  
  12.       
  13. }  


       假设我们要把它作为一个消息监听器来监听发送到adapterQueue的消息,这个时候我们就可以定义一个对应的MessageListenerAdapter来把它当做一个MessageListener使用。

Xml代码  收藏代码
  1. <!-- 消息监听适配器 -->  
  2. <bean id="messageListenerAdapter" class="org.springframework.jms.listener.adapter.MessageListenerAdapter">  
  3.     <property name="delegate">  
  4.         <bean class="com.tiantian.springintejms.listener.ConsumerListener"/>  
  5.     </property>  
  6.     <property name="defaultListenerMethod" value="receiveMessage"/>  
  7. </bean>  


       当然,有了MessageListener之后我们还需要配置其对应的MessageListenerContainer,这里配置如下:

Xml代码  收藏代码
  1. <!-- 消息监听适配器对应的监听容器 -->  
  2. <bean id="messageListenerAdapterContainer" class="org.springframework.jms.listener.DefaultMessageListenerContainer">  
  3.     <property name="connectionFactory" ref="connectionFactory"/>  
  4.     <property name="destination" ref="adapterQueue"/>  
  5.     <property name="messageListener" ref="messageListenerAdapter"/><!-- 使用MessageListenerAdapter来作为消息监听器 -->  
  6. </bean>  


       在上面的MessageListenerAdapter中我们指定了其defaultListenerMethod属性的值为receiveMessage,所以当MessageListenerAdapter接收到消息之后会自动的调用我们指定的ConsumerListener的receiveMessage方法。

       针对于上述代码我们定义测试代码如下:

Java代码  收藏代码
  1. package com.tiantian.springintejms.test;  
  2.    
  3. import javax.jms.Destination;  
  4.    
  5. import org.junit.Test;  
  6. import org.junit.runner.RunWith;  
  7. import org.springframework.beans.factory.annotation.Autowired;  
  8. import org.springframework.beans.factory.annotation.Qualifier;  
  9. import org.springframework.test.context.ContextConfiguration;  
  10. import org.springframework.test.context.junit4.SpringJUnit4ClassRunner;  
  11.    
  12. import com.tiantian.springintejms.service.ProducerService;  
  13.    
  14. @RunWith(SpringJUnit4ClassRunner.class)  
  15. @ContextConfiguration("/applicationContext.xml")  
  16. public class ProducerConsumerTest {  
  17.   
  18.     @Autowired  
  19.     @Qualifier("adapterQueue")  
  20.     private Destination adapterQueue;  
  21.   
  22.     @Test  
  23.     public void testMessageListenerAdapter() {  
  24.         producerService.sendMessage(adapterQueue, "测试MessageListenerAdapter");  
  25.     }  
  26.       
  27. }  


       这时候我们会看到控制台输出如下:


如果我们不指定MessageListenerAdapter的defaultListenerMethod属性,那么在运行上述代码时控制台会输出如下结果:


        MessageListenerAdapter
除了会自动的把一个普通Java类当做MessageListener来处理接收到的消息之外,其另外一个主要的功能是可以自动的发送返回消息。

     当我们用于处理接收到的消息的方法的返回值不为空的时候,Spring会自动将它封装为一个JMS Message,然后自动进行回复。那么这个时候这个回复消息将发送到哪里呢?这主要有两种方式可以指定。
       第一,可以通过发送的Message的setJMSReplyTo方法指定该消息对应的回复消息的目的地。这里我们把我们的生产者发送消息的代码做一下修改,在发送消息之前先指定该消息对应的回复目的地为一个叫responseQueue的队列目的地,具体代码如下所示:

Java代码  收藏代码
  1. package com.tiantian.springintejms.service.impl;  
  2.    
  3. import javax.jms.Destination;  
  4. import javax.jms.JMSException;  
  5. import javax.jms.Message;  
  6. import javax.jms.Session;  
  7. import javax.jms.TextMessage;  
  8.    
  9. import org.springframework.beans.factory.annotation.Autowired;  
  10. import org.springframework.beans.factory.annotation.Qualifier;  
  11. import org.springframework.jms.core.JmsTemplate;  
  12. import org.springframework.jms.core.MessageCreator;  
  13. import org.springframework.stereotype.Component;  
  14.    
  15. import com.tiantian.springintejms.service.ProducerService;  
  16.    
  17. @Component  
  18. public class ProducerServiceImpl implements ProducerService {   
  19.   
  20.     @Autowired  
  21.     private JmsTemplate jmsTemplate;  
  22.   
  23.     @Autowired  
  24.     @Qualifier("responseQueue")  
  25.     private Destination responseDestination;  
  26.       
  27.     public void sendMessage(Destination destination, final String message) {  
  28.         System.out.println("---------------生产者发送消息-----------------");  
  29.         System.out.println("---------------生产者发了一个消息:" + message);  
  30.         jmsTemplate.send(destination, new MessageCreator() {  
  31.             public Message createMessage(Session session) throws JMSException {  
  32.                 TextMessage textMessage = session.createTextMessage(message);  
  33.                 textMessage.setJMSReplyTo(responseDestination);  
  34.                 return textMessage;  
  35.             }  
  36.         });  
  37.     }  
  38.    
  39. }  


       接着定义一个叫responseQueue的队列目的地及其对应的消息监听器和监听容器。

Xml代码  收藏代码
  1. <!-- 用于测试消息回复的 -->  
  2. <bean id="responseQueue" class="org.apache.activemq.command.ActiveMQQueue">  
  3.     <constructor-arg>  
  4.         <value>responseQueue</value>  
  5.     </constructor-arg>  
  6. </bean>  
  7.   
  8. <!-- responseQueue对应的监听器 -->  
  9. <bean id="responseQueueListener" class="com.tiantian.springintejms.listener.ResponseQueueListener"/>  
  10.   
  11. <!-- responseQueue对应的监听容器 -->  
  12. <bean id="responseQueueMessageListenerContainer" class="org.springframework.jms.listener.DefaultMessageListenerContainer">  
  13.     <property name="connectionFactory" ref="connectionFactory"/>  
  14.     <property name="destination" ref="responseQueue"/>  
  15.     <property name="messageListener" ref="responseQueueListener"/>  
  16. </bean>  


       ResponseQueueListener的定义如下所示:

Java代码  收藏代码
  1. public class ResponseQueueListener implements MessageListener {  
  2.    
  3.     public void onMessage(Message message) {  
  4.         if (message instanceof TextMessage) {  
  5.             TextMessage textMessage = (TextMessage) message;  
  6.             try {  
  7.                 System.out.println("接收到发送到responseQueue的一个文本消息,内容是:" + textMessage.getText());  
  8.             } catch (JMSException e) {  
  9.                 e.printStackTrace();  
  10.             }  
  11.         }  
  12.     }  
  13.    
  14. }  

        接着把我们接收消息的ConsumerListener的receiveMessage方法改为如下:

Java代码  收藏代码
  1. /** 
  2.  * 当返回类型是非null时MessageListenerAdapter会自动把返回值封装成一个Message,然后进行回复 
  3.  * @param message 
  4.  * @return 
  5.  */  
  6. public String receiveMessage(String message) {  
  7.     System.out.println("ConsumerListener通过receiveMessage接收到一个纯文本消息,消息内容是:" + message);  
  8.     return "这是ConsumerListener对象的receiveMessage方法的返回值。";  
  9. }  

        我们可以看到在上述负责接收消息的receiveMessage方法有一个非空的返回值。

       接着我们运行我们的测试代码,利用生产者往我们定义好的MessageListenerAdapter负责处理的adapterQueue目的地发送一个消息。测试代码如下所示:

Java代码  收藏代码
  1. @RunWith(SpringJUnit4ClassRunner.class)  
  2. @ContextConfiguration("/applicationContext.xml")  
  3. public class ProducerConsumerTest {  
  4.    
  5.     @Autowired  
  6.     private ProducerService producerService;  
  7.   
  8.     @Qualifier("adapterQueue")  
  9.     @Autowired  
  10.     private Destination adapterQueue;     
  11.   
  12.     @Test  
  13.     public void testMessageListenerAdapter() {  
  14.         producerService.sendMessage(adapterQueue, "测试MessageListenerAdapter");  
  15.     }  
  16.       
  17. }  


       运行上述测试代码之后,控制台输出如下:


这说明我们的生产者发送消息被MessageListenerAdapter处理之后,MessageListenerAdapter确实把监听器的返回内容封装成一个Message往原Message通过setJMSReplyTo方法指定的回复目的地发送了一个消息。对于MessageListenerAdapter对应的监听器处理方法返回的是一个null值或者返回类型是void的情况,MessageListenerAdapter是不会自动进行消息的回复的,有兴趣的网友可以自己测试一下。

       第二,通过MessageListenerAdapter的defaultResponseDestination属性来指定。这里我们也来做一个测试,首先维持生产者发送消息的代码不变,即发送消息前不通过Message的setJMSReplyTo方法指定消息的回复目的地;接着我们在定义MessageListenerAdapter的时候通过其defaultResponseDestination属性指定其默认的回复目的地是“defaultResponseQueue”,并定义defaultResponseQueue对应的消息监听器和消息监听容器。

Xml代码  收藏代码
  1. <!-- 消息监听适配器 -->  
  2. <bean id="messageListenerAdapter" class="org.springframework.jms.listener.adapter.MessageListenerAdapter">  
  3.     <!-- <constructor-arg>  
  4.         <bean class="com.tiantian.springintejms.listener.ConsumerListener"/>  
  5.     </constructor-arg> -->  
  6.     <property name="delegate">  
  7.         <bean class="com.tiantian.springintejms.listener.ConsumerListener"/>  
  8.     </property>  
  9.     <property name="defaultListenerMethod" value="receiveMessage"/>  
  10.     <property name="defaultResponseDestination" ref="defaultResponseQueue"/>  
  11. </bean>  
  12.   
  13. <!-- 消息监听适配器对应的监听容器 -->  
  14. <bean id="messageListenerAdapterContainer" class="org.springframework.jms.listener.DefaultMessageListenerContainer">  
  15.     <property name="connectionFactory" ref="connectionFactory"/>  
  16.     <property name="destination" ref="adapterQueue"/>  
  17.     <property name="messageListener" ref="messageListenerAdapter"/><!-- 使用MessageListenerAdapter来作为消息监听器 -->  
  18. </bean>  
  19.   
  20. !-- 默认的消息回复队列 -->  
  21. <bean id="defaultResponseQueue" class="org.apache.activemq.command.ActiveMQQueue">  
  22.     <constructor-arg>  
  23.         <value>defaultResponseQueue</value>  
  24.     </constructor-arg>  
  25. </bean>  
  26.   
  27. <!-- defaultResponseQueue对应的监听器 -->  
  28. <bean id="defaultResponseQueueListener" class="com.tiantian.springintejms.listener.DefaultResponseQueueListener"/>  
  29.   
  30. <!-- defaultResponseQueue对应的监听容器 -->  
  31. <bean id="defaultResponseQueueMessageListenerContainer" class="org.springframework.jms.listener.DefaultMessageListenerContainer">  
  32.     <property name="connectionFactory" ref="connectionFactory"/>  
  33.     <property name="destination" ref="defaultResponseQueue"/>  
  34.     <property name="messageListener" ref="defaultResponseQueueListener"/>  
  35. </bean>  


       DefaultResponseQueueListener的代码如下所示:

Java代码  收藏代码
  1. package com.tiantian.springintejms.listener;  
  2.    
  3. import javax.jms.JMSException;  
  4. import javax.jms.Message;  
  5. import javax.jms.MessageListener;  
  6. import javax.jms.TextMessage;  
  7.    
  8. public class DefaultResponseQueueListener implements MessageListener {  
  9.    
  10.     public void onMessage(Message message) {  
  11.         if (message instanceof TextMessage) {  
  12.             TextMessage textMessage = (TextMessage) message;  
  13.             try {  
  14.                 System.out.println("DefaultResponseQueueListener接收到发送到defaultResponseQueue的一个文本消息,内容是:" + textMessage.getText());  
  15.             } catch (JMSException e) {  
  16.                 e.printStackTrace();  
  17.             }  
  18.         }  
  19.     }  
  20.    
  21. }  


       这时候运行如下测试代码:

Java代码  收藏代码
  1. @Test  
  2. public void testMessageListenerAdapter() {  
  3.     producerService.sendMessage(adapterQueue, "测试MessageListenerAdapter");  
  4. }  


       控制台将输出如下内容:


这说明MessageListenerAdapter会自动把真正的消息处理器返回的非空内容封装成一个Message发送回复消息到通过defaultResponseDestination属性指定的默认消息回复目的地。

       既然我们可以通过两种方式来指定MessageListenerAdapter自动发送回复消息的目的地,那么当我们两种方式都指定了而且它们的目的地还不一样的时候会怎么发送呢?是两个都发还是只发其中的一个呢?关于这部分的测试我这里就不赘述了,有兴趣的网友可以自己进行。这里我可以直接的告诉大家,当两种方式都指定了消息的回复目的地的时候使用发送消息的setJMSReplyTo方法指定的目的地将具有较高的优先级,MessageListenerAdapter将只往该方法指定的消息回复目的地发送回复消息。


附:

阅读全文……

标签 : , ,

Feed系统架构资料收集 - 张兆坤 - 博客频道 - CSDN.NET

腾讯微博主要使用拉模型,只有未读的微博数是使用推得模式实现的!拉模型的问题在于一个人跟随了几百或者上千的人的时候,去看关注的人所发的消息要进行多个层次的Map/Reduce才能得到结果,需要非常高效的获取最新Feed的方式以及快速的聚合算法,只用Memcache\Redis之类的从性能上是比较难于实现的,需要从数据层面或者是缓存的层面都进行聚合,再在应用层面进行聚合,技术难度比较大!这个模式属于知易行难,绝大多数公司不具备构建基础设施的能力!

新浪微博使用推拉结合的方式,大号不推送,小号则推送,看Feeds的时候,需要将推过来的Feeds索引数据与关注的大号的Feed进行聚合,小小的牺牲下拉的性能一下子就将大号的推送问题解决掉了!

对于稍微小些的网站,比如Pinterest和花瓣都使用推的方式来实现,PInterest的直接在Redis中保存500个最新的索引信息,使用Python脚本定时来扫描,保证缓存的索引信息始终只保存最新的500个,老的信息则直接丢弃掉,花瓣则将老索引存储到LevelDBA中去了!

Pinterest网站的内容信息缓存在memcache中,关系信息则缓存到Redis中,持久化方式保存!对于那种大号的粉丝,亦或是关注的人数太多则需要将关系数据拆分之后再缓存起来,对于动态变化的部分则需要独立存放,在使用的时候需要将两部分数据聚合,在可变部分达到一定长度的时候,需要与不变的部分进行合并!

当然推送的时候,所有的网站都使用异步的方式来实现!

阅读全文……

标签 : ,

百万用户时尚分享网站feed系统扩展实践-CSDN.NET

Fashiolista是一个在线的时尚交流网站,用户可以在上面建立自己的档案,和他人分享自己的以及在浏览网页时看到的时尚物品。目前,Fashiolista的用户来自于全球100多个国家,用户达百万级,每日分享的时尚物品超过500万。作为一个以社交、分享的网站,feed系统占据了网站的核心架构,Fashiolista的创始人兼CTO Thierry Schellenbach撰写了一篇博客,分享了自家网站feed系统建设的经验,译文如下:

Fashiolista最初是我们作为兴趣在业余时间开发的一个项目,当初完全没有想到它会成长为规模如此大的在线时尚交流网站。最早的版本开发用了大概两周的时间,当时feed信息流推送系统相当简单。在这里分享一些我们扩展feed系统的经验。

对于许多大型的创业公司,如Pinterest、Instagram、Wanelo和Fashiolista来说,feed是一个核心组件。在Fashiolista网上的 flat feed、aggregated feed和notification系统功能都是靠feed系统来支撑的。本文中将介绍我们在扩展feed系统中遇到的问题,以及你自己方案中的设计决策。随着越来越多的应用依赖于feed系统,理解feed系统的基本工作原理变得至关重要了。

另外,Fashiolista的feed系统Python版本——Feedly已经开源了。

Feed简介

feed系统的扩展问题曾引起过广泛关注,这个解决方案是为了在网络拥挤的情况下,构建一个类似于Facebook新鲜事feed、Twitter流或Fashiolista的feed页面。这些系统的共同点在于向用户展示其关注的人的动态,我们就是基于这个标准来构建动态数据流的,诸如“Thierry在Fashiolista列表中添加了一件服饰”或“Tommaso发布了一条twitter”。

构建这个feed系统用到了两个策略:


  1. 拉取(Pull),读取的过程中收集feed。
  2. 推送(Push),写的过程中提前计算好feed。


大多数实时在线应用程序会使用这两种方法的组合,将动态推送给你的粉丝的过程被称为消息分发(fanout)。

历史和背景

Fashiolista的feed系统经过了三次重大改进。第一个版本基于PostgreSQL数据库,第二个版本使用Redis数据库,目前的版本采用Cassandra数据库。为了便于读者更好的理解这些版本更替的时间和原因,笔者会首先介绍一些背景知识。

第一部分——数据库

第一版本的数据库查询语句很简单,类似于这种:

select * from love where user_id in (...)

令人惊讶的是这个系统的强健性还不错。当love(类似于“赞”了某件服饰)的数量达到百万时,它运行得很好,超过500万时,依然没有问题。我们还打赌说这个系统不能支持千万的数量级,但是当love到达千万时,它依然运行得很好。这个简单的系统支撑着我们的系统达到了百万的用户和过亿的love,期间只进行了一些小改动。之后随着用户的增多,这个系统开始出现波动,部分用户的延时长达数秒,在参考了很多关于feed系统的架构设计之后,我们开发了第一个基于Redis的Feedly。

第二阶段——Redis和Feedly

我们为每个用户建立一个用Redis存储的feed,当你love了一件服饰时,这个动态会分发给你所有的粉丝。我们尝试了一些小技巧来减少内存的消耗(笔者会在下面具体介绍),Redis的启动和保持确实比较简单。我们使用Twemproxy在几台Redis机器上进行共享,使用Sentinel做自动备份。

Redis是一个好的解决方案,但是几个原因迫使我们不得不寻找新的方案。首先,我们希望支持多文档类型,而Redis返回数据库查询更困难,并且提高了存储需求。另外,随着业务的增大,数据库回滚也变得越来越慢。这些问题只能靠在Redis上存储更多的数据来解决,但是这样做的成本太高了。


第三阶段——Cassandra和Feedly


通过比较HBase、DynamoDB和Cassandra2.0,我们最终选择了Cassandra,因为它拥有几个移动部件,Instagram使用的数据库就是Cassandra,并且Datastax为它提供支持。Fashiolista目前在flat feed中完全采取推送流,聚合feed采用推送和拉取混合的技术。我们在每个用户的feed中最多保存3600条动态,目前占用了2.12TB的存储空间。由明星用户带来的系统波动我们也采取了一些方式进行缓解,包括:优先队列、扩大容量和自动扩展等。

Feed设计

笔者认为Fashiolista设计的改进过程非常有代表性,在构建一个feed系统时(尤其是使用Feedly)有几个重要的设计问题需要考虑。

1.非规范化Vs规范化

规范化的方法是,你关注的人的feed列表中是每条动态的ID,非规范的存储是动态的所有信息。

仅存储ID可以大幅度减少内存消耗,然而这意味着每次加载feed都要重新访问数据库。如何选择取决于你在进行非规范化存储时,复制数据的频率。比如构建一个消息通知系统和一个feed系统有很大的区别:通知系统中每个动作的发生只需要被发送给几个用户,而feed系统中每个动态的数据可能要被复制给成千上万的粉丝。

另外,如何选择取决于你的存储架构,使用Redis时,内存是需要特别注意的问题;而使用Cassandra要占用大量的存储空间,但是对于规范化数据来说使用并不简单。

对于feed通知和基于Cassandra构建的feed,笔者建议将你的数据非规范化。而基于Redis的feed你需要最小化内存消耗,并保持数据规范化。采用Feedly可以轻松实现两种方案。

2.基于生产者的选择性分发

Yahoo的Adam Silberstein等人所著的论文中,提出了一种选择性推送用户feed的方法,Twitter目前也在使用类似的方法。明星用户的消息分发会给系统带来突然和巨大的负载压力,这意味着必须要预留出额外的空间来保持实时性。这篇论文中建议通过选择性地分发消息,来减少这些明星用户带来的负载。Twitter采用了这个方法后,在用户读取时才加载这些明星用户的tweet,性能得到了大幅度提升。


3.基于消费者的选择性分发


另外一种选择性分发方式是指对那些活跃用户(比如过去一周登录过的用户)分发消息。我们对这个方法进行了修改,为活跃用户存储最近的3600条动态,为非活跃用户存储180条,读取180条之后的数据需要重新访问数据库,这种方式对于非活跃用户的体验不太好,但是能有效降低内存消耗。

Silberstein等人认为最适合选择性推送模式的情境是:

  1. 生产者偶尔生产动态信息
  2. 消费者经常请求feed


遗憾的是Fashiolista还不需要如此复杂的系统,很好奇业务要达到多少数量级才会需要这种解决方案。

4.优先级

 一个替代的策略是在分发任务时采取不同的优先级,将给活跃用户的分发任务设为高优先级,向非活跃用户的分发任务设为低优先级。Fashiolista为高优先级的用户预留了一个较大的缓存空间,来处理随时的峰值。对于低优先级用户,我们靠自动扩展和点实例。在实践中,这意味着非活跃用户的feed会有一定的延时。使用优先级降低了明星用户对系统的负载压力,虽然没有解决根本问题,但大幅度降低了系统负载峰值的量级。


5.Redis Vs Cassandra

Fashiolista和Instagram都经历了从Redis开始,然后转战Cassandra的过程。笔者之所以会推荐从Redis开始是因为Redis更容易启动和维持。

然而Redis存在一定的限制,所有的数据需要被存储在RAM中,成本很高。另外,Redis不支持分片,这意味着你必须在结点间分片(Twemproxy是一个不错的选择),这种分片很容易,但是添加和删除节点时的数据处理很复杂。当然你可以将Redis作为缓存,然后重新访问数据库,来克服这个限制。但是随着访问数据库的成本越来越高,笔者建议还是用Cassandra代替Redis。

Cassandra Python的生态系统正在发生巨变,CQLEngine和Python-Driver都是很优秀的项目,但是它们需要投入一定的时间去学习。

结论


在构建自己的feed解决方案时,有很多因素需要在节点分片时考虑:选择何种存储架构?如何处理明星用户带来的负载峰值?非规范化数据到何种程度?笔者希望借助这篇文章能够为你提供一些建议。

Feedly不会为你做任何选择,这仅是一个构建feed系统的框架,你可以自己决定内部的技术细节。可以看Feedly的介绍进行了解或参看操作手册构建一个Pinterestsque应用程序。

请注意只有数据库中的用户达到百万时,你才会需要解决这个问题。在Fashiolista简单的数据库解决方案就支撑我们达到了百万用户和过亿的love。

更多关于feed系统的设计,笔者强烈建议看一下这些文章:


原文链接:Design Decisions For Scaling Your High Traffic Feeds(编译/周小璐 审校/仲浩)

阅读全文……

标签 : ,

完全用nosql轻松打造千万级数据量的微博系统 - 开源中国社区

其实微博是一个结构相对简单,但数据量却是很庞大的一种产品.标题所说的是千万级数据量也并不是一千万条微博信息而已,而是千万级订阅关系之间发布。在看 我这篇文章之前,大多数人都看过sina的杨卫华大牛的微博开发大会上的演讲.我这也不当复读机了,挑重点跟大家说一下。

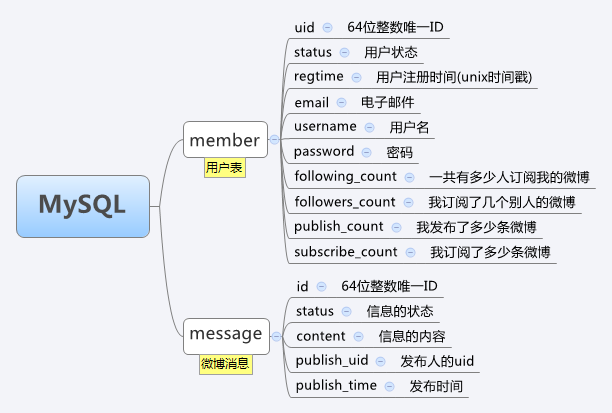
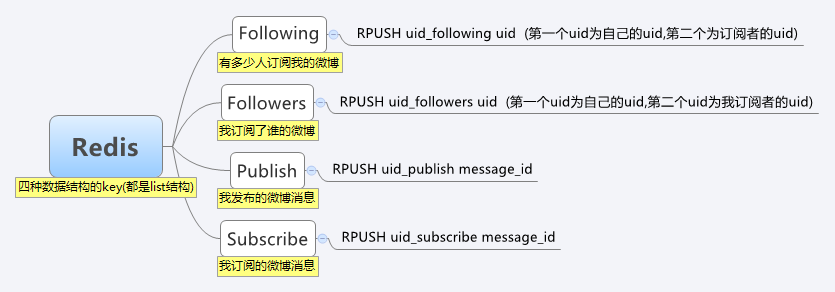
大家都知道微博的难点在于明星会员问题,什么是明星会员问题了,就是刘德华来咱这开了微博,他有几百万的粉丝订阅者,他发一条微博信息,那得一下子把微博 信息发布到几百万的粉丝里去,如果黎明、郭富城等四大天王都来咱来开微博,那咱小站不是死翘翘了.所以这时消息队列上场了。在我的架构里 有一个异步publish集群,publish的任务都去zeromq队列读取队列.zeromq是目前已知开源的消息传递最快的一个。具体关于 zeromq可以自己google。zeromq有一个问题是不能持久化数据,这个自己做持久化存储.回过刚才那个话题, 把明星会员的粉丝按照"活跃度"进行分级。"活跃度"是根据登陆频度,时间,发布微博等因素大致分为铁杆粉丝、爱理不理、半死不活三大类分到不同的发布集 群中去. 铁杆粉丝类型的异步发布集群,发布速度肯定是最快的.微博的信息是用handler socket保存到mysql。这个信息ID,是用rdtsc+2位随机整数拼接而成的 64位整数唯一ID,防止出现自增ID出现的多服务器 id一致性的问题. 在publish的时候,集群只是把微博信息的ID发送给redis的订阅者。所以这个数据是很快的。而且订阅者的list里只保存的是ID.在内存的占 用率上也不是很高.

下面我给大家看一下我的mysql和redis数据结构

在我的结构中还有一个重要角色就是"Key GPS Server"(简称:KGS)简单来说,这个是分布式数据存储的中心索引服务器.一切数据的存储和获取,都通过KGS来定位. KGS支持多个服务器,多个机房多重备份存储。KGS是以Tokyo Cabinet的hash db为存储的socket server。记录key跟服务器之间的对应关系. KGS的任务就是告知key该存储在哪几台服务器上,或者告知该key存储在哪几台服务器上,并不做其他的服务.这样大大的减轻KGS的压力.

再说一下Redis集群,redis是以纯内存形式模式运行,关闭了热备的功能(redis的热备并不是那么好). 自己写了个backend server.在每台运行redis的机子上都运行着backend socket 进程, backend进程也是以tc的hash db为存储。备份着当前服务器的redis数据。当redis重启的时候,从本机的bakcend db 加载所有数据. Redis的集群是以用户水平切分法来分布的

现在该轮到mysql里, 在这个架构中,基本消除了这边缓存 那边缓存的问题。因为在这个集群中的每个服务都是高速运行的.唯一的一处的cache 就是在php端的eAccelerator local cache. eAccelerator是基于共享内存的,所有速度比基于socket类型的cache快多了. eAccelerator 缓存了用户top N条的微博信息还有从KGS查询的结果。 看到这里有人问了,你把用户信息和微博信息都放在mysql里,怎么能不用cache了.嘿嘿,因为我用了 handler socket。HS 是小日本写的一款mysql插件.HS避开了MySQL通讯协议,直接读取MySQL引擎。在多核、大内存、 InnoDB引擎环境,性能直超memcached.HS能以Key-Value方式直接读写mysql引擎

总结

Google首席科学家讲过一句话,就是一个大的复杂的系统,应该要分解成很多小的服务. 我的这个架构也是由一个个小的集群来共同处理大数据量发布数据。有的人为什么不用mongodb了,因为mongodb是一款大众性的分布式nosql db,我们有自己的key分布策略,不太适合用mongodb. 不理解redis的存储关系的同学,可以先参考一下 Retwis, Retwis是用纯redis实现的简单微博.

具体的架构图、流程图、ppt文件。请下载附件来阅读.   http://code.google.com/p/php-tokyocabinet/downloads/detail?name=micro-blog-qiye.tar.bz2&can=2&q=#makechanges

我的QQ: 531020471 mail: lijinxing#gmail.com

阅读全文……

标签 : ,

Synchronous Request Response with ActiveMQ and Spring | CodeDependents

Request Response with JMS

ActiveMQ documentation actually has a pretty good overview of how request-response semantics work in JMS.

You might think at first that to implement request-response type operations in JMS that you should create a new consumer with a selector per request; or maybe create a new temporary queue per request.

Creating temporary destinations, consumers, producers and connections are all synchronous request-response operations with the broker and so should be avoided for processing each request as it results in lots of chat with the JMS broker.

The best way to implement request-response over JMS is to create a temporary queue and consumer per client on startup, set JMSReplyTo property on each message to the temporary queue and then use a correlationID on each message to correlate request messages to response messages. This avoids the overhead of creating and closing a consumer for each request (which is expensive). It also means you can share the same producer & consumer across many threads if you want (or pool them maybe).

This is a pretty good start but it requires some tweaking to work best in Spring. It also should be noted that Lingoand Camel are also suggested as options when using ActiveMQ. In my previous post I addressed why I don’t use either of these options. In short Camel is more power than is needed for basic messaging and Lingo is built onJencks, neither of which have been updated in years.

Request Response in Spring

The first thing to notice is that its infeasible to create a consumer and temporary queue per client in Spring since pooling resources is required overcome the JmsTemplate gotchas. To get around this, I suggest using predefined request and response queues, removing the overhead of creating a temporary queue for each request/response. To allow for multiple consumers and producers on the same queue the JMSCorrelationId is used to correlated the request with its response message.

At this point I implemented the following naive solution:

1
2
3
4
5
6
7
8
9
10
11
12
13
14
15
16
17
18
19
20
21
22
23
24
25
26
27
28
29
30
31
@Component
public class Requestor {
 
    private static final class CorrelationIdPostProcessor implements MessagePostProcessor {
 
        private final String correlationId;
 
        public CorrelationIdPostProcessor( final String correlationId ) {
            this.correlationId = correlationId;
        }
 
        @Override
        public Message postProcessMessage( final Message msg ) throws JMSException {
            msg.setJMSCorrelationID( correlationId );
            return msg;
        }
    }
 
    private final JmsTemplate jmsTemplate;
 
    @Autowired
    public RequestGateway( JmsTemplate jmsTemplate ) {
        this.jmsTemplate = jmsTemplate;
    }
 
    public String request( final String request, String queue ) throws IOException {
        final String correlationId = UUID.randomUUID().toString();
        jmsTemplate.convertAndSend( queue+".request", request, new CorrelationIdPostProcessor( correlationId ) );
        return (String) jmsTemplate.receiveSelectedAndConvert( queue+".response", "JMSCorrelationID='" + correlationId + "'" );
    }
}

This worked for a while until the system started occasionally timing out when making a request against a particularly fast responding service. After some debugging it became apparent that the service was responding so quickly that the receive() call was not fully initialized, causing it to miss the message. Once it finished initializing, it would wait until the timeout and fail. Unfortunately, there is very little in the way of documentation for this and the best suggestion I could find still seemed to leave open the possibility for the race condition by creating the consumer after sending the message. Luckily, according to the JMS spec, a consumer becomes active as soon as it is created and, assuming the connection has been started, it will start consuming messages. This allows for the reordering of the method calls leading to the slightly more verbose but also more correct solution. (NOTE: Thanks to Aaron Korver for pointing out that ProducerConsumer needs to implement SessionCallback and that true needs to be passed to the JmsTemplate.execute() for the connection to be started.)

1
2
3
4
5
6
7
8
9
10
11
12
13
14
15
16
17
18
19
20
21
22
23
24
25
26
27
28
29
30
31
32
33
34
35
36
37
38
39
40
41
42
43
44
45
46
47
48
49
50
51
52
53
54
55
56
57
58
59
@Component
public class Requestor {
 
    private static final class ProducerConsumer implements SessionCallback<Message> {
 
        private static final int TIMEOUT = 5000;
 
        private final String msg;
 
        private final DestinationResolver destinationResolver;
 
        private final String queue;
 
        public ProducerConsumer( final String msg, String queue, final DestinationResolver destinationResolver ) {
            this.msg = msg;
            this.queue = queue;
            this.destinationResolver = destinationResolver;
        }
 
        public Message doInJms( final Session session ) throws JMSException {
            MessageConsumer consumer = null;
            MessageProducer producer = null;
            try {
                final String correlationId = UUID.randomUUID().toString();
                final Destination requestQueue =
                        destinationResolver.resolveDestinationName( session, queue+".request", false );
                final Destination replyQueue =
                        destinationResolver.resolveDestinationName( session, queue+".response", false );
                // Create the consumer first!
                consumer = session.createConsumer( replyQueue, "JMSCorrelationID = '" + correlationId + "'" );
                final TextMessage textMessage = session.createTextMessage( msg );
                textMessage.setJMSCorrelationID( correlationId );
                textMessage.setJMSReplyTo( replyQueue );
                // Send the request second!
                producer = session.createProducer( requestQueue );
                producer.send( requestQueue, textMessage );
                // Block on receiving the response with a timeout
                return consumer.receive( TIMEOUT );
            }
            finally {
                // Don't forget to close your resources
                JmsUtils.closeMessageConsumer( consumer );
                JmsUtils.closeMessageProducer( producer );
            }
        }
    }
 
    private final JmsTemplate jmsTemplate;
 
    @Autowired
    public Requestor( final JmsTemplate jmsTemplate ) {
        this.jmsTemplate = jmsTemplate;
     }
 
    public String request( final String request, String queue ) {
        // Must pass true as the second param to start the connection
        return (String) jmsTemplate.execute( new ProducerConsumer( msg, queue, jmsTemplate.getDestinationResolver() ), true );
    }
}

About Pooling

Once the request/response logic was correct it was time to load test. Almost instantly, memory usage exploded and the garbage collector started thrashing. Inspecting ActiveMQ with the Web Console showed that MessageConsumers were hanging around even though they were being explicitly closed using Spring’s own JmsUtils. Turns out, the CachingConnectionFactory‘s JavaDoc held the key to what was going on: “Note also that MessageConsumers obtained from a cached Session won’t get closed until the Session will eventually be removed from the pool.” However, if the MessageConsumers could be reused this wouldn’t be an issue. Unfortunately, CachingConnectionFactory caches MessageConsumers based on a hash key which contains the selector among other values. Obviously each request/response call, with its necessarily unique selector, was creating a new consumer that could never be reused. Luckily ActiveMQ provides a PooledConnectionFactory which does not cache MessageConsumers and switching to it fixed the problem instantly. However, this means that each request/response requires a new MessageConsumer to be created. This is adds overhead but its the price that must be payed to do synchronous request/response.

阅读全文……

标签 : , ,

JMS&MQ系列之JMS的请求和回应 - geloin - 博客频道 - CSDN.NET

代理类:


[java] view plaincopy
 
  1. /** 
  2.  *  
  3.  * @author geloin 
  4.  * @date 2012-9-14 下午5:57:36 
  5.  */  
  6. package com.geloin.activemq.test4;  
  7.   
  8. import org.apache.activemq.broker.BrokerService;  
  9.   
  10. /** 
  11.  *  
  12.  * @author geloin 
  13.  * @date 2012-9-14 下午5:57:36 
  14.  */  
  15. public class Broker {  
  16.       
  17.     /** 
  18.      * 创建并启动代理 
  19.      *  
  20.      * @author geloin 
  21.      * @date 2012-9-14 下午5:58:35 
  22.      * @throws Exception 
  23.      */  
  24.     private void createBroker() throws Exception {  
  25.         BrokerService broker = new BrokerService();  
  26.         broker.setPersistent(false);  
  27.         broker.setUseJmx(false);  
  28.         broker.addConnector("tcp://localhost:61616");  
  29.         broker.start();  
  30.           
  31.         System.out.println("\nPress any key to stop broker\n");  
  32.         System.in.read();  
  33.           
  34.         broker.start();  
  35.     }  
  36.       
  37.     /** 
  38.      *  
  39.      *  
  40.      * @author geloin 
  41.      * @date 2012-9-14 下午5:59:30 
  42.      * @param args 
  43.      * @throws Exception 
  44.      */  
  45.     public static void main(String[] args) throws Exception {  
  46.         Broker broker = new Broker();  
  47.         broker.createBroker();  
  48.     }  
  49. }  


        服务端:


[java] view plaincopy
 
  1. /** 
  2.  *  
  3.  * @author geloin 
  4.  * @date 2012-9-14 下午5:37:38 
  5.  */  
  6. package com.geloin.activemq.test4;  
  7.   
  8. import javax.jms.Connection;  
  9. import javax.jms.DeliveryMode;  
  10. import javax.jms.Destination;  
  11. import javax.jms.Message;  
  12. import javax.jms.MessageConsumer;  
  13. import javax.jms.MessageListener;  
  14. import javax.jms.MessageProducer;  
  15. import javax.jms.Session;  
  16. import javax.jms.TextMessage;  
  17.   
  18. import org.apache.activemq.ActiveMQConnectionFactory;  
  19.   
  20. /** 
  21.  * 服务进程 
  22.  *  
  23.  * @author geloin 
  24.  * @date 2012-9-14 下午5:37:38 
  25.  */  
  26. public class Server implements MessageListener {  
  27.   
  28.     private String brokerURL = "tcp://localhost:61616";  
  29.     private Connection conn;  
  30.     private Session session;  
  31.     private String requestQueue = "TEST.QUEUE";  
  32.     private MessageProducer producer;  
  33.     private MessageConsumer consumer;  
  34.   
  35.     /** 
  36.      * 消息处理 
  37.      *  
  38.      * @author geloin 
  39.      * @date 2012-9-14 下午5:53:46 
  40.      * @param messageText 
  41.      * @return 
  42.      */  
  43.     private String handleRequest(String messageText) {  
  44.         return "Response to '" + messageText + "'";  
  45.     }  
  46.   
  47.     /* 
  48.      * (non-Javadoc) 
  49.      *  
  50.      * @see javax.jms.MessageListener#onMessage(javax.jms.Message) 
  51.      */  
  52.     @Override  
  53.     public void onMessage(Message message) {  
  54.         // 监听到有消息传送至此时,执行onMessage  
  55.         try {  
  56.             // 若有消息传送到服务时,先创建一个文本消息  
  57.             TextMessage response = this.session.createTextMessage();  
  58.             // 若从客户端传送到服务端的消息为文本消息  
  59.             if (message instanceof TextMessage) {  
  60.                 // 先将传送到服务端的消息转化为文本消息  
  61.                 TextMessage txtMsg = (TextMessage) message;  
  62.                 // 取得文本消息的内容  
  63.                 String messageText = txtMsg.getText();  
  64.                 // 将客户端传送过来的文本消息进行处理后,设置到回应消息里面  
  65.                 response.setText(handleRequest(messageText));  
  66.             }  
  67.             // 设置回应消息的关联ID,关联ID来自于客户端传送过来的关联ID  
  68.             response.setJMSCorrelationID(message.getJMSCorrelationID());  
  69.             // 生产者发送回应消息,目的由客户端的JMSReplyTo定义,内容即刚刚定义的回应消息  
  70.             producer.send(message.getJMSReplyTo(), response);  
  71.   
  72.         } catch (Exception e) {  
  73.             e.printStackTrace();  
  74.         }  
  75.     }  
  76.   
  77.     /** 
  78.      *  
  79.      * @author geloin 
  80.      * @date 2012-9-14 下午5:37:39 
  81.      * @param args 
  82.      */  
  83.     public static void main(String[] args) throws Exception {  
  84.         // 定义并启动服务  
  85.         Server server = new Server();  
  86.         server.start();  
  87.   
  88.         // 监听控制器输入  
  89.         System.out.println("\nPress any key to stop the server\n");  
  90.         System.in.read();  
  91.   
  92.         // 停止服务  
  93.         server.stop();  
  94.     }  
  95.   
  96.     /** 
  97.      * 服务 
  98.      *  
  99.      * @author geloin 
  100.      * @date 2012-9-14 下午5:55:49 
  101.      * @throws Exception 
  102.      */  
  103.     public void start() throws Exception {  
  104.         // 使用tcp协议创建连接通道并启动  
  105.         ActiveMQConnectionFactory factory = new ActiveMQConnectionFactory(  
  106.                 brokerURL);  
  107.         conn = factory.createConnection();  
  108.         conn.start();  
  109.   
  110.         // 创建session及消息的目的地,并设定交互时使用的存储方式,同时定义队列名称,客户端通过此名称连接  
  111.         session = conn.createSession(false, Session.AUTO_ACKNOWLEDGE);  
  112.         Destination dest = session.createQueue(requestQueue);  
  113.   
  114.         // 创建生产者,并设定分配模式,生产者的目的地为null,因为它的目的地由JMSReplyTo定义  
  115.         producer = session.createProducer(null);  
  116.         producer.setDeliveryMode(DeliveryMode.NON_PERSISTENT);  
  117.   
  118.         // 消费者,及消费者的临听程序  
  119.         consumer = session.createConsumer(dest);  
  120.         consumer.setMessageListener(this);  
  121.     }  
  122.   
  123.     /** 
  124.      * 回收资源 
  125.      *  
  126.      * @author geloin 
  127.      * @date 2012-9-13 上午9:42:06 
  128.      * @throws Exception 
  129.      */  
  130.     private void stop() {  
  131.         try {  
  132.             if (null != producer) {  
  133.                 producer.close();  
  134.             }  
  135.   
  136.             if (null != consumer) {  
  137.                 consumer.close();  
  138.             }  
  139.   
  140.             if (null != session) {  
  141.                 session.close();  
  142.             }  
  143.   
  144.             if (null != conn) {  
  145.                 conn.close();  
  146.             }  
  147.         } catch (Exception e) {  
  148.             e.printStackTrace();  
  149.         }  
  150.     }  
  151. }  


        客户端:


[java] view plaincopy
 
  1. /** 
  2.  *  
  3.  * @author geloin 
  4.  * @date 2012-9-14 下午6:00:15 
  5.  */  
  6. package com.geloin.activemq.test4;  
  7.   
  8. import java.util.UUID;  
  9.   
  10. import javax.jms.Connection;  
  11. import javax.jms.DeliveryMode;  
  12. import javax.jms.Destination;  
  13. import javax.jms.JMSException;  
  14. import javax.jms.Message;  
  15. import javax.jms.MessageConsumer;  
  16. import javax.jms.MessageListener;  
  17. import javax.jms.MessageProducer;  
  18. import javax.jms.Session;  
  19. import javax.jms.TextMessage;  
  20.   
  21. import org.apache.activemq.ActiveMQConnectionFactory;  
  22.   
  23. /** 
  24.  *  
  25.  * @author geloin 
  26.  * @date 2012-9-14 下午6:00:15 
  27.  */  
  28. public class Client implements MessageListener {  
  29.   
  30.     private String brokerURL = "tcp://localhost:61616";  
  31.     private Connection conn;  
  32.     private Session session;  
  33.     private String requestQueue = "TEST.QUEUE";  
  34.     private MessageProducer producer;  
  35.     private MessageConsumer consumer;  
  36.     private Destination tempDest;  
  37.       
  38.     /* (non-Javadoc) 
  39.      * @see javax.jms.MessageListener#onMessage(javax.jms.Message) 
  40.      */  
  41.     @Override  
  42.     public void onMessage(Message message) {  
  43.         try {  
  44.             System.out.println("Receive response for: "  
  45.                     + ((TextMessage) message).getText());  
  46.         } catch (JMSException e) {  
  47.             e.printStackTrace();  
  48.         }  
  49.     }  
  50.   
  51.     /** 
  52.      * 启动 
  53.      *  
  54.      * @author geloin 
  55.      * @date 2012-9-13 下午7:49:00 
  56.      */  
  57.     private void start() {  
  58.         try {  
  59.             // 使用tcp协议创建连接通道并启动  
  60.             ActiveMQConnectionFactory factory = new ActiveMQConnectionFactory(  
  61.                     brokerURL);  
  62.             conn = factory.createConnection();  
  63.             conn.start();  
  64.               
  65.             // 创建session及消息的目的地,并设定交互时使用的存储方式,同时定义队列名称,此名称与服务端相同  
  66.             session = conn.createSession(false, Session.AUTO_ACKNOWLEDGE);  
  67.             Destination dest = session.createQueue(requestQueue);  
  68.   
  69.             // 创建生产者,并设定分配模式  
  70.             producer = session.createProducer(dest);  
  71.             producer.setDeliveryMode(DeliveryMode.NON_PERSISTENT);  
  72.   
  73.             // 使用临时目的地创建消费者,及消费者的临听程序  
  74.             tempDest = session.createTemporaryQueue();  
  75.             consumer = session.createConsumer(tempDest);  
  76.             consumer.setMessageListener(this);  
  77.         } catch (Exception e) {  
  78.             e.printStackTrace();  
  79.         }  
  80.     }  
  81.   
  82.     /** 
  83.      * 停止 
  84.      *  
  85.      * @author geloin 
  86.      * @date 2012-9-13 下午7:49:06 
  87.      */  
  88.     public void stop() {  
  89.         try {  
  90.             if (null != producer) {  
  91.                 producer.close();  
  92.             }  
  93.   
  94.             if (null != consumer) {  
  95.                 consumer.close();  
  96.             }  
  97.   
  98.             if (null != session) {  
  99.                 session.close();  
  100.             }  
  101.   
  102.             if (null != conn) {  
  103.                 conn.close();  
  104.             }  
  105.         } catch (Exception e) {  
  106.             e.printStackTrace();  
  107.         }  
  108.     }  
  109.   
  110.     /** 
  111.      * 请求 
  112.      *  
  113.      * @author geloin 
  114.      * @date 2012-9-13 下午7:52:54 
  115.      * @param request 
  116.      * @throws Exception 
  117.      */  
  118.     public void request(String request) throws Exception {  
  119.         System.out.println("Requesting:" + request);  
  120.         TextMessage txtMsg = session.createTextMessage();  
  121.         txtMsg.setText(request);  
  122.   
  123.         txtMsg.setJMSReplyTo(tempDest);  
  124.   
  125.         String correlationId = UUID.randomUUID().toString();  
  126.         txtMsg.setJMSCorrelationID(correlationId);  
  127.   
  128.         producer.send(txtMsg);  
  129.     }  
  130.       
  131.     /** 
  132.      *  
  133.      * @author geloin 
  134.      * @date 2012-9-14 下午6:00:15 
  135.      * @param args 
  136.      */  
  137.     public static void main(String[] args) throws Exception {  
  138.         Client client = new Client();  
  139.         client.start();  
  140.         int i = 0;  
  141.         while (i++ < 10) {  
  142.             client.request("REQUEST-" + i);  
  143.         }  
  144.         Thread.sleep(3000);  
  145.         client.stop();  
  146.     }  
  147.   
  148. }  


        代码比较简单,是实现JMS的基本过程,从以上代码中,我们可以得出以下结论:


        1. 要实现交互,必须有代理,即Broker,该代理必须设定Connector,也即是我们所谓brokerURL。在服务端与客户端交互过程中,broker必须被启动;

        2. 要向外发送消息,需要执行以下步骤:

        (1) 通过第一步中的brokerURL创建ConnectionFactory;

        (2) 通过ConnectionFactory创建Connection并启动;

        (3) 通过Connection创建Session;

        (4) 通过Session创建发送目标;

        (5) 通过Session创建MessageProducer;

        (6) 通过Session创建Message;

        (7) 通过MessageProducer发送Message。

        3. 要接收消息,需要执行以下步骤:


        (1) 通过第一步中的brokerURL创建ConnectionFactory;

        (2) 通过ConnectionFactory创建Connection并启动;

        (3) 通过Connection创建Session;

        (4) 通过Session创建发送目标;

        (5) 通过Session创建MessageConsumer;

        (6) 通过MessageConsumer取得Message并分析处理。

        4. 若要实现交互,则注意以下几点:

        (1) 服务端和客户端使用同一个brokerURL;

        (2) 通常情况下,服务端和客户端各有一个MessageProducer和MessageConsumer;

        (3) 为使服务端能够回应多个客户端,通常将其MessageProducer的Destination设置为null,即不设定,而由JMSReplyTo定义;

        (4) 对应于服务端的MessageProducer的为null的Destination,若确定服务端与客户端能够交互,则在客户端可设置其MessageConsumer的Destination为临时Destination;

        (5) 为使服务端能够正常回应客户端,客户端需设置消息的JMSReplyTo属性及JMSCorrelationID,服务端需设置消息的JMSCorrelationID为客户端设定的JMSCorrelationID,producer的send的Destination为客户端设定的JMSReplyTo。

        5. 两个需要交互的MessageProducer和MessageConsumer之间除需要使用同一brokerURL外,还需要保障其Destination的对应,即保持在创建Destination时使用的queueName相同。

阅读全文……

标签 : ,

深入掌握JMS 12 系列

深入掌握JMS(一):JMS基础
1. JMS基本概念
     JMS(Java Message Service) 即Java消息服务。它提供标准的产生、发送、接收消息的接口简化企业应用的开发。它支持两种消息通信模型:点到点(point-to-point)(P2P)模型和发布/订阅(Pub/Sub)模型。P2P 模型规定了一个消息只能有一个接收者;Pub/Sub 模型允许一个消息可以有多个接收者。
    对于点到点模型,消息生产者产生一个消息后,把这个消息发送到一个Queue(队列)中,然后消息接收者再从这个Queue中读取,一旦这个消息被一个接收者读取之后,它就在这个Queue中消失了,所以一个消息只能被一个接收者消费。
    与点到点模型不同,发布/订阅模型中,消息生产者产生一个消息后,把这个消息发送到一个Topic中,这个Topic可以同时有多个接收者在监听,当一个消息到达这个Topic之后,所有消息接收者都会收到这个消息。
     
简单的讲,点到点模型和发布/订阅模型的区别就是前者是一对一,后者是一对多。 
2. 几个重要概念
   Destination:消息发送的目的地,也就是前面说的Queue和Topic。创建好一个消息之后,只需要把这个消息发送到目的地,消息的发送者就可以继续做自己的事情,而不用等待消息被处理完成。至于这个消息什么时候,会被哪个消费者消费,完全取决于消息的接受者。
    Message:从字面上就可以看出是被发送的消息。它有下面几种类型:
        StreamMessage:Java 数据流消息,用标准流操作来顺序的填充和读取。
        MapMessage:一个Map类型的消息;名称为 string 类型,而值为 Java 的基本类型。
        TextMessage:普通字符串消息,包含一个String。
        ObjectMessage:对象消息,包含一个可序列化的Java 对象
        BytesMessage:二进制数组消息,包含一个byte[]。
        XMLMessage: 一个XML类型的消息。
    最常用的是TextMessage和ObjectMessage。
   Session:与JMS提供者所建立的会话,通过Session我们才可以创建一个Message。
   Connection:与JMS提供者建立的一个连接。可以从这个连接创建一个会话,即Session。
   ConnectionFactory:那如何创建一个Connection呢?这就需要下面讲到的ConnectionFactory了。通过这个工厂类就可以得到一个与JMS提供者的连接,即Conection。
   Producer:消息的生产者,要发送一个消息,必须通过这个生产者来发送。
   MessageConsumer:与生产者相对应,这是消息的消费者或接收者,通过它来接收一个消息。
   前面多次提到JMS提供者,因为JMS给我们提供的只是一系列接口,当我们使用一个JMS的时候,还是需要一个第三方的提供者,它的作用就是真正管理这些Connection,Session,Topic和Queue等。

    通过下面这个简图可以看出上面这些概念的关系。

ConnectionFactory---->Connection--->Session--->Message
Destination + Session------------------------------------>Producer
Destination + Session------------------------------------>MessageConsumer
    那么可能有人会问: ConnectionFactory和Destination 从哪儿得到?
    这就和JMS提供者有关了. 如果在一个JavaEE环境中, 可以通过JNDI查找得到, 如果在一个非JavaEE环境中, 那只能通过JMS提供者提供给我们的接口得到了.


深入掌握JMS(二):一个JMS例子
        前一讲简单的介绍了一下JMS的基本概念, 这一讲结合一个例子让大家深入理解前一讲的基本概念. 首先需要做的是选择一个JMS提供者, 如果在JavaEE环境中可以不用考虑这些. 我们选择ActiveMQ, 官方地址:http://activemq.apache.org/. 网上有很多介绍ActiveMQ的文档, 所以在这里就不介绍了.

按照上一讲的这个简图,


ConnectionFactory---->Connection--->Session--->Message
Destination + Session------------------------------------>Producer
Destination + Session------------------------------------>MessageConsumer

首先需要得到ConnectionFactoy和Destination,这里创建一个一对一的Queue作为Destination。
ConnectionFactory factory = new ActiveMQConnectionFactory("vm://localhost");
Queue queue = new ActiveMQQueue("testQueue");

然后又ConnectionFactory创建一个Connection, 再启动这个Connection:
Connection connection = factory.createConnection();
connection.start();

接下来需要由Connection创建一个Session:
Session session = connection.createSession(false, Session.AUTO_ACKNOWLEDGE)
    现在暂且不用管参数的含义, 以后会详细讲到.

下面就可以创建Message了,这里创建一个TextMessage。
Message message = session.createTextMessage("Hello JMS!");

要想把刚才创建的消息发送出去,需要由Session和Destination创建一个消息生产者:
MessageProducer producer = session.createProducer(queue);

下面就可以发送刚才创建的消息了:
producer.send(message);

消息发送完成之后,我们需要创建一个消息消费者来接收这个消息:
MessageConsumer comsumer = session.createConsumer(queue);
Message recvMessage = comsumer.receive();

消息消费者接收到这个消息之后,就可以得到它的内容:
System.out.println(((TextMessage)recvMessage).getText());


至此,一个简单的JMS例子就完成了。下面是全部源码 :

import javax.jms.Connection;
import javax.jms.Message;
import javax.jms.MessageConsumer;
import javax.jms.MessageProducer;
import javax.jms.Queue;
import javax.jms.Session;
import javax.jms.TextMessage;

import org.apache.activemq.ActiveMQConnectionFactory;
import org.apache.activemq.command.ActiveMQQueue;

public class MessageSendAndReceive {

    public static void main(String[] args) throws Exception {
        ConnectionFactory factory = new ActiveMQConnectionFactory("vm://localhost");
   
        Connection connection = factory.createConnection();
        connection.start();
       
        Queue queue = new ActiveMQQueue("testQueue");
       
        final Session session = connection.createSession(false, Session.AUTO_ACKNOWLEDGE);
        Message message = session.createTextMessage("Hello JMS!");
       
        MessageProducer producer = session.createProducer(queue);
        producer.send(message);
   
        System.out.println("Send Message Completed!");
       
        MessageConsumer comsumer = session.createConsumer(queue);
        Message recvMessage = comsumer.receive();
        System.out.println(((TextMessage)recvMessage).getText());
    }

}

深入掌握JMS(三):MessageListener

消息的消费者接收消息可以采用两种方式:

1、consumer.receive() 或 consumer.receive(int timeout);
2、注册一个MessageListener。

采用第一种方式,消息的接收者会一直等待下去,直到有消息到达,或者超时。后一种方式会注册一个监听器,当有消息到达的时候,会回调它的onMessage()方法。下面举例说明:

MessageConsumer comsumer = session.createConsumer(queue);
comsumer.setMessageListener(new MessageListener(){
            @Override
            public void onMessage(Message m) {
                TextMessage textMsg = (TextMessage) m;
                try {
                    System.out.println(textMsg.getText());
                } catch (JMSException e) {
                    e.printStackTrace();
                }
            }
           
        });

深入掌握JMS(四):实战Queue

    Queue实现的是点到点模型,在下面的例子中,启动2个消费者共同监听一个Queue,然后循环给这个Queue中发送多个消息,我们依然采用ActiveMQ。

import javax.jms.Connection;
import javax.jms.DeliveryMode;
import javax.jms.JMSException;
import javax.jms.Message;
import javax.jms.MessageConsumer;
import javax.jms.MessageListener;
import javax.jms.MessageProducer;
import javax.jms.Queue;
import javax.jms.Session;
import javax.jms.TextMessage;

import org.apache.activemq.ActiveMQConnectionFactory;
import org.apache.activemq.command.ActiveMQQueue;


public class QueueTest {

    public static void main(String[] args) throws Exception {
        ActiveMQConnectionFactory factory = new ActiveMQConnectionFactory("vm://localhost");
   
        Connection connection = factory.createConnection();
        connection.start();


        //创建一个Queue
        Queue queue = new ActiveMQQueue("testQueue");

        //创建一个Session
        Session session = connection.createSession(false, Session.AUTO_ACKNOWLEDGE);


        //注册消费者1
        MessageConsumer comsumer1 = session.createConsumer(queue);
        comsumer1.setMessageListener(new MessageListener(){
            public void onMessage(Message m) {
                try {
                    System.out.println("Consumer1 get " + ((TextMessage)m).getText());
                } catch (JMSException e) {
                    e.printStackTrace();
                }
            }
        });


        //注册消费者2
        MessageConsumer comsumer2 = session.createConsumer(queue);
        comsumer2.setMessageListener(new MessageListener(){
            public void onMessage(Message m) {
                try {
                    System.out.println("Consumer2 get " + ((TextMessage)m).getText());
                } catch (JMSException e) {
                    e.printStackTrace();
                }
            }
           
        });


        //创建一个生产者,然后发送多个消息。
        MessageProducer producer = session.createProducer(queue);
        for(int i=0; i<10; i++){
            producer.send(session.createTextMessage("Message:" + i));
        }
    }

}

运行这个例子会得到下面的输出结果:


Consumer1 get Message:0
Consumer2 get Message:1
Consumer1 get Message:2
Consumer2 get Message:3
Consumer1 get Message:4
Consumer2 get Message:5
Consumer1 get Message:6
Consumer2 get Message:7
Consumer1 get Message:8
Consumer2 get Message:9

可以看出每个消息直被消费了一次,但是如果有多个消费者同时监听一个Queue的话,无法确定一个消息最终会被哪一个消费者消费。


深入掌握JMS(五):实战Topic

    与Queue不同的是,Topic实现的是发布/订阅模型,在下面的例子中,启动2个消费者共同监听一个Topic,然后循环给这个Topic中发送多个消息。

import javax.jms.Connection;
import javax.jms.JMSException;
import javax.jms.Message;
import javax.jms.MessageConsumer;
import javax.jms.MessageListener;
import javax.jms.MessageProducer;
import javax.jms.Session;
import javax.jms.TextMessage;
import javax.jms.Topic;

import org.apache.activemq.ActiveMQConnectionFactory;
import org.apache.activemq.command.ActiveMQTopic;


public class TopicTest {

    public static void main(String[] args) throws Exception {
        ActiveMQConnectionFactory factory = new ActiveMQConnectionFactory("vm://localhost");
   
        Connection connection = factory.createConnection();
        connection.start();
       
        //创建一个Topic
        Topic topic= new ActiveMQTopic("testTopic");
        Session session = connection.createSession(false, Session.AUTO_ACKNOWLEDGE);
        
        //注册消费者1
        MessageConsumer comsumer1 = session.createConsumer(topic);
        comsumer1.setMessageListener(new MessageListener(){
            public void onMessage(Message m) {
                try {
                    System.out.println("Consumer1 get " + ((TextMessage)m).getText());
                } catch (JMSException e) {
                    e.printStackTrace();
                }
            }
        });
       
        //注册消费者2
        MessageConsumer comsumer2 = session.createConsumer(topic);
        comsumer2.setMessageListener(new MessageListener(){
            public void onMessage(Message m) {
                try {
                    System.out.println("Consumer2 get " + ((TextMessage)m).getText());
                } catch (JMSException e) {
                    e.printStackTrace();
                }
            }
           
        });
       
        //创建一个生产者,然后发送多个消息。
        MessageProducer producer = session.createProducer(topic);
        for(int i=0; i<10; i++){
            producer.send(session.createTextMessage("Message:" + i));
        }
    }

}

运行后得到下面的输出结果:

Consumer1 get Message:0
Consumer2 get Message:0
Consumer1 get Message:1
Consumer2 get Message:1
Consumer1 get Message:2
Consumer2 get Message:2
Consumer1 get Message:3
Consumer2 get Message:3
Consumer1 get Message:4
Consumer2 get Message:4
Consumer1 get Message:5
Consumer2 get Message:5
Consumer1 get Message:6
Consumer2 get Message:6
Consumer1 get Message:7
Consumer2 get Message:7
Consumer1 get Message:8
Consumer2 get Message:8
Consumer1 get Message:9
Consumer2 get Message:9

说明每一个消息都会被所有的消费者消费。

深入掌握JMS(六):消息头

    一个消息对象分为三部分:消息头(Headers),属性(Properties)和消息体(Payload)。对于StreamMessage和MapMessage,消息本身就有特定的结构,而对于TextMessage,ObjectMessage和BytesMessage是无结构的。一个消息可以包含一些重要的数据或者仅仅是一个事件的通知。

    消息的Headers部分通常包含一些消息的描述信息,它们都是标准的描述信息。包含下面一些值:

  JMSDestination
       消息的目的地,Topic或者是Queue。

  JMSDeliveryMode
        消息的发送模式:persistent或nonpersistent。前者表示消息在被消费之前,如果JMS提供者DOWN了,重新启动后消息仍然存在。后者在这种情况下表示消息会被丢失。可以通过下面的方式设置:
       Producer.setDeliveryMode(DeliveryMode.NON_PERSISTENT);

       JMSTimestamp
       当调用send()方法的时候,JMSTimestamp会被自动设置为当前事件。可以通过下面方式得到这个值:
       long timestamp = message.getJMSTimestamp();

  JMSExpiration 
       表示一个消息的有效期。只有在这个有效期内,消息消费者才可以消费这个消息。默认值为0,表示消息永不过期。可以通过下面的方式设置:
       producer.setTimeToLive(3600000); //有效期1小时 (1000毫秒 * 60秒 * 60分)

  JMSPriority 
       消息的优先级。0-4为正常的优先级,5-9为高优先级。可以通过下面方式设置:
       producer.setPriority(9);

  JMSMessageID 
       一个字符串用来唯一标示一个消息。

  JMSReplyTo 
       有时消息生产者希望消费者回复一个消息,JMSReplyTo为一个Destination,表示需要回复的目的地。当然消费者可以不理会它。

  JMSCorrelationID 
       通常用来关联多个Message。例如需要回复一个消息,可以把JMSCorrelationID设置为所收到的消息的JMSMessageID。

  JMSType 
       表示消息体的结构,和JMS提供者有关。

  JMSRedelivered 
       如果这个值为true,表示消息是被重新发送了。因为有时消费者没有确认他已经收到消息或者JMS提供者不确定消费者是否已经收到。

    除了Header,消息发送者可以添加一些属性(Properties)。这些属性可以是应用自定义的属性,JMS定义的属性和JMS提供者定义的属性。我们通常只适用自定义的属性。

深入掌握JMS(七):DeliveryMode例子

    在下面的例子中,分别发送一个Persistent和nonpersistent的消息,然后关闭退出JMS。

import javax.jms.Connection;
import javax.jms.DeliveryMode;
import javax.jms.MessageProducer;
import javax.jms.Queue;
import javax.jms.Session;
import org.apache.activemq.ActiveMQConnectionFactory;
import org.apache.activemq.command.ActiveMQQueue;

public class DeliveryModeSendTest {

    public static void main(String[] args) throws Exception {
        ActiveMQConnectionFactory factory = new ActiveMQConnectionFactory("vm://localhost");
   
        Connection connection = factory.createConnection();
        connection.start();
       
        Queue queue = new ActiveMQQueue("testQueue");
        Session session = connection.createSession(false, Session.AUTO_ACKNOWLEDGE);
               
        MessageProducer producer = session.createProducer(queue);
        producer.setDeliveryMode(DeliveryMode.PERSISTENT);
        producer.send(session.createTextMessage("A persistent Message"));
       
        producer.setDeliveryMode(DeliveryMode.NON_PERSISTENT);
        producer.send(session.createTextMessage("A non persistent Message"));
       
        System.out.println("Send messages sucessfully!");
    }
}

    运行上面的程序,当输出“Send messages sucessfully!”时,说明两个消息都已经发送成功,然后我们结束它,来停止JMS Provider。

    接下来我们重新启动JMS Provicer,然后添加一个消费者:

import javax.jms.Connection;
import javax.jms.JMSException;
import javax.jms.Message;
import javax.jms.MessageConsumer;
import javax.jms.MessageListener;
import javax.jms.Queue;
import javax.jms.Session;
import javax.jms.TextMessage;
import org.apache.activemq.ActiveMQConnectionFactory;
import org.apache.activemq.command.ActiveMQQueue;

public class DeliveryModeReceiveTest {

    public static void main(String[] args) throws Exception {
        ActiveMQConnectionFactory factory = new ActiveMQConnectionFactory("vm://localhost");
   
        Connection connection = factory.createConnection();
        connection.start();
       
        Queue queue = new ActiveMQQueue("testQueue");
        Session session = connection.createSession(false, Session.AUTO_ACKNOWLEDGE);
       
        MessageConsumer comsumer = session.createConsumer(queue);
        comsumer.setMessageListener(new MessageListener(){
            public void onMessage(Message m) {
                try {
                    System.out.println("Consumer get " + ((TextMessage)m).getText());
                } catch (JMSException e) {
                    e.printStackTrace();
                }
            }
        });
    }
}

运行上面的程序,可以得到下面的输出结果:

Consumer get A persistent Message

可以看出消息消费者只接收到一个消息,它是一个Persistent的消息。而刚才发送的non persistent消息已经丢失了。

另外, 如果发送一个non persistent消息, 而刚好这个时候没有消费者在监听, 这个消息也会丢失.


深入掌握JMS(八):JMSReplyTo
上一篇 / 下一篇 2009-03-27 11:08:04

查看( 526 ) / 评论( 3 ) / 评分( 10 / 0 ) 
    在下面的例子中,首先创建两个Queue,发送者给一个Queue发送,接收者接收到消息之后给另一个Queue回复一个Message,然后再创建一个消费者来接受所回复的消息。

import javax.jms.Connection;
import javax.jms.JMSException;
import javax.jms.Message;
import javax.jms.MessageConsumer;
import javax.jms.MessageListener;
import javax.jms.MessageProducer;
import javax.jms.Queue;
import javax.jms.Session;
import javax.jms.TextMessage;

import org.apache.activemq.ActiveMQConnectionFactory;
import org.apache.activemq.command.ActiveMQQueue;

public class MessageSendReceiveAndReply {

    public static void main(String[] args) throws Exception {
        ActiveMQConnectionFactory factory = new ActiveMQConnectionFactory("vm://localhost");
   
        Connection connection = factory.createConnection();
        connection.start();
       
        //消息发送到这个Queue
        Queue queue = new ActiveMQQueue("testQueue");

        //消息回复到这个Queue
        Queue replyQueue = new ActiveMQQueue("replyQueue");
       
        final Session session = connection.createSession(false, Session.AUTO_ACKNOWLEDGE);

        //创建一个消息,并设置它的JMSReplyTo为replyQueue。
        Message message = session.createTextMessage("Andy");
        message.setJMSReplyTo(replyQueue);
       
        MessageProducer producer = session.createProducer(queue);
        producer.send(message);
           
        //消息的接收者
        MessageConsumer comsumer = session.createConsumer(queue);
        comsumer.setMessageListener(new MessageListener(){
            public void onMessage(Message m) {
                try {
                    //创建一个新的MessageProducer来发送一个回复消息。
                    MessageProducer producer = session.createProducer(m.getJMSReplyTo());
                    producer.send(session.createTextMessage("Hello " + ((TextMessage) m).getText()));
                } catch (JMSException e1) {
                    e1.printStackTrace();
                }
            }
           
        });
       
        //这个接收者用来接收回复的消息
        MessageConsumer comsumer2 = session.createConsumer(replyQueue);
        comsumer2.setMessageListener(new MessageListener(){
            public void onMessage(Message m) {
                try {
                    System.out.println(((TextMessage) m).getText());
                } catch (JMSException e) {
                    e.printStackTrace();
                }
            }
        });
    }

}

    首先消息生产者发送一个消息,内容为“Andy”, 然后消费者收到这个消息之后根据消息的JMSReplyTo,回复一个消息,内容为“Hello Andy‘。 最后在回复的Queue上创建一个接收回复消息的消费者,它输出所回复的内容。

    运行上面的程序,可以得到下面的输出结果:

Hello Andy

深入掌握JMS(九):Selector

    前面的例子中创建一个消息消费者使用的是:
          sesssion.createConsumer(destination)
另外,还提供了另一种方式:
    sesssion.createConsumer(destination, selector)
这里selector是一个字符串,用来过滤消息。也就是说,这种方式可以创建一个可以只接收特定消息的一个消费者。Selector的格式是类似于SQL-92的一种语法。可以用来比较消息头信息和属性。

下面的例子中,创建两个消费者,共同监听同一个Queue,但是它们的Selector不同,然后创建一个消息生产者,来发送多个消息。

import javax.jms.Connection;
import javax.jms.JMSException;
import javax.jms.Message;
import javax.jms.MessageConsumer;
import javax.jms.MessageListener;
import javax.jms.MessageProducer;
import javax.jms.Queue;
import javax.jms.Session;
import javax.jms.TextMessage;

import org.apache.activemq.ActiveMQConnectionFactory;
import org.apache.activemq.command.ActiveMQQueue;

public class JMSSelectorTest {

    public static void main(String[] args) throws Exception {
        ActiveMQConnectionFactory factory = new ActiveMQConnectionFactory("vm://localhost");
   
        Connection connection = factory.createConnection();
        connection.start();
       
        Queue queue = new ActiveMQQueue("testQueue");
       
        Session session = connection.createSession(false, Session.AUTO_ACKNOWLEDGE);
       
        MessageConsumer comsumerA = session.createConsumer(queue, "receiver = 'A'");
        comsumerA.setMessageListener(new MessageListener(){
            public void onMessage(Message m) {
                try {
                    System.out.println("ConsumerA get " + ((TextMessage) m).getText());
                } catch (JMSException e1) { }
            }
        });
       
        MessageConsumer comsumerB = session.createConsumer(queue, "receiver = 'B'");
        comsumerB.setMessageListener(new MessageListener(){
            public void onMessage(Message m) {
                try {
                    System.out.println("ConsumerB get " + ((TextMessage) m).getText());
                } catch (JMSException e) { }
            }
        });
       
        MessageProducer producer = session.createProducer(queue);
        for(int i=0; i<10; i++) {
            String receiver = (i%3 == 0 ? "A" : "B");
            TextMessage message = session.createTextMessage("Message" + i + ", receiver:" + receiver);
            message.setStringProperty("receiver", receiver);
            producer.send(message );
        }
    }
}

结果如下:
ConsumerA get Message0, receiver:A
ConsumerB get Message1, receiver:B
ConsumerB get Message2, receiver:B
ConsumerA get Message3, receiver:A
ConsumerB get Message4, receiver:B
ConsumerB get Message5, receiver:B
ConsumerA get Message6, receiver:A
ConsumerB get Message7, receiver:B
ConsumerB get Message8, receiver:B
ConsumerA get Message9, receiver:A

可以看出,消息消费者只会取走它自己感兴趣的消息。


深入掌握JMS(十):JMSCorrelationID与Selector

    前面讲过JMSCorrelationID主要是用来关联多个Message,例如需要回复一个消息的时候,通常把回复的消息的JMSCorrelationID设置为原来消息的ID。在下面这个例子中,创建了三个消息生产者A,B,C和三个消息消费者A,B,C。生产者A给消费者A发送一个消息,同时需要消费者A给它回复一个消息。B、C与A类似。
    简图如下:
       生产者A-----发送----〉消费者A-----回复------〉生产者A
        生产者B-----发送----〉消费者B-----回复------〉生产者B
        生产者C-----发送----〉消费者C-----回复------〉生产者C
   
    需要注意的是,所有的发送和回复都使用同一个Queue,通过Selector区分。

import javax.jms.*;
import org.apache.activemq.ActiveMQConnectionFactory;
import org.apache.activemq.command.ActiveMQQueue;

public class JMSCorrelationIDTest {
   
    private Queue queue;
    private Session session;
   
    public JMSCorrelationIDTest() throws JMSException{
        ActiveMQConnectionFactory factory = new ActiveMQConnectionFactory("vm://localhost");
        Connection connection = factory.createConnection();
        connection.start();
   
        queue = new ActiveMQQueue("testQueue");
        session = connection.createSession(false, Session.AUTO_ACKNOWLEDGE);
       
        setupConsumer("ConsumerA");
        setupConsumer("ConsumerB");
        setupConsumer("ConsumerC");
       
        setupProducer("ProducerA", "ConsumerA");
        setupProducer("ProducerB", "ConsumerB");
        setupProducer("ProducerC", "ConsumerC");
    }
   
    private void setupConsumer(final String name) throws JMSException {
        //创建一个消费者,它只接受属于它自己的消息
        MessageConsumer consumer = session.createConsumer(queue, "receiver='" + name + "'");
        consumer.setMessageListener(new MessageListener(){
            public void onMessage(Message m) {
                try {
                    MessageProducer producer = session.createProducer(queue);
                    System.out.println(name + " get:" + ((TextMessage)m).getText());
                    //回复一个消息
                    Message replyMessage = session.createTextMessage("Reply from " + name);
                    //设置JMSCorrelationID为刚才收到的消息的ID
                    replyMessage.setJMSCorrelationID(m.getJMSMessageID());
                    producer.send(replyMessage);
                } catch (JMSException e) { }
            }
        });
    }

    private void setupProducer(final String name, String consumerName) throws JMSException {
        MessageProducer producer = session.createProducer(queue);
        producer.setDeliveryMode(DeliveryMode.NON_PERSISTENT);
        //创建一个消息,并设置一个属性receiver,为消费者的名字。
        Message message = session.createTextMessage("Message from " + name);
        message.setStringProperty("receiver", consumerName);
        producer.send(message);
       
        //等待回复的消息
        MessageConsumer replyConsumer = session.createConsumer(queue, "JMSCorrelationID='" + message.getJMSMessageID() + "'");
        replyConsumer.setMessageListener(new MessageListener(){
            public void onMessage(Message m) {
                try {
                    System.out.println(name + " get reply:" + ((TextMessage)m).getText());
                } catch (JMSException e) { }
            }
        });
    }
   
    public static void main(String[] args) throws Exception {
        new JMSCorrelationIDTest ();
    }
}

运行结果为:
ConsumerA get:Message from ProducerA
ProducerA get reply:Reply from ConsumerA
ConsumerB get:Message from ProducerB
ProducerB get reply:Reply from ConsumerB
ConsumerC get:Message from ProducerC
ProducerC get reply:Reply from ConsumerC


深入掌握JMS(十一):TemporaryQueue和TemporaryTopic

    TemporaryQueue和TemporaryTopic,从字面上就可以看出它们是“临时”的目的地。可以通过Session来创建,例如:
    TemporaryQueue replyQueue = session.createTemporaryQueue();
    
    虽然它们是由Session来创建的,但是它们的生命周期确实整个Connection。如果在一个Connection上创建了两个Session,则一个Session创建的TemporaryQueue或TemporaryTopic也可以被另一个Session访问。那如果这两个Session是由不同的Connection创建,则一个Session创建的TemporaryQueue不可以被另一个Session访问。
    另外,它们的主要作用就是用来指定回复目的地, 即作为JMSReplyTo。
    在下面的例子中,先创建一个Connection,然后创建两个Session,其中一个Session创建了一个TemporaryQueue,另一个Session在这个TemporaryQueue上读取消息。
import javax.jms.*;
import org.apache.activemq.ActiveMQConnectionFactory;
import org.apache.activemq.command.ActiveMQQueue;

public class TemporaryQueueTest {

    public static void main(String[] args) throws Exception {
        ActiveMQConnectionFactory factory = new ActiveMQConnectionFactory("vm://localhost");
        Connection connection = factory.createConnection();
        connection.start();

        Queue queue = new ActiveMQQueue("testQueue2");
        final Session session = connection.createSession(false, Session.AUTO_ACKNOWLEDGE);
        //使用session创建一个TemporaryQueue。
        TemporaryQueue replyQueue = session.createTemporaryQueue();
       
        //接收消息,并回复到指定的Queue中(即replyQueue)
        MessageConsumer comsumer = session.createConsumer(queue);
        comsumer.setMessageListener(new MessageListener(){
            public void onMessage(Message m) {
                try {
                    System.out.println("Get Message: " + ((TextMessage)m).getText());
                    MessageProducer producer = session.createProducer(m.getJMSReplyTo());
                    producer.send(session.createTextMessage("ReplyMessage"));
                } catch (JMSException e) { }
            }
        });
       
        //使用同一个Connection创建另一个Session,来读取replyQueue上的消息。
        Session session2 = connection.createSession(true, Session.AUTO_ACKNOWLEDGE);
        MessageConsumer replyComsumer = session2.createConsumer(replyQueue);
        replyComsumer.setMessageListener(new MessageListener(){
            public void onMessage(Message m) {
                try {
                    System.out.println("Get reply: " + ((TextMessage)m).getText());
                } catch (JMSException e) { }
            }
        });
       
        MessageProducer producer = session.createProducer(queue);
        TextMessage message = session.createTextMessage("SimpleMessage");
        message.setJMSReplyTo(replyQueue);
        producer.send(message);
    }
}

运行结果为:
Get Message: SimpleMessage
Get reply: ReplyMessage

如果将:
Session session2 = connection.createSession(true, Session.AUTO_ACKNOWLEDGE);
更改为:
Connection connection2 = factory.createConnection();
Session session2 = connection2.createSession(true, Session.AUTO_ACKNOWLEDGE);
就会得到类似于下面的异常:
Exception in thread "main" javax.jms.InvalidDestinationException: Cannot use a Temporary destination from another Connection。


深入掌握JMS(十二):MDB 

在EJB3中,一个MDB(消息驱动Bean)就是一个实现了MessageListener接口的POJO。下面就是一个简单的MDB。

@MessageDriven(activationConfig={

        @ActivationConfigProperty(propertyName="destinationType", 

                propertyValue="javax.jms.Queue"),

        @ActivationConfigProperty(propertyName="destination", 

                propertyValue="queue/testQueue")})

public class SimpleMDB implements MessageListener {


    public void onMessage(Message message) {

        try {

            System.out.println("Receive Message : " + ((TextMessage)message).getText());

        } catch (JMSException e) {

            e.printStackTrace();

        }

    }

}


它要求必须标注为@MessageDriven。它所监听Destination通过标注属性来注入。


下面是一个发送消息的StatelessBean:

@Remote

public interface IMessageSender {

    public void sendMessage(String content) throws Exception;

}


@Stateless

@Remote

public class MessageSender implements IMessageSender {

    @Resource(mappedName="ConnectionFactory")

    private ConnectionFactory factory;


    @Resource(mappedName="queue/testQueue")

    private Queue queue;


    public void sendMessage(String content) throws Exception {

        Connection cn = factory.createConnection();


        Session session = cn.createSession(false, Session.AUTO_ACKNOWLEDGE);

        MessageProducer producer = session.createProducer(queue);

        producer.send(session.createTextMessage(content));

    }

}

这个EJB只有一个方法SendMessage。ConnectionFactory和Queue通过标注注入。


接下来是客户端:

public class MessageSenderClient {

    public static void main(String[] args) throws Exception {

        Properties props = new Properties();

        props.setProperty(Context.INITIAL_CONTEXT_FACTORY, "org.jnp.interfaces.NamingContextFactory");

        props.setProperty(Context.PROVIDER_URL, "localhost:2099");

        Context context = new InitialContext(props);

        IMessageSender messageSender = (IMessageSender) context.lookup("MessageSender/remote");

        messageSender.sendMessage("Hello");

    }

}

它通过JNDI查找到上面的EJB,然后调用sengMessage.

阅读全文……

标签 : ,

Apache ActiveMQ ™ -- How should I implement request response with JMS

 ActiveMQ 使用请求/响应应答方式进行应用集成

Server Side

import org.apache.activemq.broker.BrokerService;
import org.apache.activemq.ActiveMQConnectionFactory;
 
import javax.jms.*;
 
public class Server implements MessageListener {
    private static int ackMode;
    private static String messageQueueName;
    private static String messageBrokerUrl;
 
    private Session session;
    private boolean transacted = false;
    private MessageProducer replyProducer;
    private MessageProtocol messageProtocol;
 
    static {
        messageBrokerUrl = "tcp://localhost:61616";
        messageQueueName = "client.messages";
        ackMode = Session.AUTO_ACKNOWLEDGE;
    }
 
    public Server() {
        try {
            //This message broker is embedded
            BrokerService broker = new BrokerService();
            broker.setPersistent(false);
            broker.setUseJmx(false);
            broker.addConnector(messageBrokerUrl);
            broker.start();
        } catch (Exception e) {
            //Handle the exception appropriately
        }
 
        //Delegating the handling of messages to another class, instantiate it before setting up JMS so it
        //is ready to handle messages
        this.messageProtocol = new MessageProtocol();
        this.setupMessageQueueConsumer();
    }
 
    private void setupMessageQueueConsumer() {
        ActiveMQConnectionFactory connectionFactory = new ActiveMQConnectionFactory(messageBrokerUrl);
        Connection connection;
        try {
            connection = connectionFactory.createConnection();
            connection.start();
            this.session = connection.createSession(this.transacted, ackMode);
            Destination adminQueue = this.session.createQueue(messageQueueName);
 
            //Setup a message producer to respond to messages from clients, we will get the destination
            //to send to from the JMSReplyTo header field from a Message
            this.replyProducer = this.session.createProducer(null);
            this.replyProducer.setDeliveryMode(DeliveryMode.NON_PERSISTENT);
 
            //Set up a consumer to consume messages off of the admin queue
            MessageConsumer consumer = this.session.createConsumer(adminQueue);
            consumer.setMessageListener(this);
        } catch (JMSException e) {
            //Handle the exception appropriately
        }
    }
 
    public void onMessage(Message message) {
        try {
            TextMessage response = this.session.createTextMessage();
            if (message instanceof TextMessage) {
                TextMessage txtMsg = (TextMessage) message;
                String messageText = txtMsg.getText();
                response.setText(this.messageProtocol.handleProtocolMessage(messageText));
            }
 
            //Set the correlation ID from the received message to be the correlation id of the response message
            //this lets the client identify which message this is a response to if it has more than
            //one outstanding message to the server
            response.setJMSCorrelationID(message.getJMSCorrelationID());
 
            //Send the response to the Destination specified by the JMSReplyTo field of the received message,
            //this is presumably a temporary queue created by the client
            this.replyProducer.send(message.getJMSReplyTo(), response);
        } catch (JMSException e) {
            //Handle the exception appropriately
        }
    }
 
    public static void main(String[] args) {
        new Server();
    }
}

Client Side

import org.apache.activemq.ActiveMQConnectionFactory;
 
import javax.jms.*;
import java.util.Random;
 
public class Client implements MessageListener {
    private static int ackMode;
    private static String clientQueueName;
 
    private boolean transacted = false;
    private MessageProducer producer;
 
    static {
        clientQueueName = "client.messages";
        ackMode = Session.AUTO_ACKNOWLEDGE;
    }
 
    public Client() {
        ActiveMQConnectionFactory connectionFactory = new ActiveMQConnectionFactory("tcp://localhost:61616");
        Connection connection;
        try {
            connection = connectionFactory.createConnection();
            connection.start();
            Session session = connection.createSession(transacted, ackMode);
            Destination adminQueue = session.createQueue(clientQueueName);
 
            //Setup a message producer to send message to the queue the server is consuming from
            this.producer = session.createProducer(adminQueue);
            this.producer.setDeliveryMode(DeliveryMode.NON_PERSISTENT);
 
            //Create a temporary queue that this client will listen for responses on then create a consumer
            //that consumes message from this temporary queue...for a real application a client should reuse
            //the same temp queue for each message to the server...one temp queue per client
            Destination tempDest = session.createTemporaryQueue();
            MessageConsumer responseConsumer = session.createConsumer(tempDest);
 
            //This class will handle the messages to the temp queue as well
            responseConsumer.setMessageListener(this);
 
            //Now create the actual message you want to send
            TextMessage txtMessage = session.createTextMessage();
            txtMessage.setText("MyProtocolMessage");
 
            //Set the reply to field to the temp queue you created above, this is the queue the server
            //will respond to
            txtMessage.setJMSReplyTo(tempDest);
 
            //Set a correlation ID so when you get a response you know which sent message the response is for
            //If there is never more than one outstanding message to the server then the
            //same correlation ID can be used for all the messages...if there is more than one outstanding
            //message to the server you would presumably want to associate the correlation ID with this
            //message somehow...a Map works good
            String correlationId = this.createRandomString();
            txtMessage.setJMSCorrelationID(correlationId);
            this.producer.send(txtMessage);
        } catch (JMSException e) {
            //Handle the exception appropriately
        }
    }
 
    private String createRandomString() {
        Random random = new Random(System.currentTimeMillis());
        long randomLong = random.nextLong();
        return Long.toHexString(randomLong);
    }
 
    public void onMessage(Message message) {
        String messageText = null;
        try {
            if (message instanceof TextMessage) {
                TextMessage textMessage = (TextMessage) message;
                messageText = textMessage.getText();
                System.out.println("messageText = " + messageText);
            }
        } catch (JMSException e) {
            //Handle the exception appropriately
        }
    }
 
    public static void main(String[] args) {
        new Client();
    }
}

Protocol Class

This class is needed to run the client/server example above. Delegating the handling of messages to a seperate class is solely a personal preference.

public class MessageProtocol {
    public String handleProtocolMessage(String messageText) {
        String responseText;
        if ("MyProtocolMessage".equalsIgnoreCase(messageText)) {
            responseText = "I recognize your protocol message";
        } else {
            responseText = "Unknown protocol message: " + messageText;
        }
         
        return responseText;
    }
}

阅读全文……

标签 : ,

weblogic92连接池的连接数异常问题(1) - 豆豆网

ERROR - java.sql.SQLException: Connection has been administratively disabled. Try later. 
ERROR - Could not release connection to pool:java.lang.NullPointerException 

Could not get JDBC Connection; nested exception is weblogic.jdbc.extensions.PoolDisabledSQLException: weblogic.common.resourcepool.ResourceDisabledException: Pool bjjcsj is disabled, cannot allocate resources to applications..

ERROR - Hibernate operation: Cannot open connection; uncategorized SQLException for SQL [???]; SQL state [null]; error code [0]; weblogic.common.resourcepool.ResourceDisabledException: Pool bjjcsj is disabled, cannot allocate resources to applications..; nested exception is weblogic.jdbc.extensions.PoolDisabledSQLException: weblogic.common.resourcepool.ResourceDisabledException: Pool bjjcsj is disabled, cannot allocate resources to applications.. (LogHandler.java:72) 

pool被disabled的原因大致有3:
1、连接被手工强制suspend;
2、网络不通;
3、程序在执行过程中被挂起;
 
有客户说,他们通过connection pool监控发现weblogic92连接池中当前连接数(current capacity)小于初始连接数(initial capacity)。从现象上来说,给客户的直觉是:连接池初始化有问题,没有帮助他们初始化他们需要的那么多连接。但他同时发现,几个 connection pool中,其他pool没有问题。拿到问题,我也怀疑这可能是weblogic的一个bug,但随后从客户发送过来的日志中发现出问题的 connection被disable过。调查后发现问题的确和这个pool被disable过有关,那么为什么pool被disable后,会出现这样的问题呢?

  首先我们看看这个pool为什么会被disable? 手工强制suspend连接池、数据库关闭、网络不稳定等因素都可能成为connection pool被disable的诱因。从客户的日志中,我能看到大量的如下异常,

  1:java.net.SocketException: 管道已断开 (errno:32)

  2:weblogic.common.resourcepool.ResourceDisabledException: Pool JDBC Data Source-0 is disabled, cannot allocate resources to applications.

  根据上面的异常,首先跟客户确认是否存在过数据库关闭、强制disable connection的操作,这些都被客户否定了,那么最大可能的原因就是网络不稳定,网络是好时坏的话,很容易造成weblogic连接池中到 database server的连接中断,从而导致connection pool被disable。

  那么为什么连接中断会引起connection pool被disable呢?这里要谈到两个参数:CountOfTestFailuresTillFlush、 CountOfRefreshFailuresTillDisable。这两个参数在weblogic连接池实现中由于控制是否、何时flush或 disable连接池,两个都是指连续几次失败操作(test、refresh)后去flush或disable connection pool。注意:这是说的是连续,而不是间断,每次成功操作(test、refresh)后,这两个值都会被reset成0。默认情况下这两个值均为2,即连续失败3(2+1)次后,connection pool会被flush或disable。两者的区别在于,flush用于清空connection pool中的所有连接(通常都是中断的connection),当pool状态仍保持在running状态,而对于后者,connection pool将会变成suspend。前者对于客户端而言,还可以从pool中reserve connection,reserve时,weblogic会尝试重现创建连接,如果创建连接成功,那么客户端就可以拿到可用的连接。而对于一个处于 suspend状态,客户端reserve connection的请求会直接被拒绝,收到的异常如下:
weblogic.common.resourcepool.ResourceDisabledException: Pool JDBC Data Source-0 is disabled, cannot allocate resources to applications

  一个被disable的connection pool我们需要手工resume吗?比如数据库因为某些原因而突发关闭,数据库恢复后,我们是否需要手工去resume这个pool?不需要,weblogic内部实现了连接池的自我健康检查功能,对于disable的connection pool,weblogic会每隔5秒钟(DEFAULT_SCAN_UNIT)去做一次连接尝试(尝试创建一个物理连接,如果连接成功,那么这个连接会被直接放入连接池中,我们的问题就处在这儿),我们通过下面的复现过程来看看具体原因:

  1:配置一个datasource,connection的连接数具体配置如下:

weblogic92连接池的连接数异常问题

  图片看不清楚?请点击这里查看原图(大图)。

  2:weblogic启动后,我们可以看到current capacity为15,此时connection pool刚被初始化,weblogic会根据initial capacity去创建相应数量的连接。此时如果我们关闭数据库,然后通过测试程序去获取连接,你会看到我们无法拿到连接(注意我们要选上 TestOnReserve),重复三次,再次去监控connection pool。因为三次test失败后,connection pool会被disable(状态为suspend),如下:
 3:重启database。由于weblogic内部实现了connection pool的自检功能,对于disabled的connection pool,weblogic每隔5秒钟去做一次连接尝试,如果连接创建成功,新建连接会被放入连接池,同时resume连接池。通过监控我们可以看到,连接池状态变成running,同时current capacity变成1,

weblogic92连接池的连接数异常问题

  图片看不清楚?请点击这里查看原图(大图)。

weblogic92连接池的连接数异常问题

  图片看不清楚?请点击这里查看原图(大图)。

  4:启动多线程测试程序,模拟2个用户并发。第一个用户可以从connection pool中成功拿到连接,而第二个用户因为连接池的current capacity为1,无法直接从pool中拿到连接,这是连接池需要做扩展,而扩展的个数就是我们设定的capacity increment(20)。再来监控connection pool,我们就会看到连接池的current capacity为21,如下:

weblogic92连接池的连接数异常问题

  图片看不清楚?请点击这里查看原图(大图)。

  那么我们能不能通过参数配置不让connection pool不作disable呢?我们前面所提到的两个参数:CountOfTestFailuresTillFlush、 CountOfRefreshFailuresTillDisable,可以实现这样的要求:

 1   <internal-properties>
2           <property>
3             <name>CountOfTestFailuresTillFlush</name>
4             <value>10</value>
5           </property>
6           <property>
7             <name>CountOfRefreshFailuresTillDisable</name>
8             <value>20</value>
9           </property>
10   </internal-properties>

  internal-properties用于定义一些weblogic internal的参数,这些参数无法在console上做配置。除了上面的这两个参数,我们还可以通过internal-properties配置如下几个参数:

    TestConnectionsOnCreate
TestConnectionsOnRelease
HighestNumUnavailable
SecurityCacheTimeoutSeconds


  通过上述分析,我们可以看到这个问题不是weblogic的bug,而是因为网络问题导致connection pool被disable,要彻底解决这个问题,可以通过网络分析工具查出网络问题,进而解决我们看到的这种现象。


阅读全文……

标签 : ,